
ClientCare User Guide
This user guide is meant for ClientCare Version v1.4.
Too many clients to keep track of? Not sure when is your next appointment? Fret not! ClientCare is a desktop application for assisting insurance agents in managing their client relationships and follow-ups effectively. Built with your needs in mind, ClientCare is here to help you manage all your clients, appointments and policies, all in one place!
New to ClientCare? We recommend you to check out the Using this guide section to get you started. Ready to head straight into the action? You can refer to our Quick Start section to set ClientCare up.
Using this guide
This guide walks you through all the features of ClientCare and can be used as a quick reference whenever you need any help. If you're just getting started with ClientCare, we welcome you to start from our Introducing ClientCare section to learn more about the app. For setting up ClientCare, you might find the Quick Start section helpful.
Ready to use ClientCare? You can check out our Features section. For ease of reference, the Features section is divided into subsections corresponding to each main feature: Clients, Schedules and Policies. Feel free to jump around as you explore ClientCare's amazing features!
Need a quick refresher? You can head to the Command Summary for a quick recap!
Unsure of any terms? You can take a look at the Glossary section.
You can also refer to our Table of Contents to navigate between the different sections of this guide.
Who is this guide for?
This guide does not assume any technical knowledge from users. Typing on a keyboard is all you need to know! ClientCare uses a Text Command Box to interact with users. Not sure how to use it? No worries, we got you covered. You can head over to the Text Command Introduction for a quick breakdown.
If you are familiar with how text commands work, good news! Using ClientCare will be a breeze for you.
Conventions used in this guide
Formatting Conventions
As you read through the guide, you might come across different text formats, and wonder what they mean. Here is a quick rundown of the conventions we use!
| Format | Description |
|---|---|
| blue hyperlink | Blue hyperlinks bring you to another section of the user guide or another website for more relevant information. |
command | Text in a monospace font and grey box are ClientCare commands. Refer to ClientCare Commands for more details. |
FIELD | Upper case text in a monospace font are fields to input with ClientCare commands. Each command has unique fields, which you can find under Features. |
Call-out Text-box Conventions
You might encounter these call-outs while reading through the guide, which contain additional information for using ClientCare.
Tip: Tip call-outs like this contain helpful pointers for using ClientCare!
Note: Information call-outs like this contain information about ClientCare you should take note of!
CAUTION: Caution call-outs like this contain warnings you should remember when using ClientCare to avoid errors!
Introducing ClientCare
Made for insurance agents and clients, by insurance agents and clients. ClientCare is the easiest way to manage your clients and schedules, all in one place. Powerful features and intuitive design, all packaged into one neat desktop app. ClientCare is supported on all major platforms (Windows, macOS).
Let ClientCare assist you in...
Managing your clients ClientCare lets you store, edit and delete your client's information. Keep all your clients' details in one place and save time!
Planning your schedule Meeting clients are part of the job. Not sure when to meet your next client? ClientCare reminds you of clients that you may have missed out!
Keeping track of policies Too many policies from different companies? Why not track all of them in one place! ClientCare allows you to attach policies to all your clients, regardless of companies and product type.
Quick start
Let's get started with ClientCare. This section will help you get familiar with how ClientCare works, from installation to using ClientCare.
Installation instructions
Don't have ClientCare installed on your computer yet? Check out our step-by-step installation instructions to download ClientCare.
ClientCare is written in the programming language Java, so you'll need Java 11 or above installed in your computer to run ClientCare.
- Not sure if you have a compatible Java version installed on your computer? Windows or macOS users might find this guide useful.
- Don't have a compatible Java version installed? Fret not, Java is free to install! Complete installation instructions can be found here.
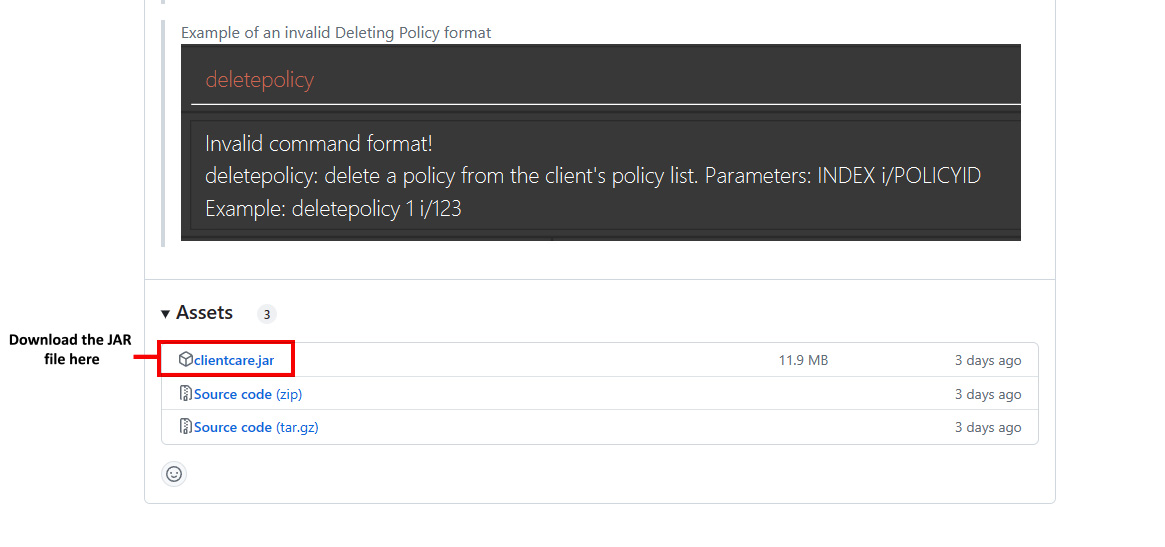
Download the latest version of ClientCare by downloading the
clientcare.jarfile found here.
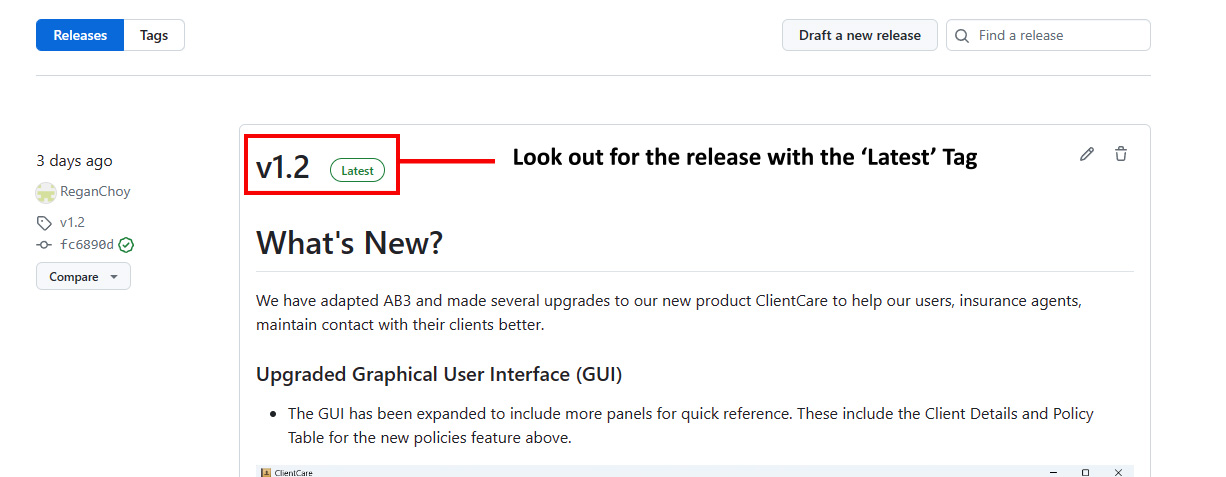
Note: The ClientCare application file can be found at the bottom of the release notes, under Assets!
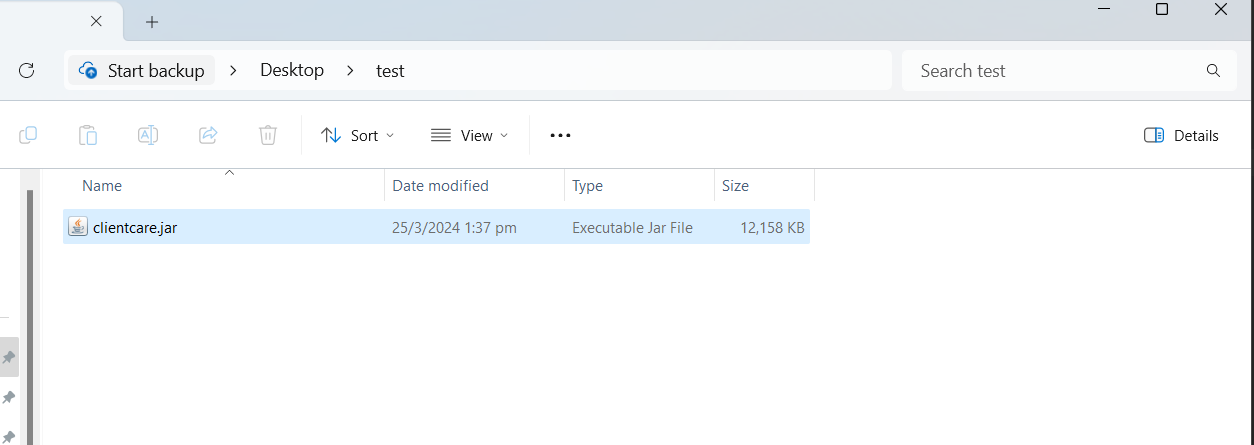
Create a new empty folder (with any name you like) in your computer where you'd like to store ClientCare.
Copy the downloaded ClientCare file (
clientcare.jar) into the new folder.And...that's it! You now have ClientCare installed on your laptop!
Refer to the Features below for details of each command.
Starting up ClientCare
Congrats! With ClientCare downloaded (if not, our installation instructions might be useful), let's get started!
These are the platforms we currently support ClientCare on:
For Windows
- To start ClientCare, simply open up the folder where your downloaded
clientcare.jar. - Double-click on the app icon and ClientCare should boot up!
If you are facing issues opening the app, you can find an alternative solution here.
For macOS
- To start ClientCare, simply open up the folder where your downloaded
clientcare.jar. - Next, double left-click on
clientcare.jarto start the application.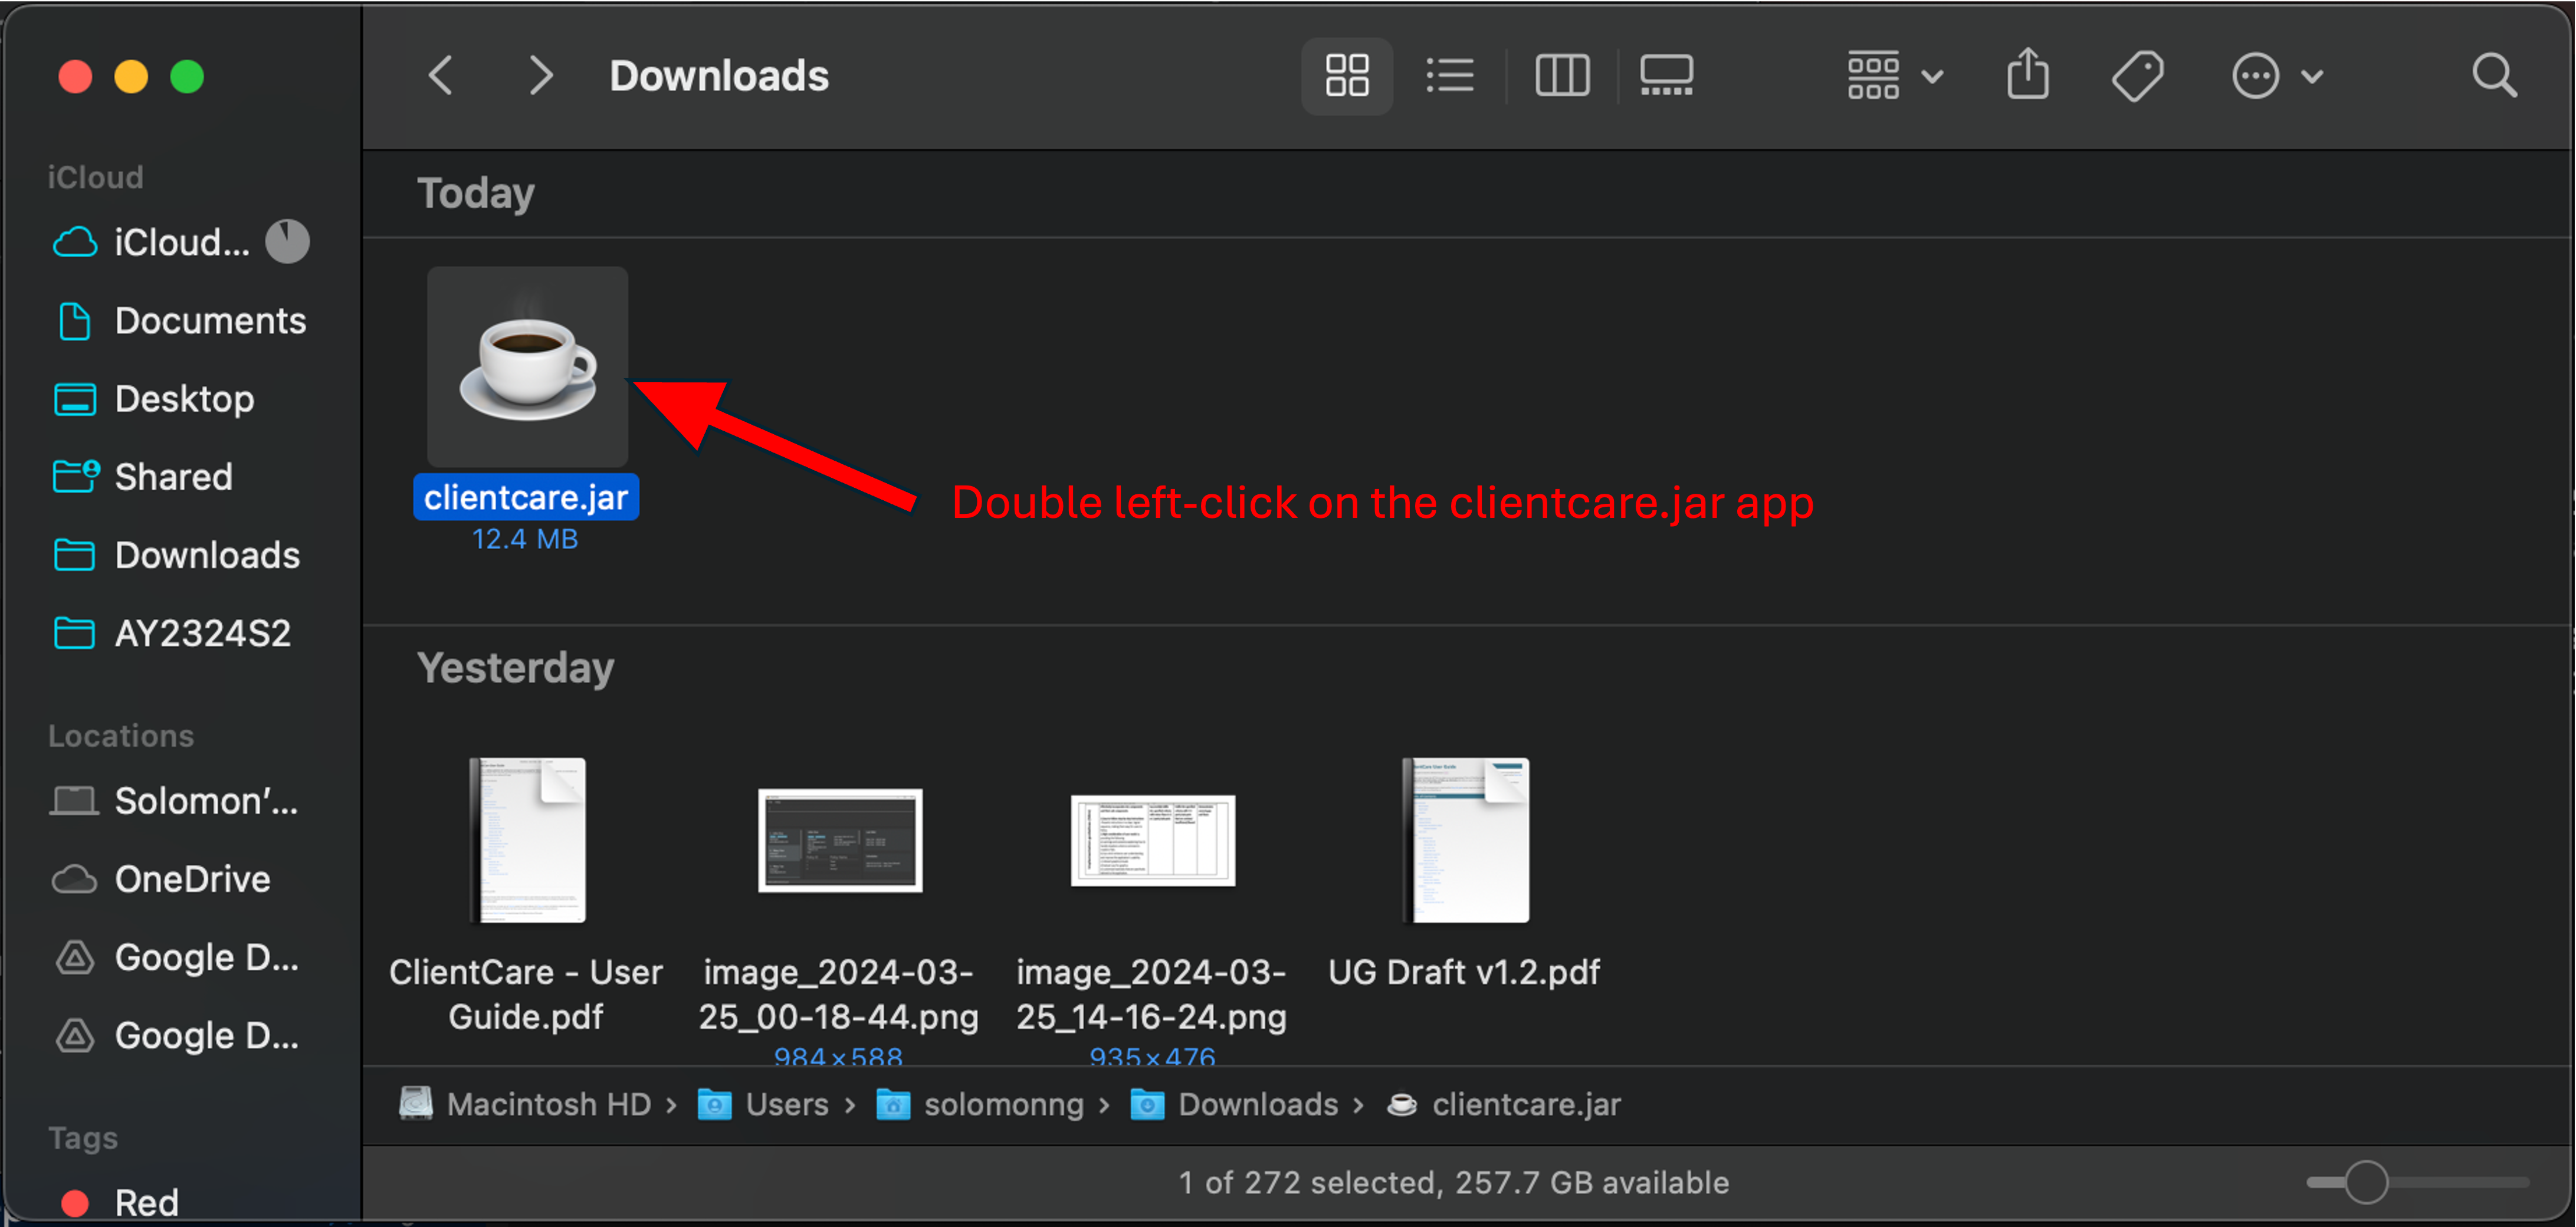
If you are facing issues opening the app, you can find an alternative solution here.
Getting familiar with ClientCare
Now that we got ClientCare up and running, let's get you familiar with its display. You will learn how the different parts of ClientCare look and work in this section.
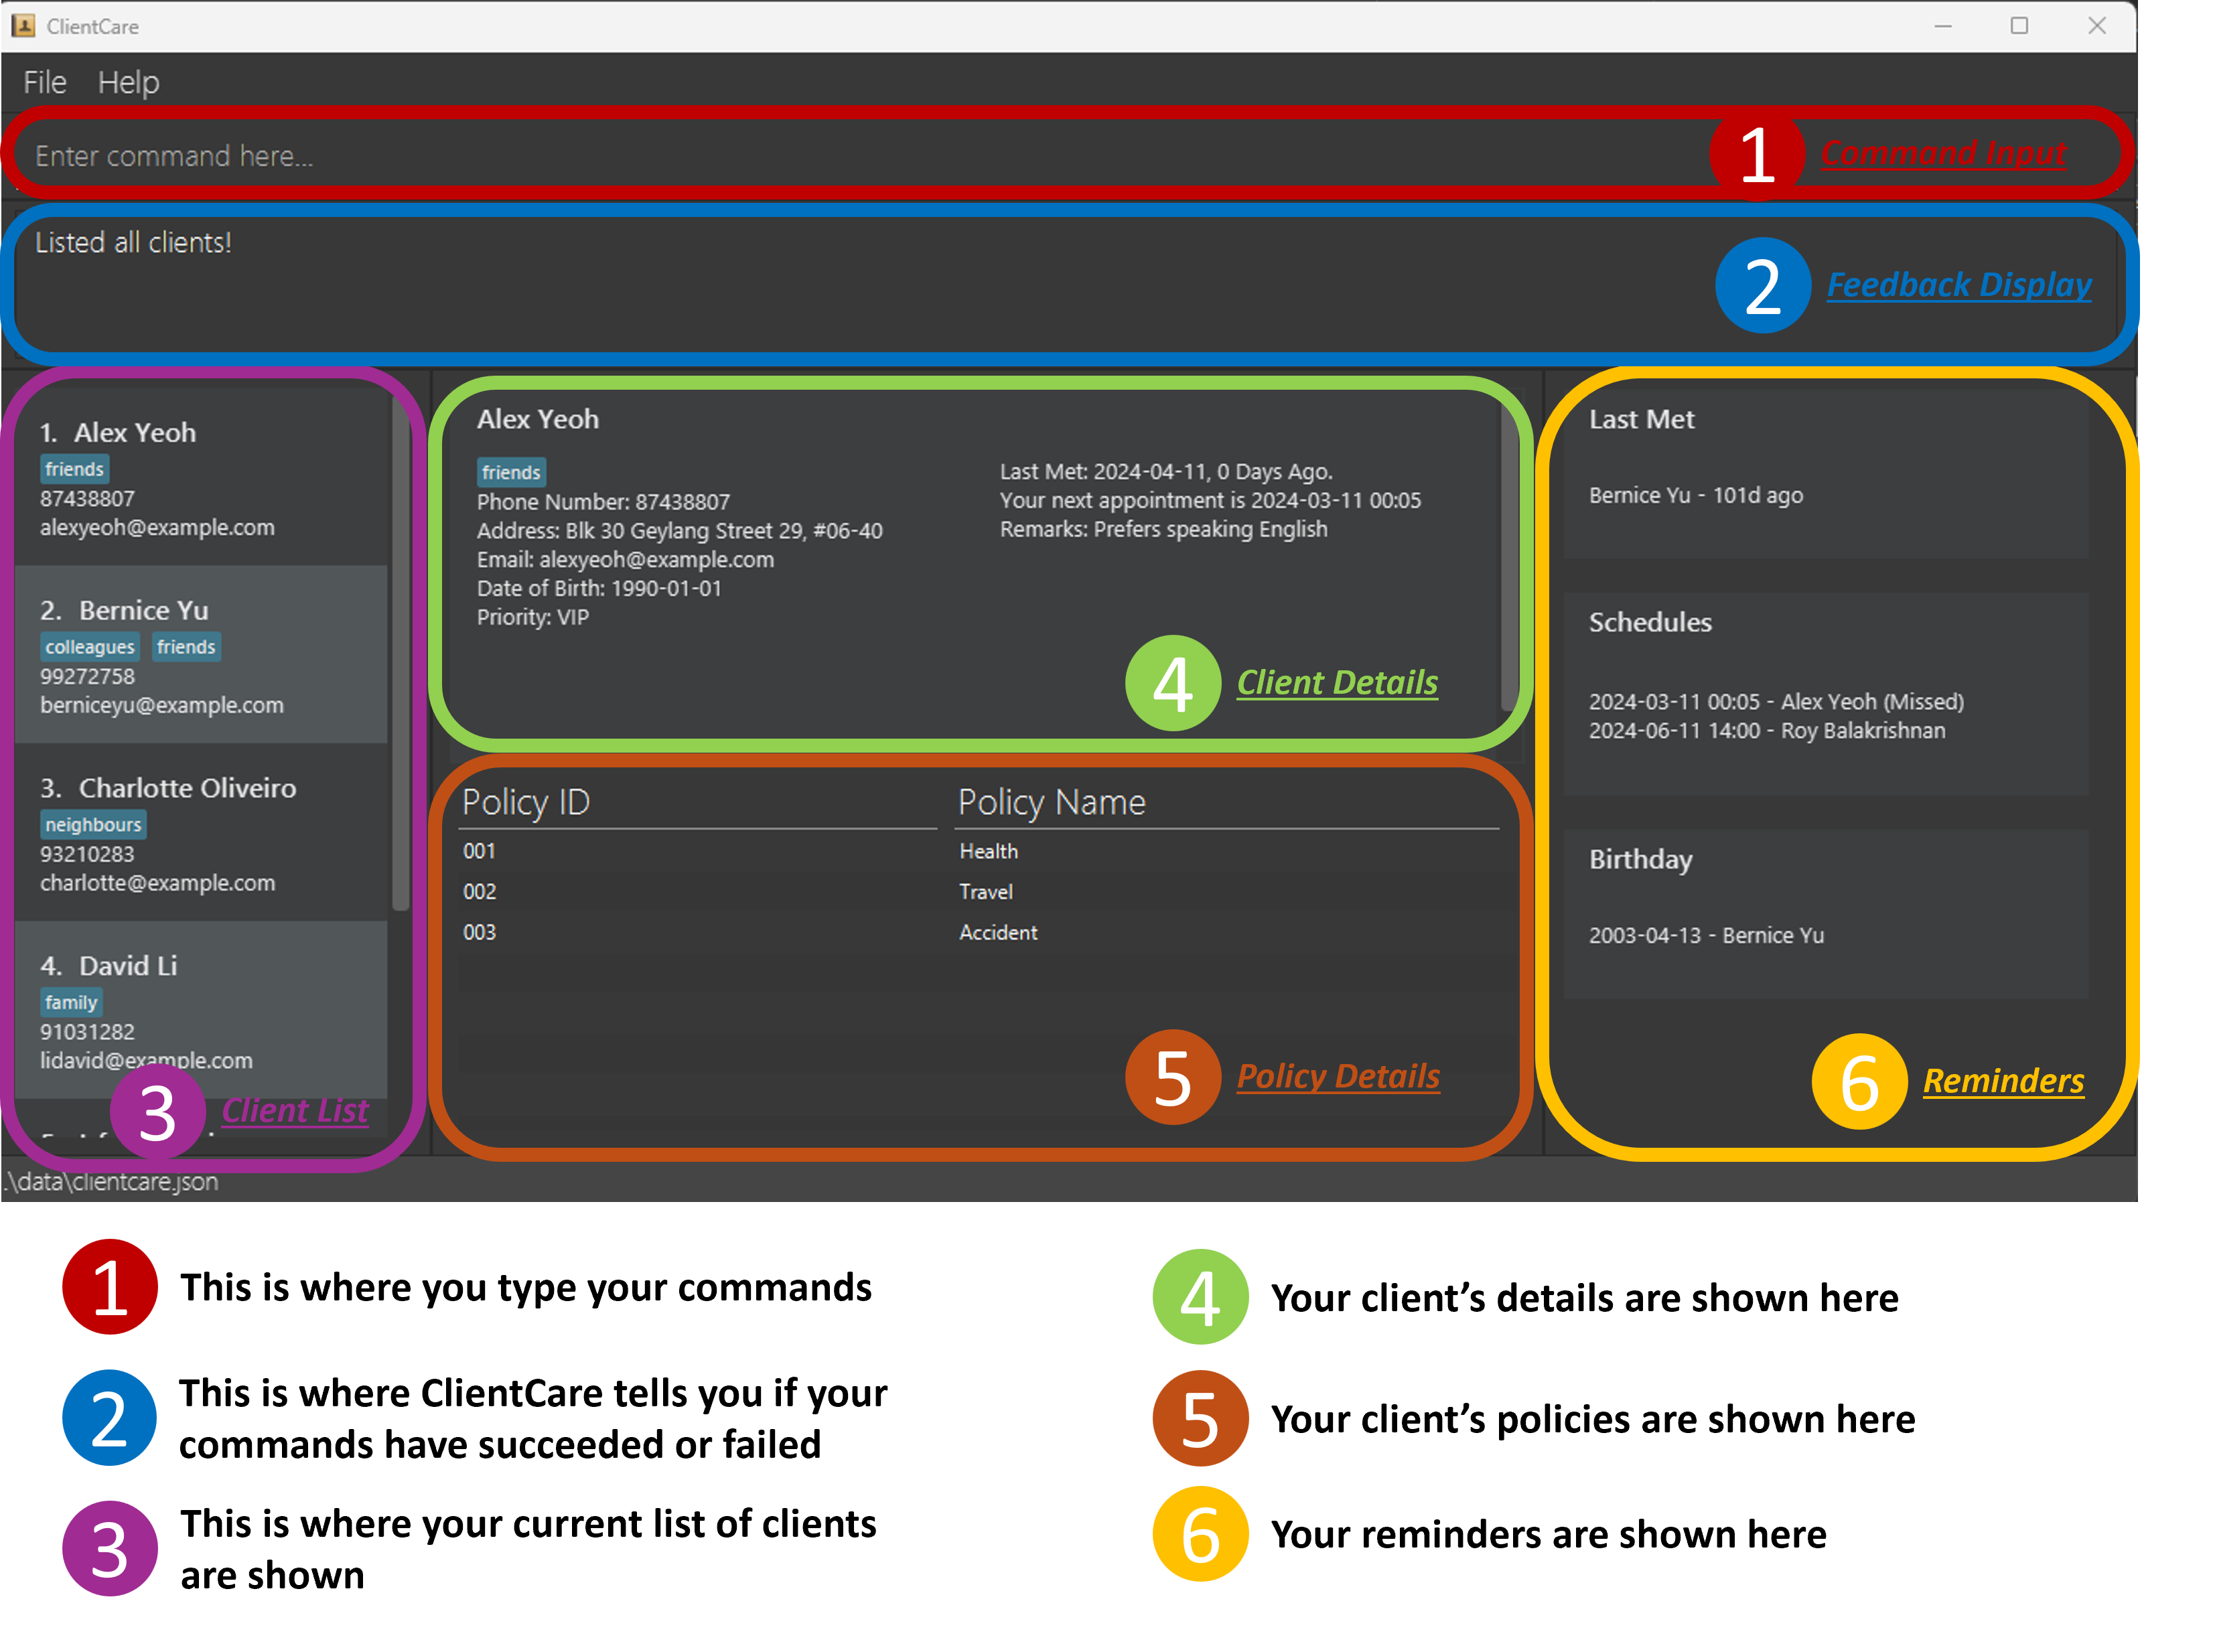
ClientCare's Display Components
ClientCare has 6 components in its display. Different commands affect parts of the Display. You can refer to the Quick Tutorial to see how the different parts of the display change when entering commands!
Text Commands Introduction
ClientCare works through text commands. Instead of clicking buttons, you tell ClientCare what to do by typing!
These commands must be formatted in a specific way or ClientCare will not understand what you are saying. Let's learn the language that ClientCare speaks in.
ClientCare commands
A ClientCare command can be made up of the following parts:
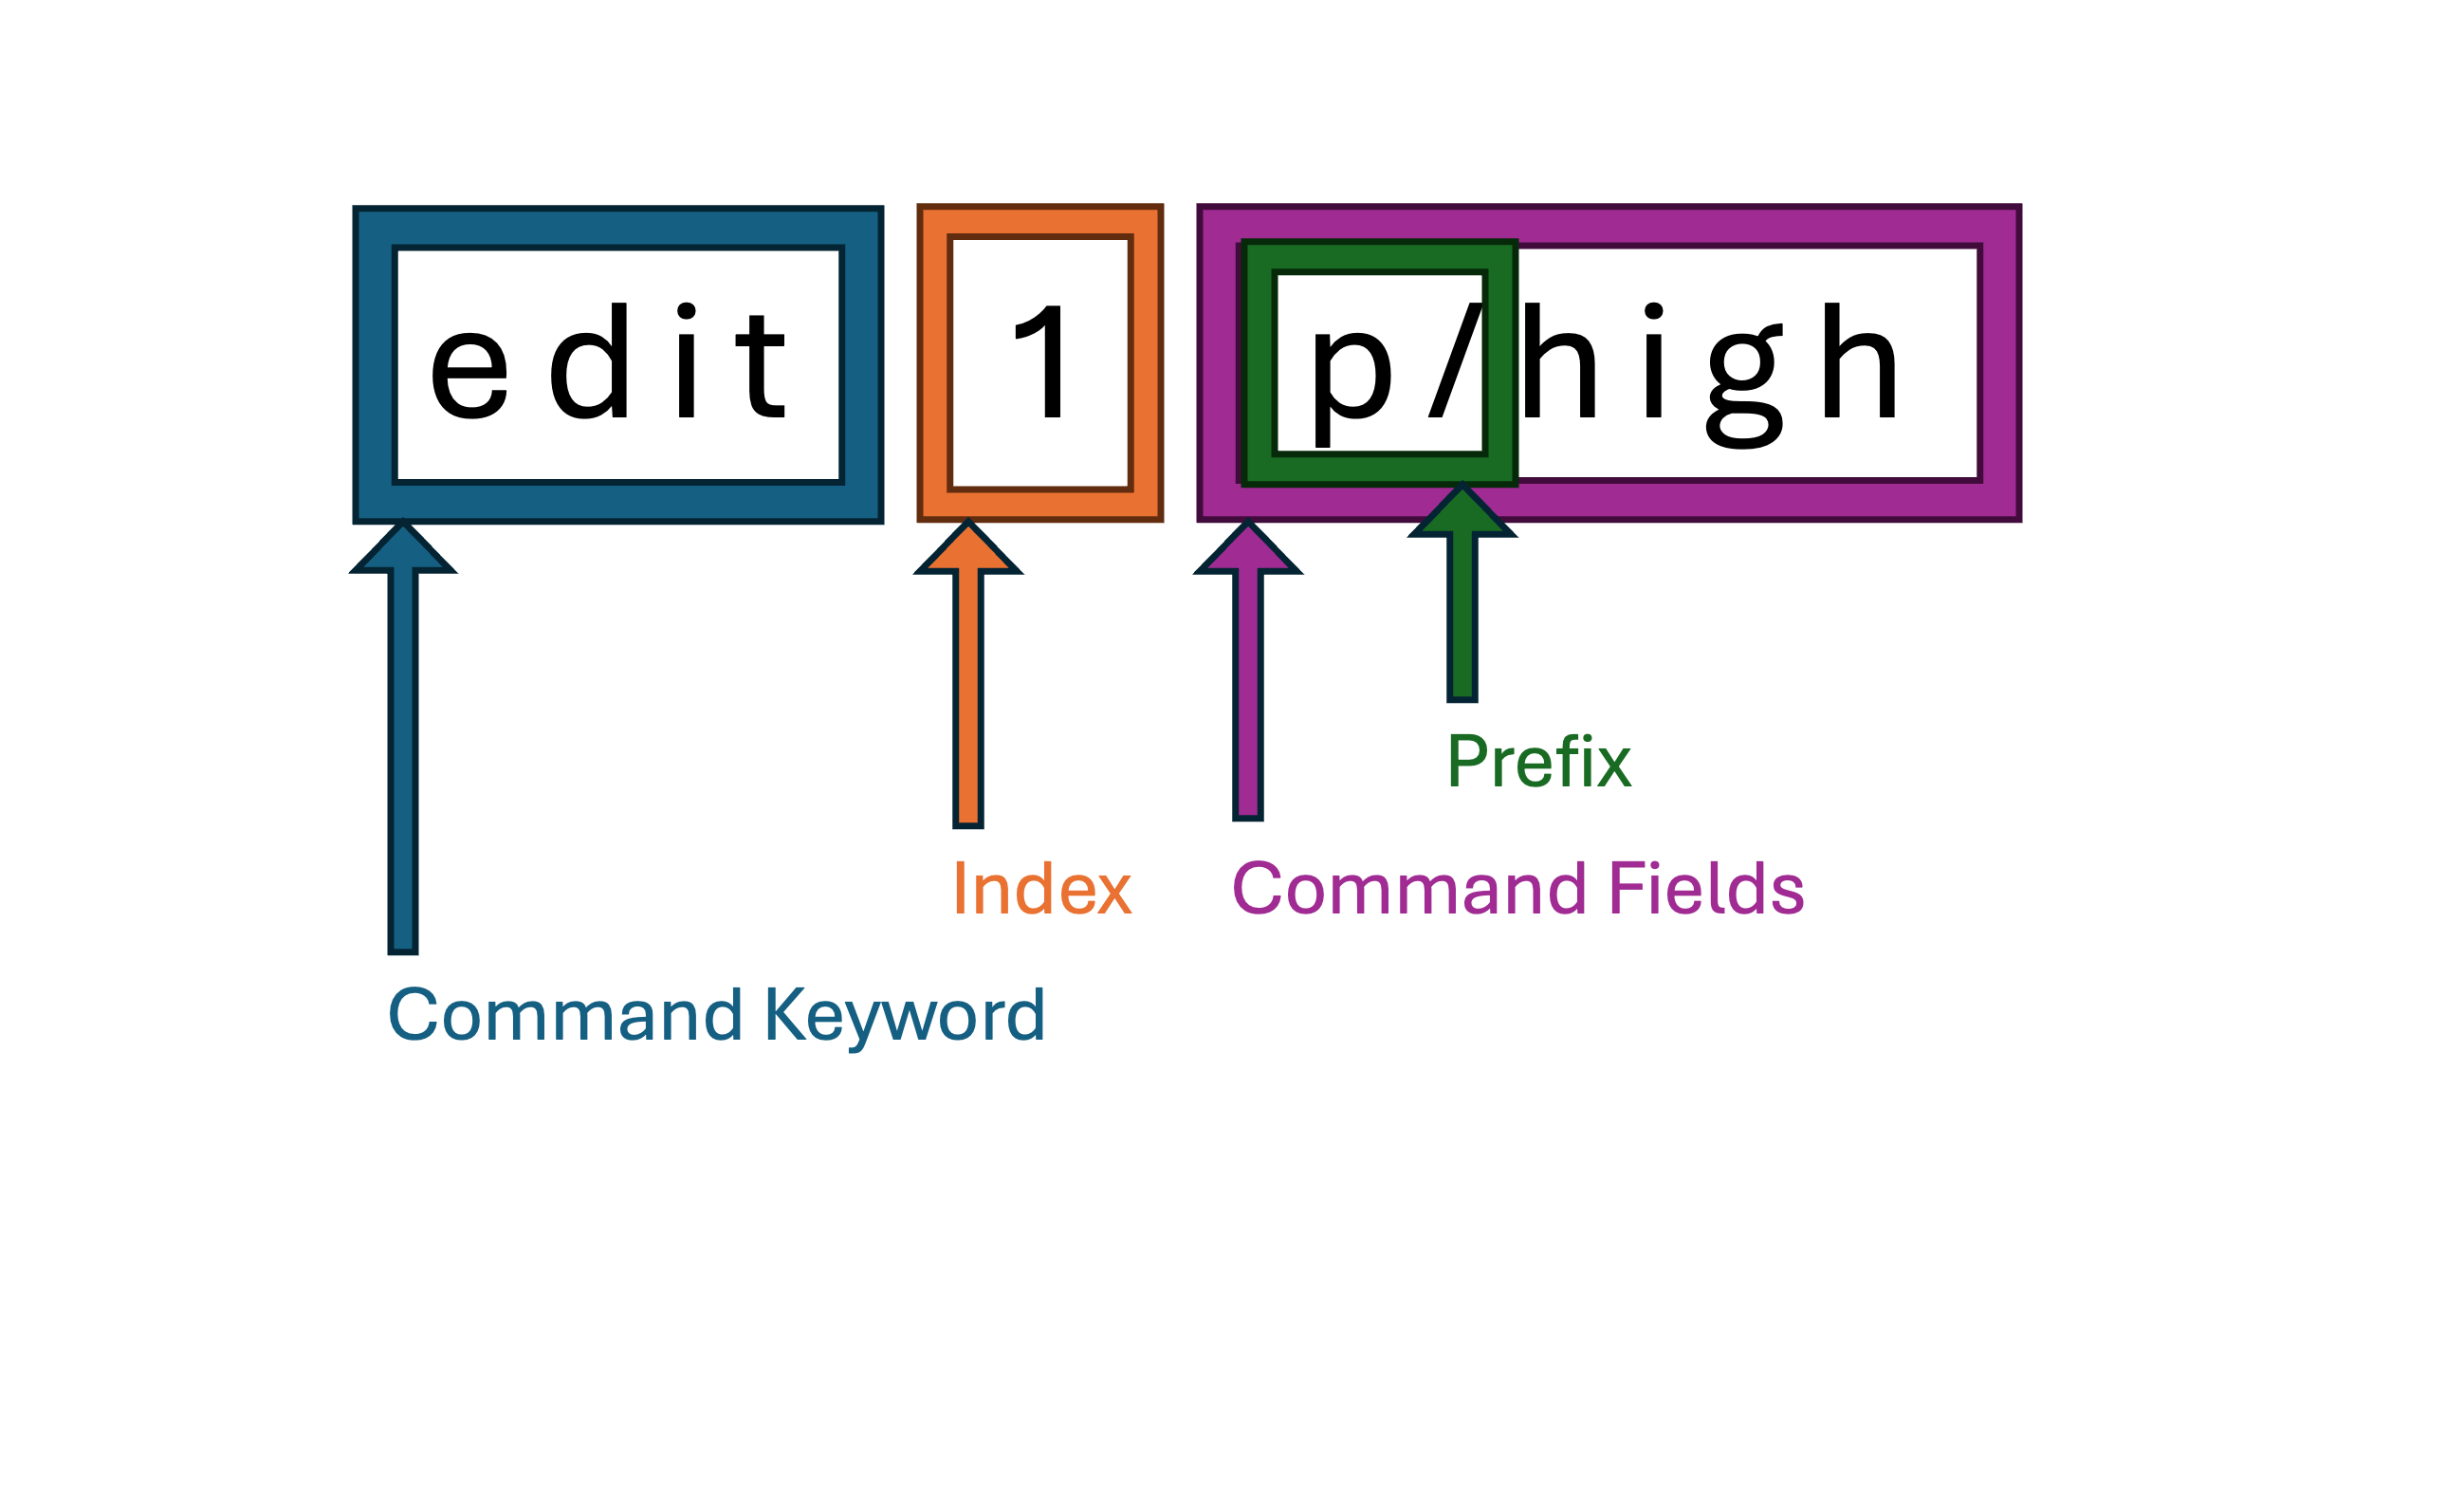
1) Command Keyword
This keyword tells ClientCare what you want to do. If you want to add a new client, then add will be the keyword.
All commands must start with a keyword.
2) Index
Some commands may involve an index, indicated in command formats as INDEX. This is simply a number which is assigned to a particular Client.
For example, the first client in the list will have the index 1.
The index can take on values from 1 to the number of clients shown in the Client List. It will never be 0 or a negative number.
3) Command Fields
Some commands have fields associated with them. For example, when you are adding a client, you need to add his name too. His name will be considered a field, similarly for Date of Birth, Address etc.
Here are some things to take note of when using them!
- Fields often have a prefix in front of them. For example, name has
n/and date hasd/. The command format will show what field a prefix is referring to in uppercase, liken/NAME, in case you forget! - Some fields are even optional, and they'll be shown with square brackets:
[a/ADDRESS]. - Fields that have a trailing ellipsis behind them like
[t/TAG]..., meaning you can use multiple of them, so you can have botht/friend t/drivesin one command. - Not all commands take in fields! For example, when clearing your client list, a simple command keyword of
clearwill do! If any extraneous fields are present for these commands, they will be ignored. For example,clear 1andclear allwill both be interpreted asclear.
The full list of commands and their formats can be found under the Features section. Alternatively, Command Summary has all of them under one page for a quick reference.
CAUTION: If you are using a PDF version of this document, be careful when copying and pasting commands that span multiple lines as the command format may be copied over incorrectly.
Handling ClientCare error messages
While using ClientCare, you may encounter errors when you mistype or missed something out in your commands. Not to worry, you will learn how to handle these error messages with ease in this section.
There are 4 types of error messages you may encounter in the Feedback Display.
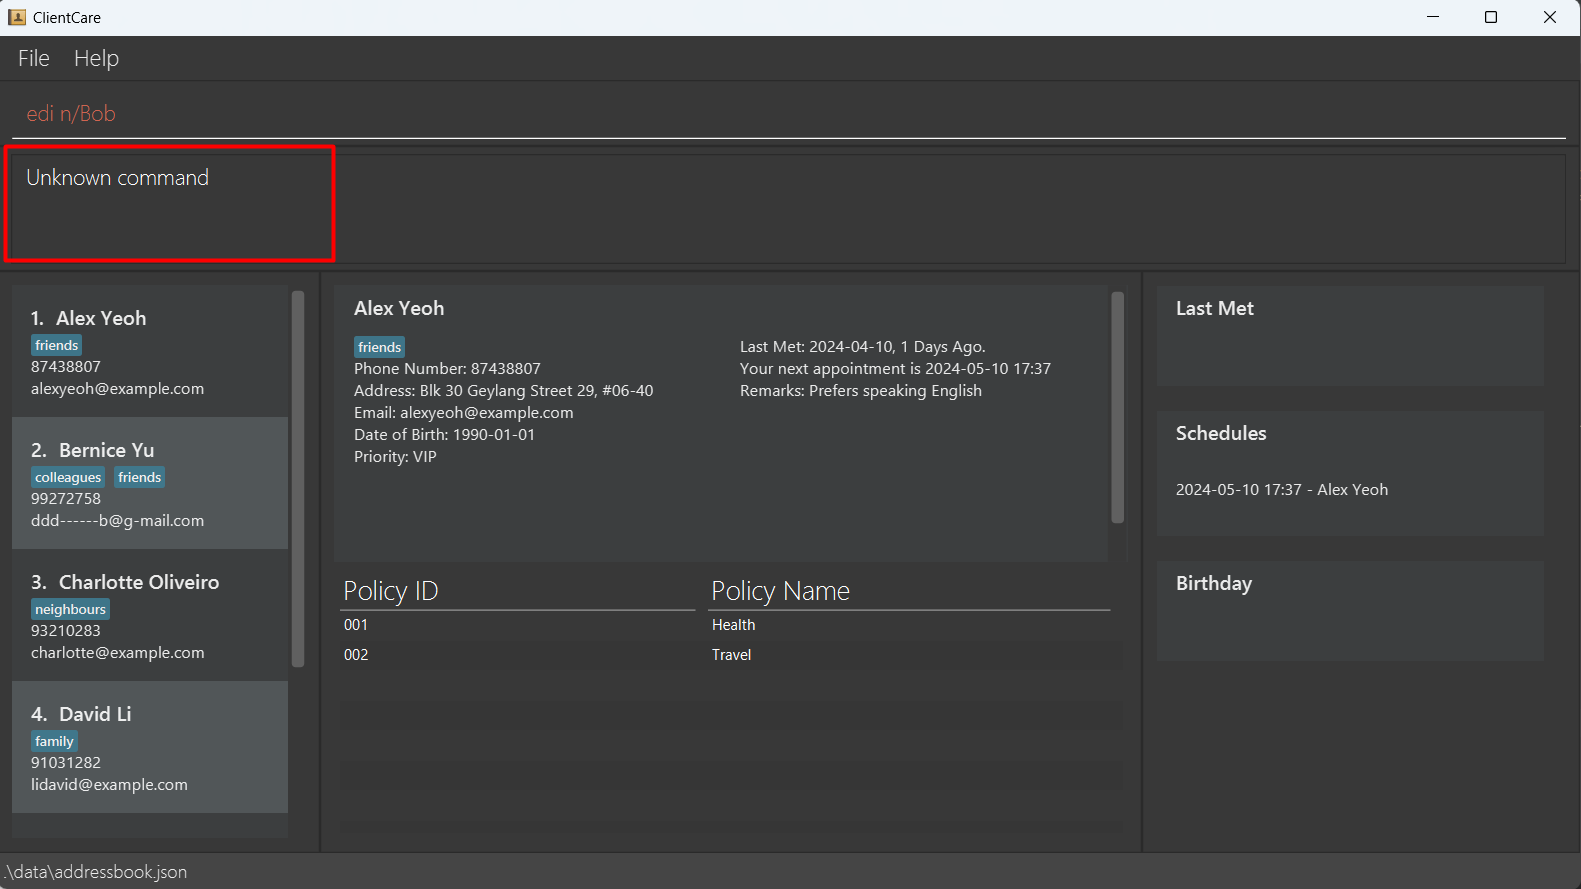
1) Invalid Command
This occurs when you have mis-spelt the command keyword or the keyword does not exist. If you do not remember what are the command keywords available, you can easily refer them again under Command Summary.
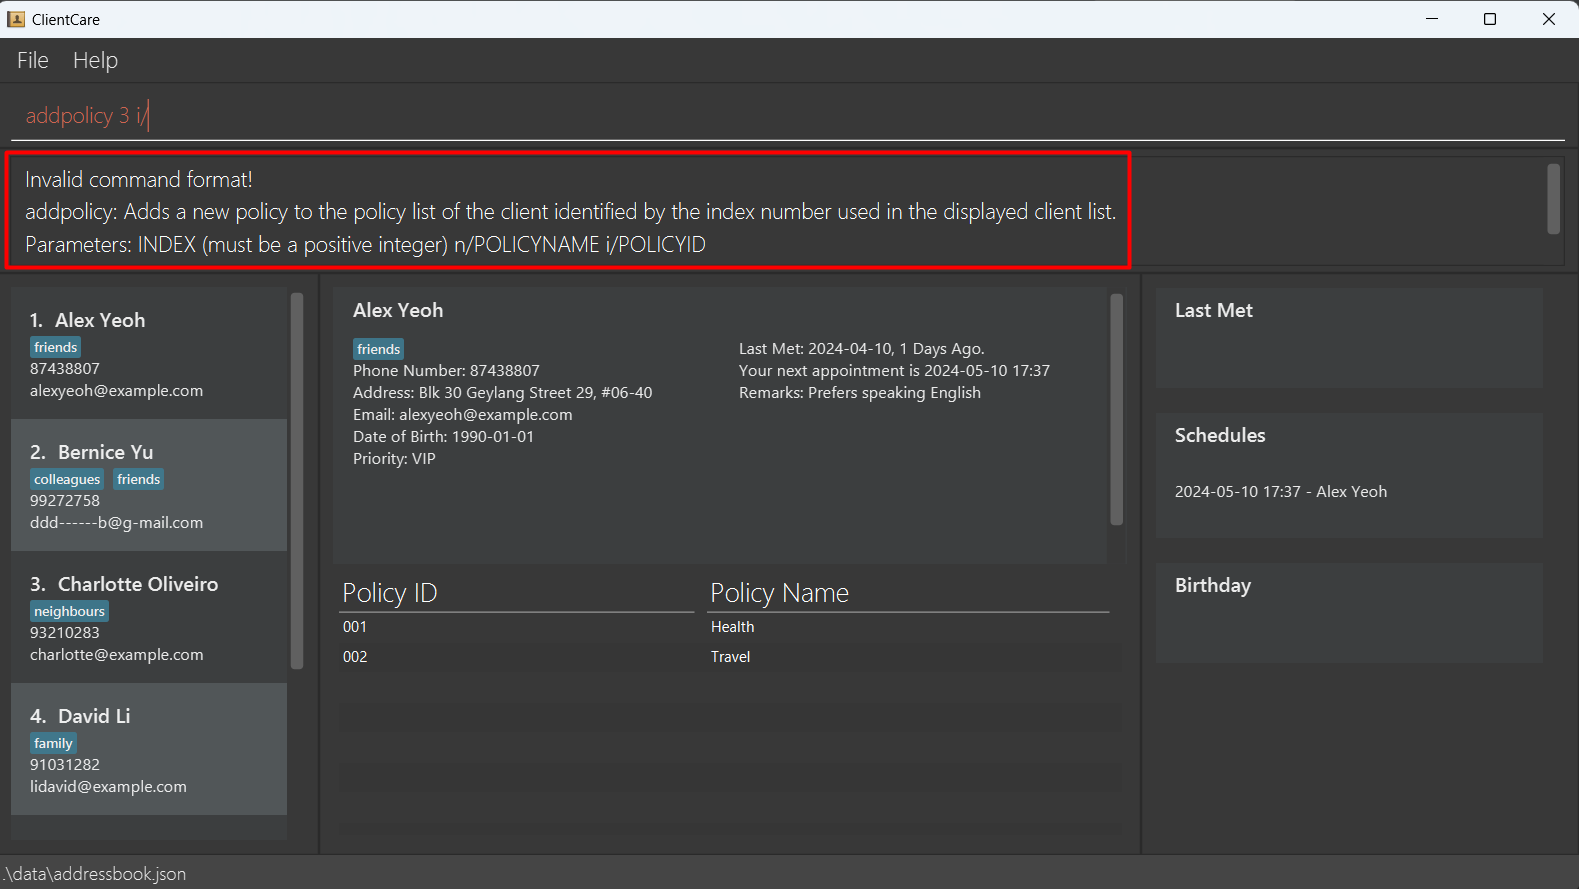
2) Invalid Command Format
This occurs when you have missed certain required fields or prefixes in the commands.
For example: adding a policy to a client requires an index, policy name and policy ID. Missing any one of these will throw an invalid command format error.
addpolicy 1 i/02141 will cause an error as you have missed out the n/ prefix and its input value.
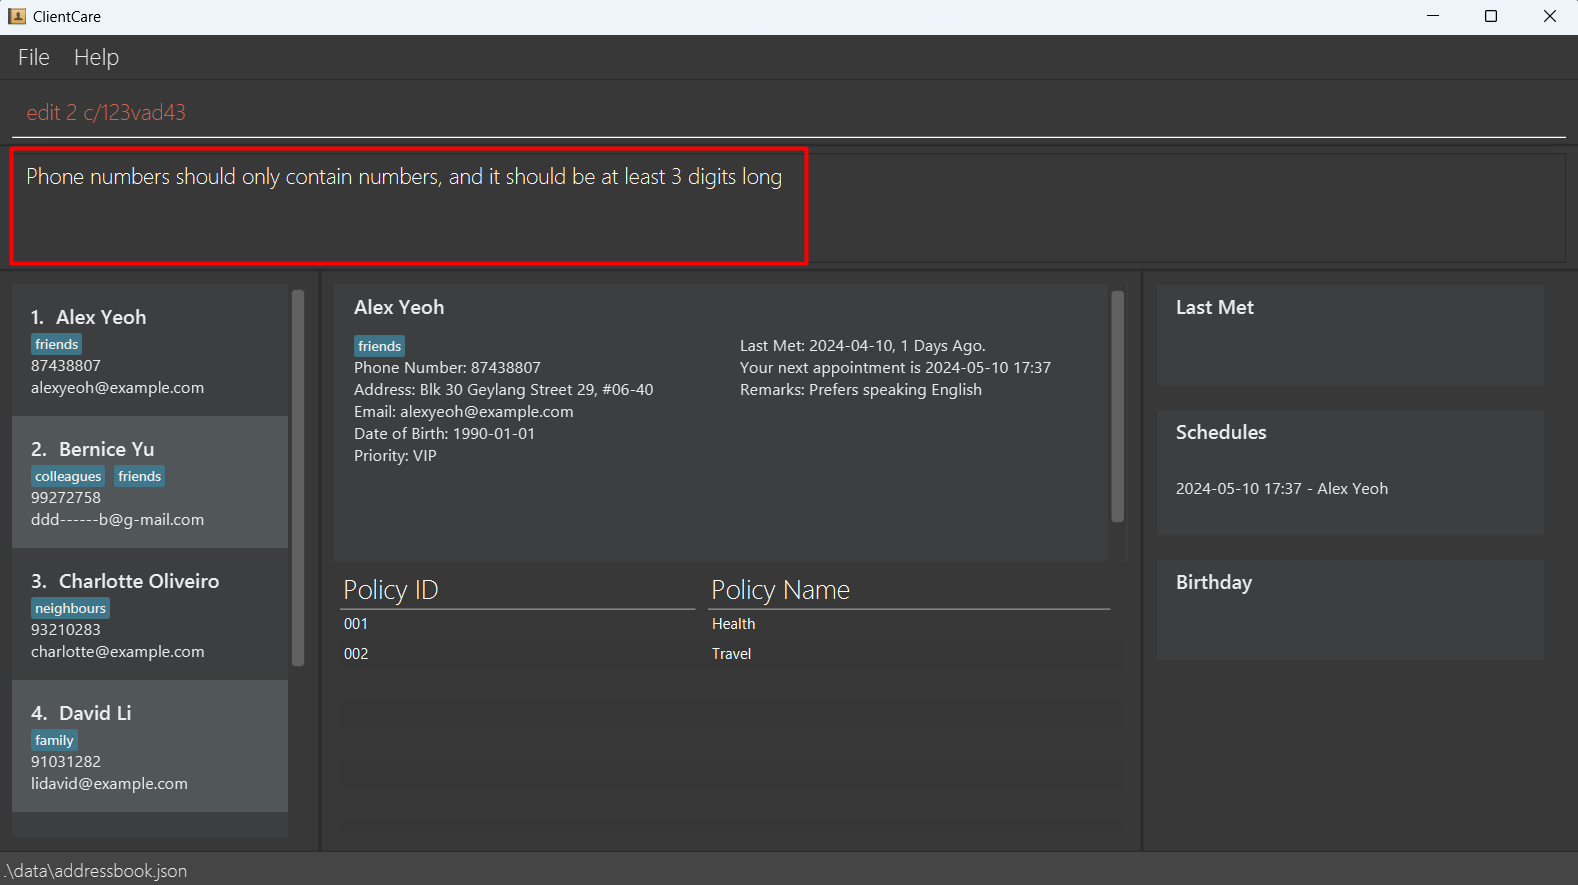
3) Invalid Fields
This occurs when you have all the prefixes required in a command but may have typed an invalid value. There are 2 possible situations where this is possible.
- Invalid field format:
For example: A phone number can only accept numbers. Putting alphabets in a phone number is not allowed.
Typing
edit 2 c/123vad43causes invalid field format error.
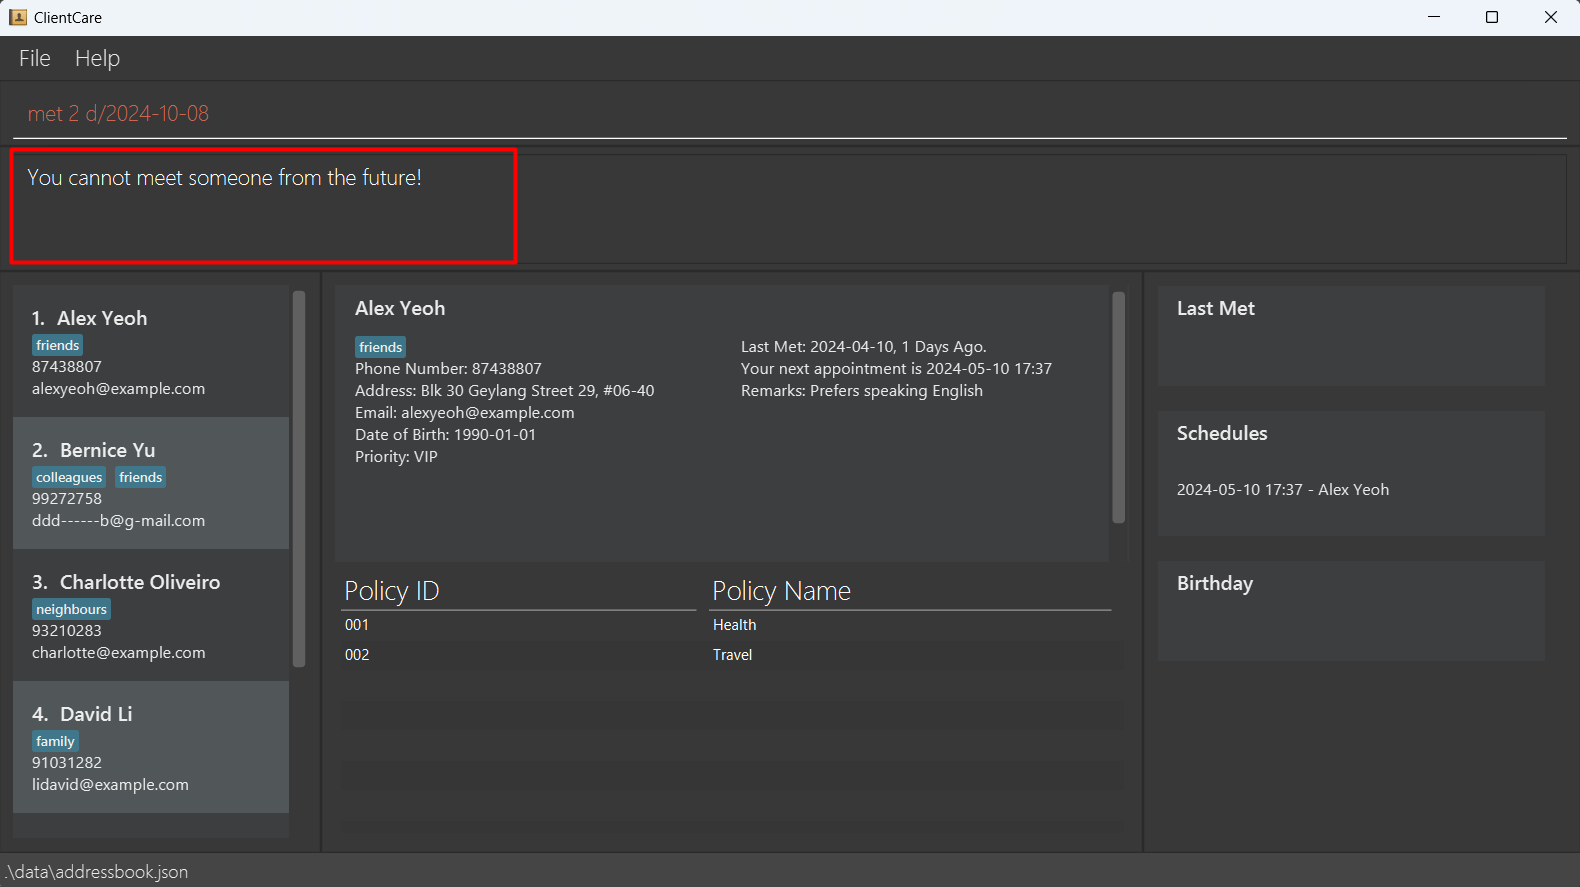
- Invalid field value:
For example: You are not allowed to type a future date when using the command
meteven though your date format is correct. If today is 5 Jan 2024, typingmet 2 d/2024-10-08which is 8 Oct 2024 will cause an invalid field value error.
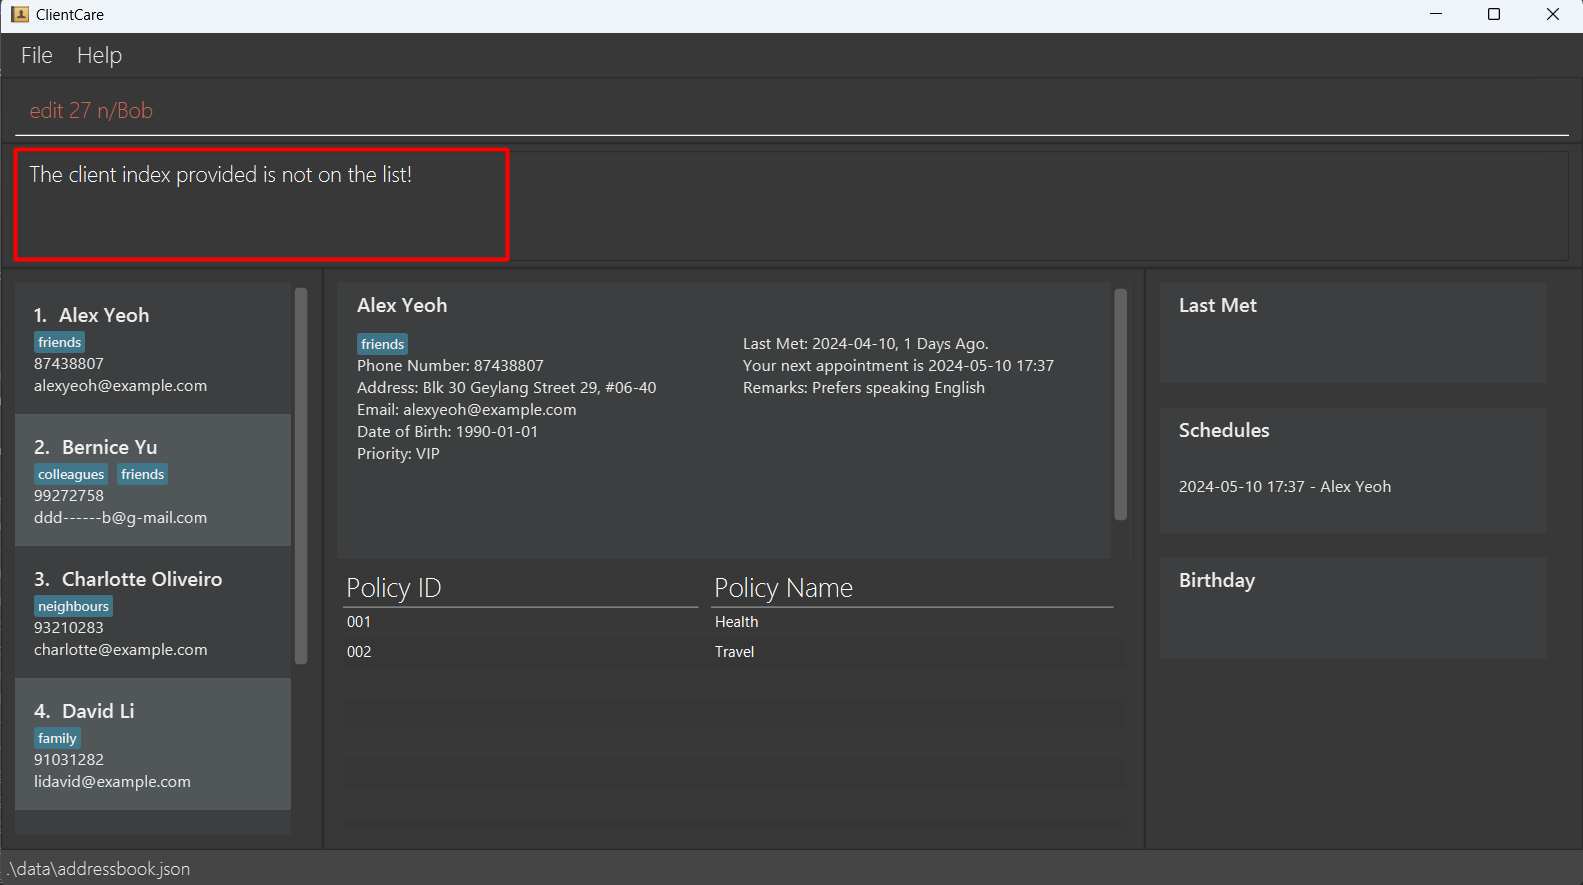
4) Invalid Index
This occurs when you gave ClientCare an index value that is larger than your current client list.
For example: If you only have 7 clients, then your index should be a value from 1 to 7.
edit 27 n/Bob will cause an error as you have less than 27 clients.
Note: ClientCare will only show you one error message at a time. If you have multiple errors, not to worry! ClientCare will be with you to correct each error!
Quick tutorial
Excited to play around with ClientCare? Let’s run you through some simple commands to get you warmed up before you dive right into ClientCare’s full feature list!
Note: Your ClientCare may look different upon starting up. This is because the client data stored within the app may be different.
Let's boot up ClientCare and get started!
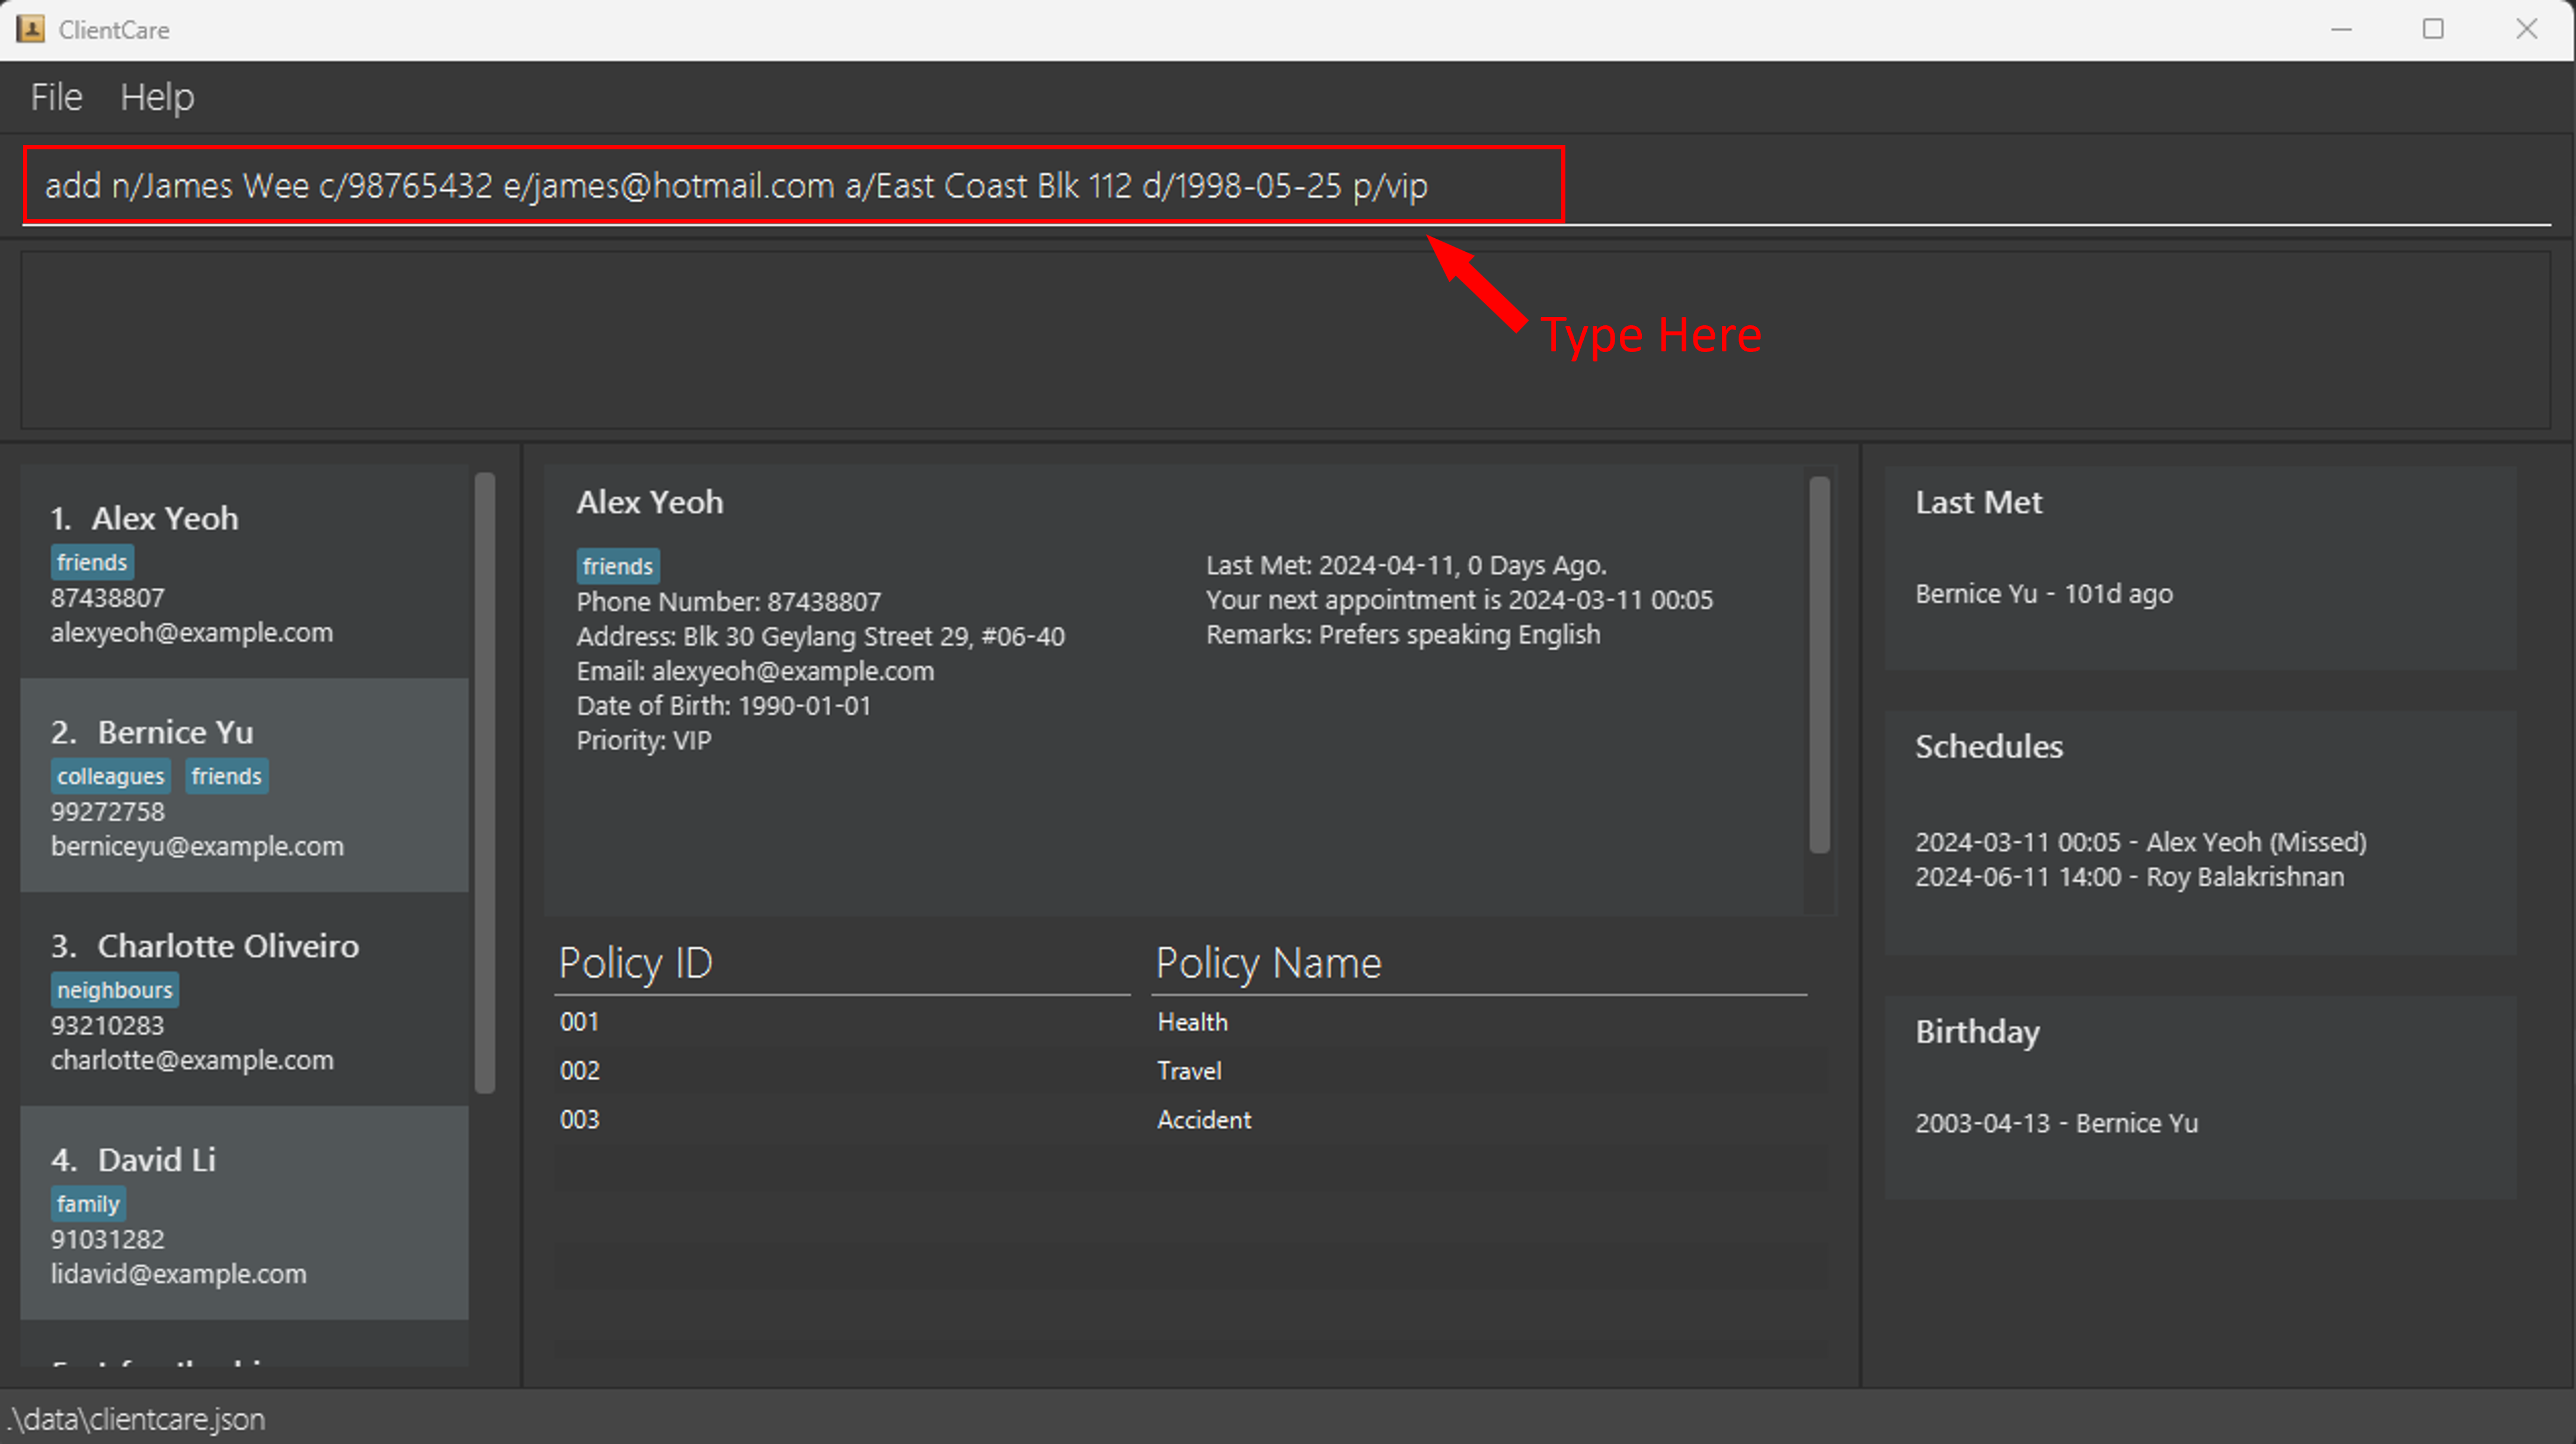
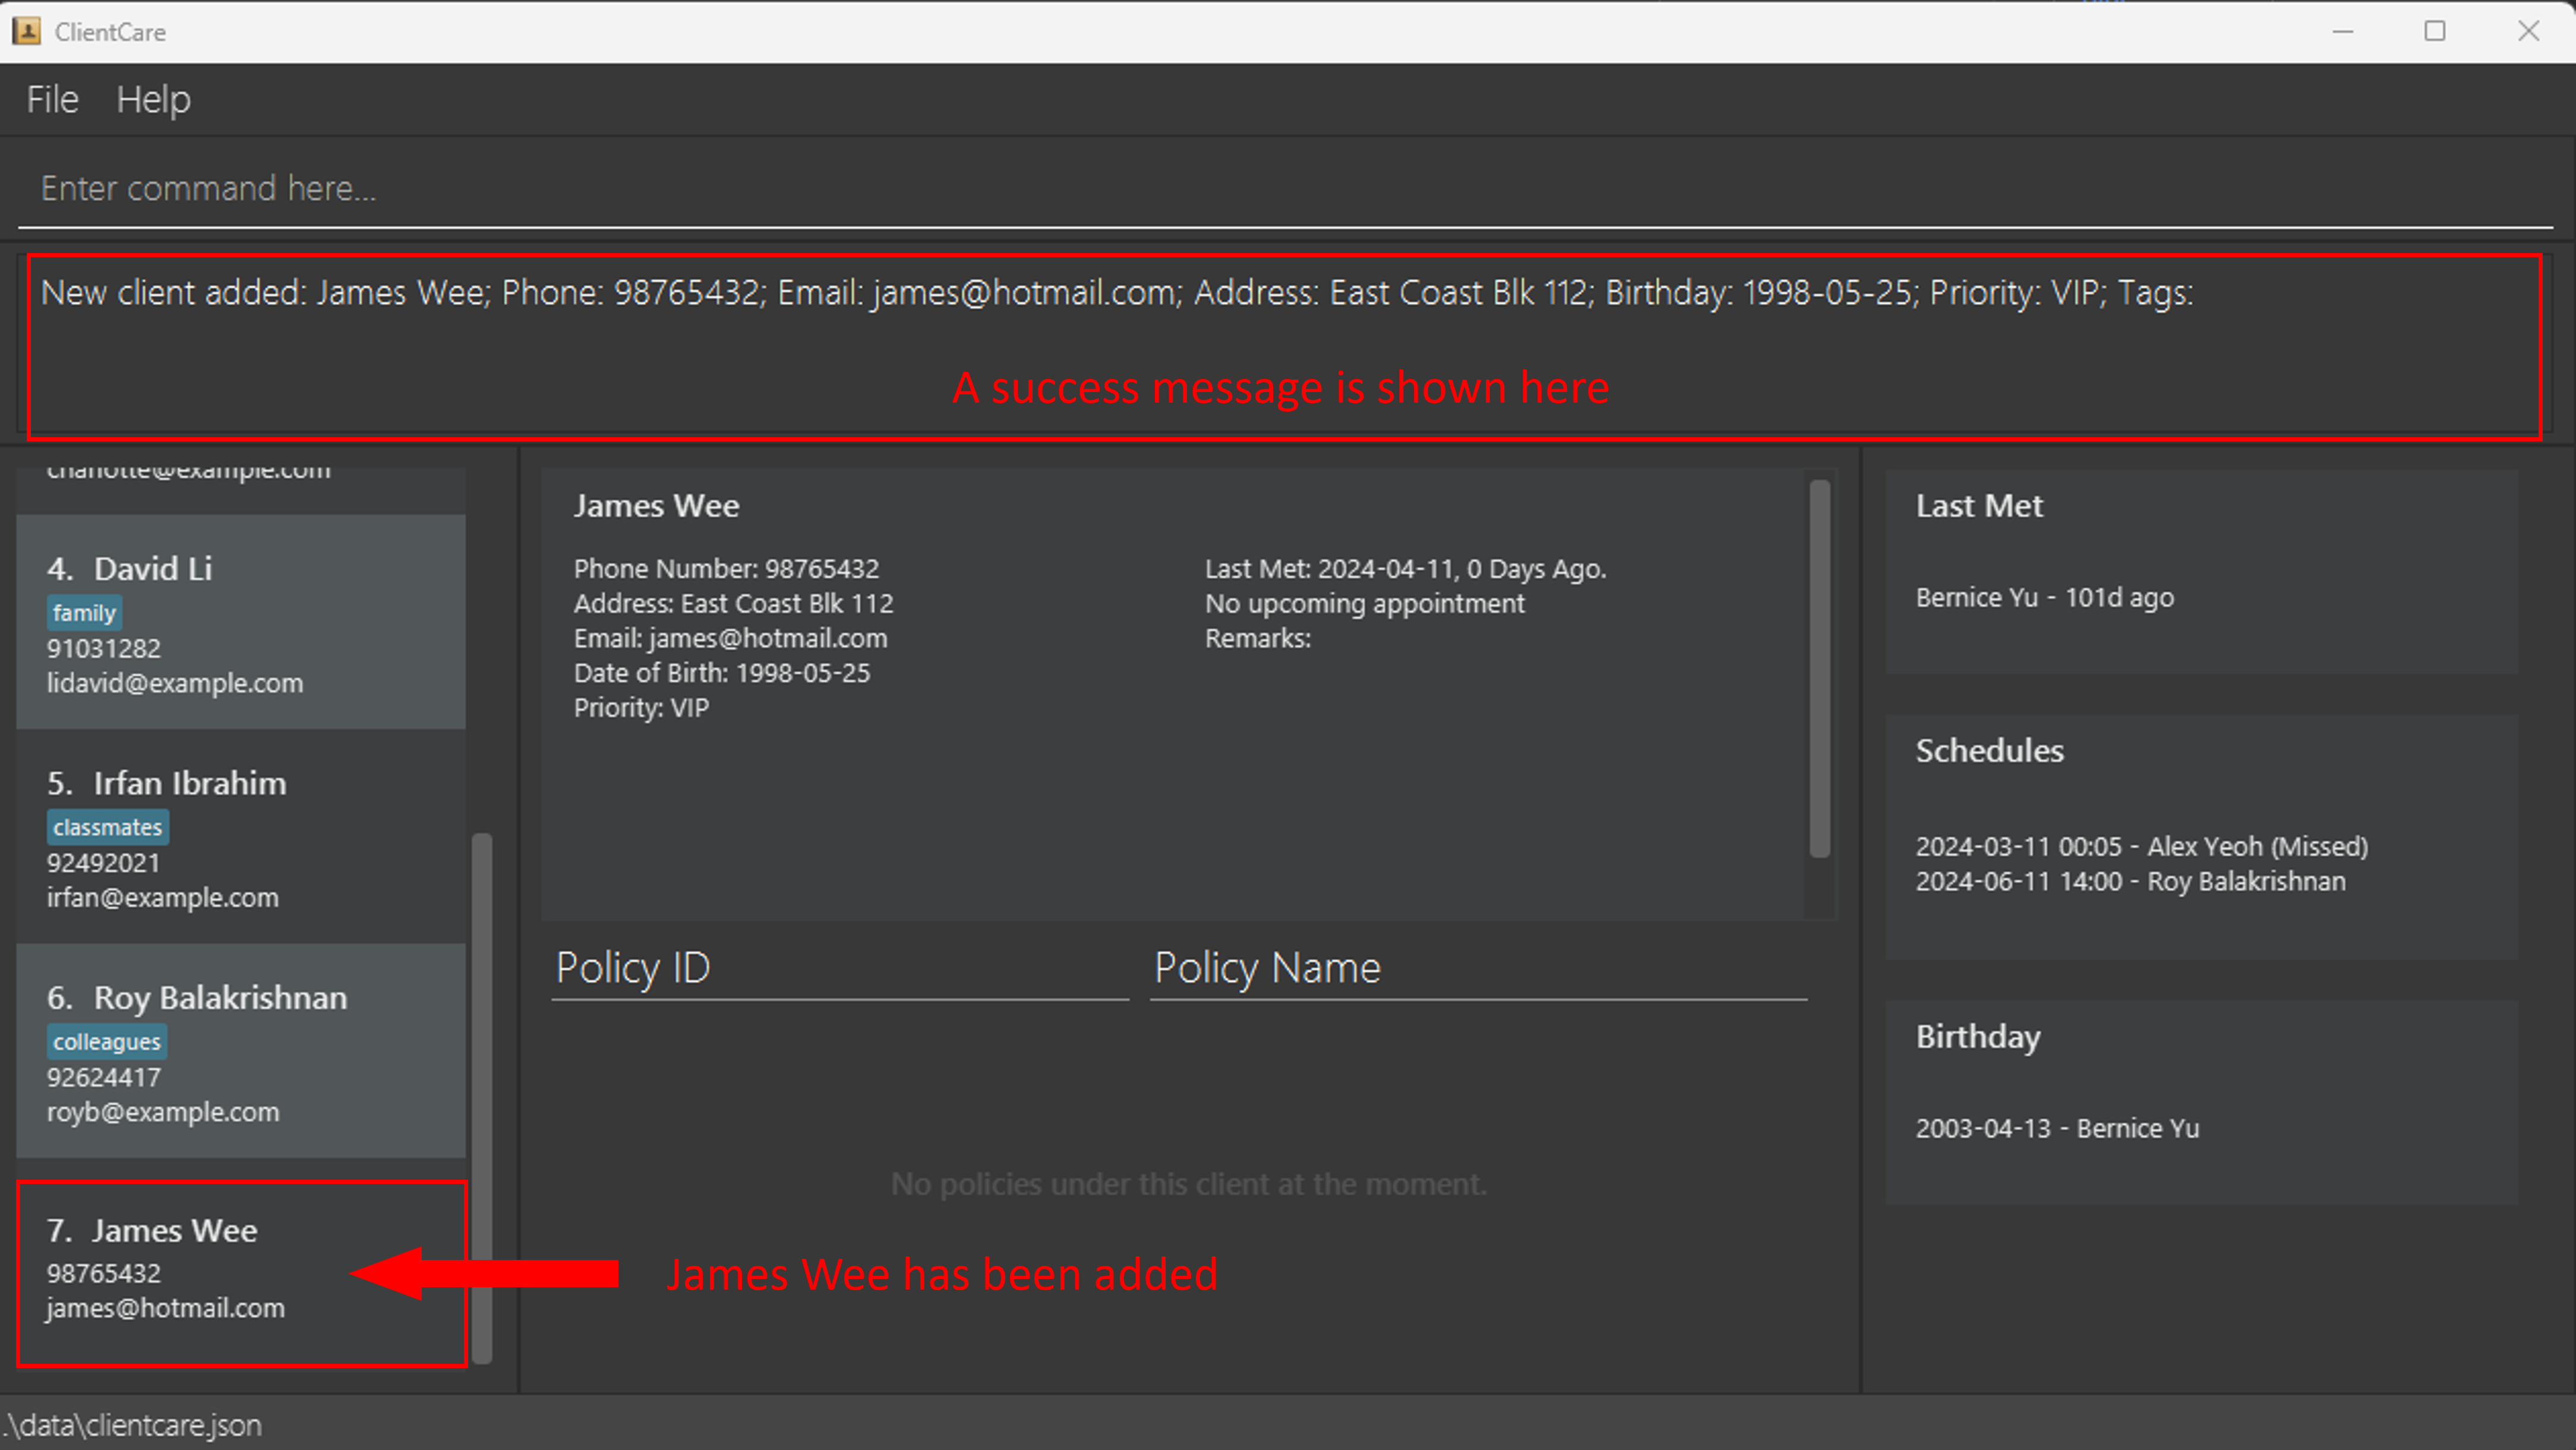
- Suppose we just met a new client! Let's add James Wee to our client list and his following details:
- Phone Number: 98765432
- Email: james@hotmail.com
- Address: East Coast Blk 112
- Birthday: 25 May 1998
- Priority: VIP
Type the following into the Command Input:
add n/James Wee c/98765432 e/james@hotmail.com a/East Coast Blk 112 d/1998-05-25 p/vip
- We have now added James Wee to our Client List! ClientCare shows a success message in the Feedback Display too.
- Now let's schedule an appointment with James Wee 7 days from now. From the Client List, James has an index of
7. When this guide was released, today was 11 April 2024. Hence, let's set the appointment at 18 April 2024 2pm. Let's type the following command into the Command Input:
schedule 7 d/2024-04-18 14:00
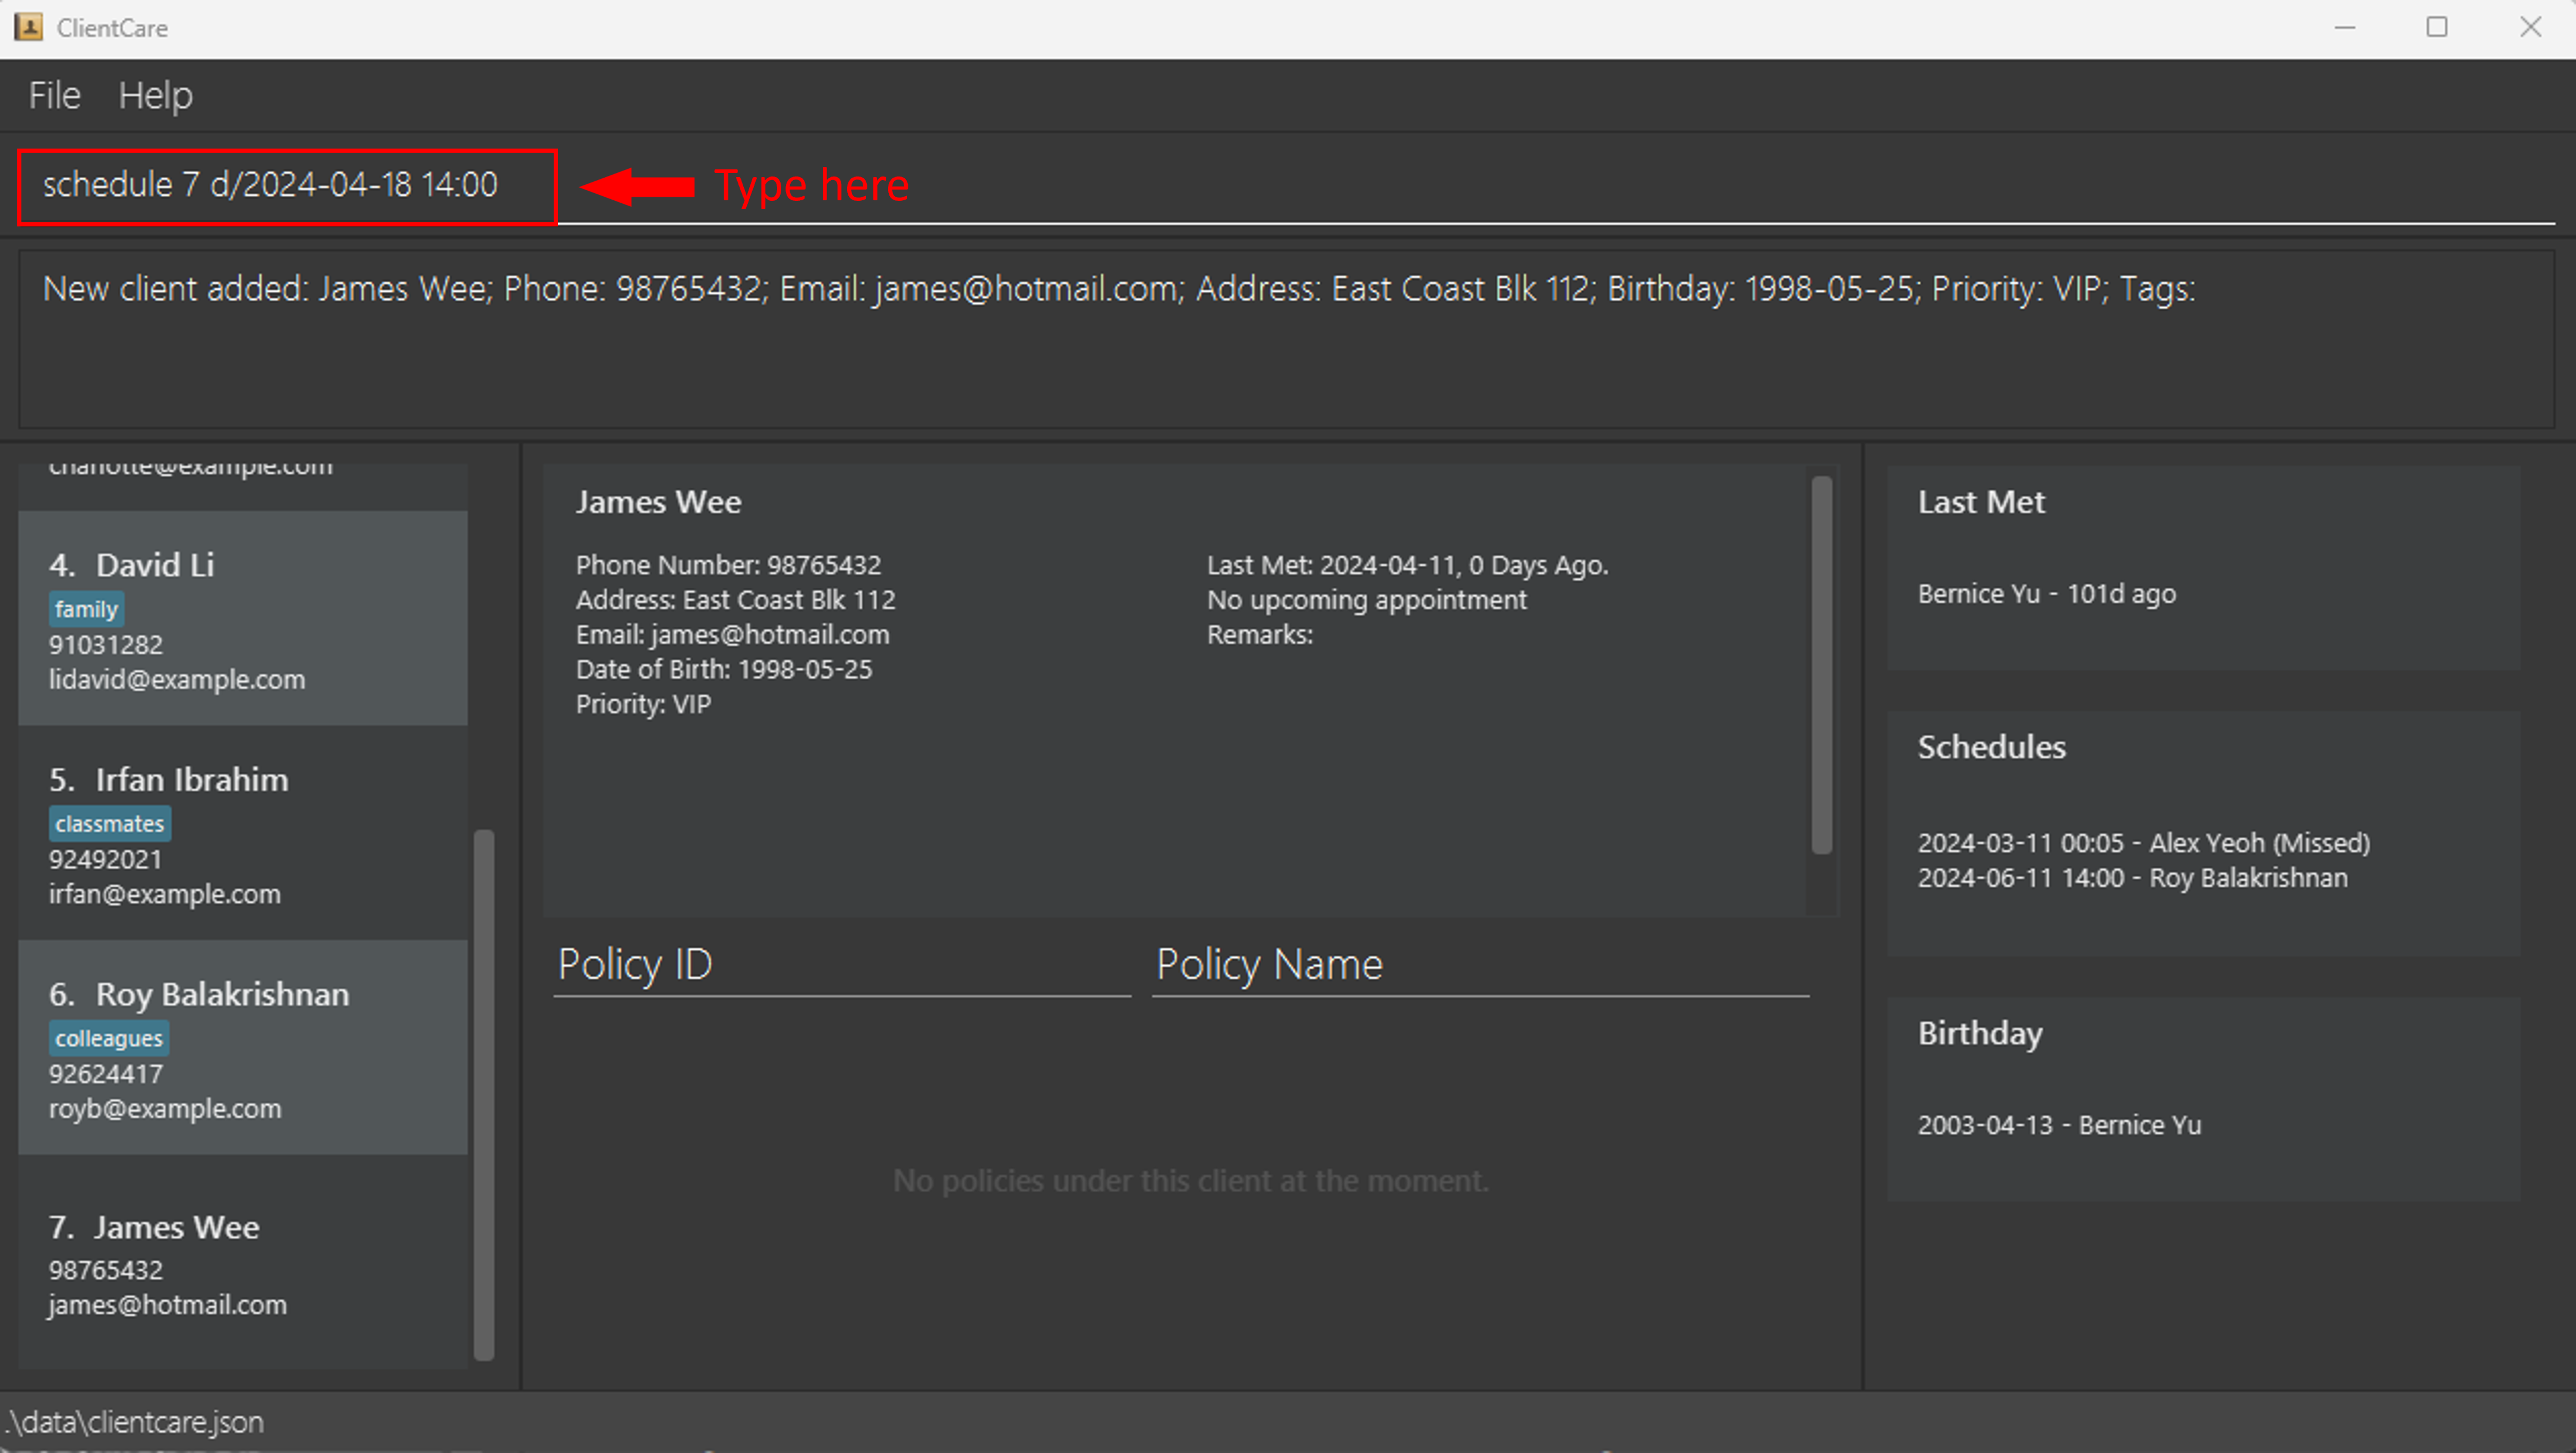
Note: Since you cannot schedule an appointment for a date and time that has passed or that exact moment, do change the date field as needed.
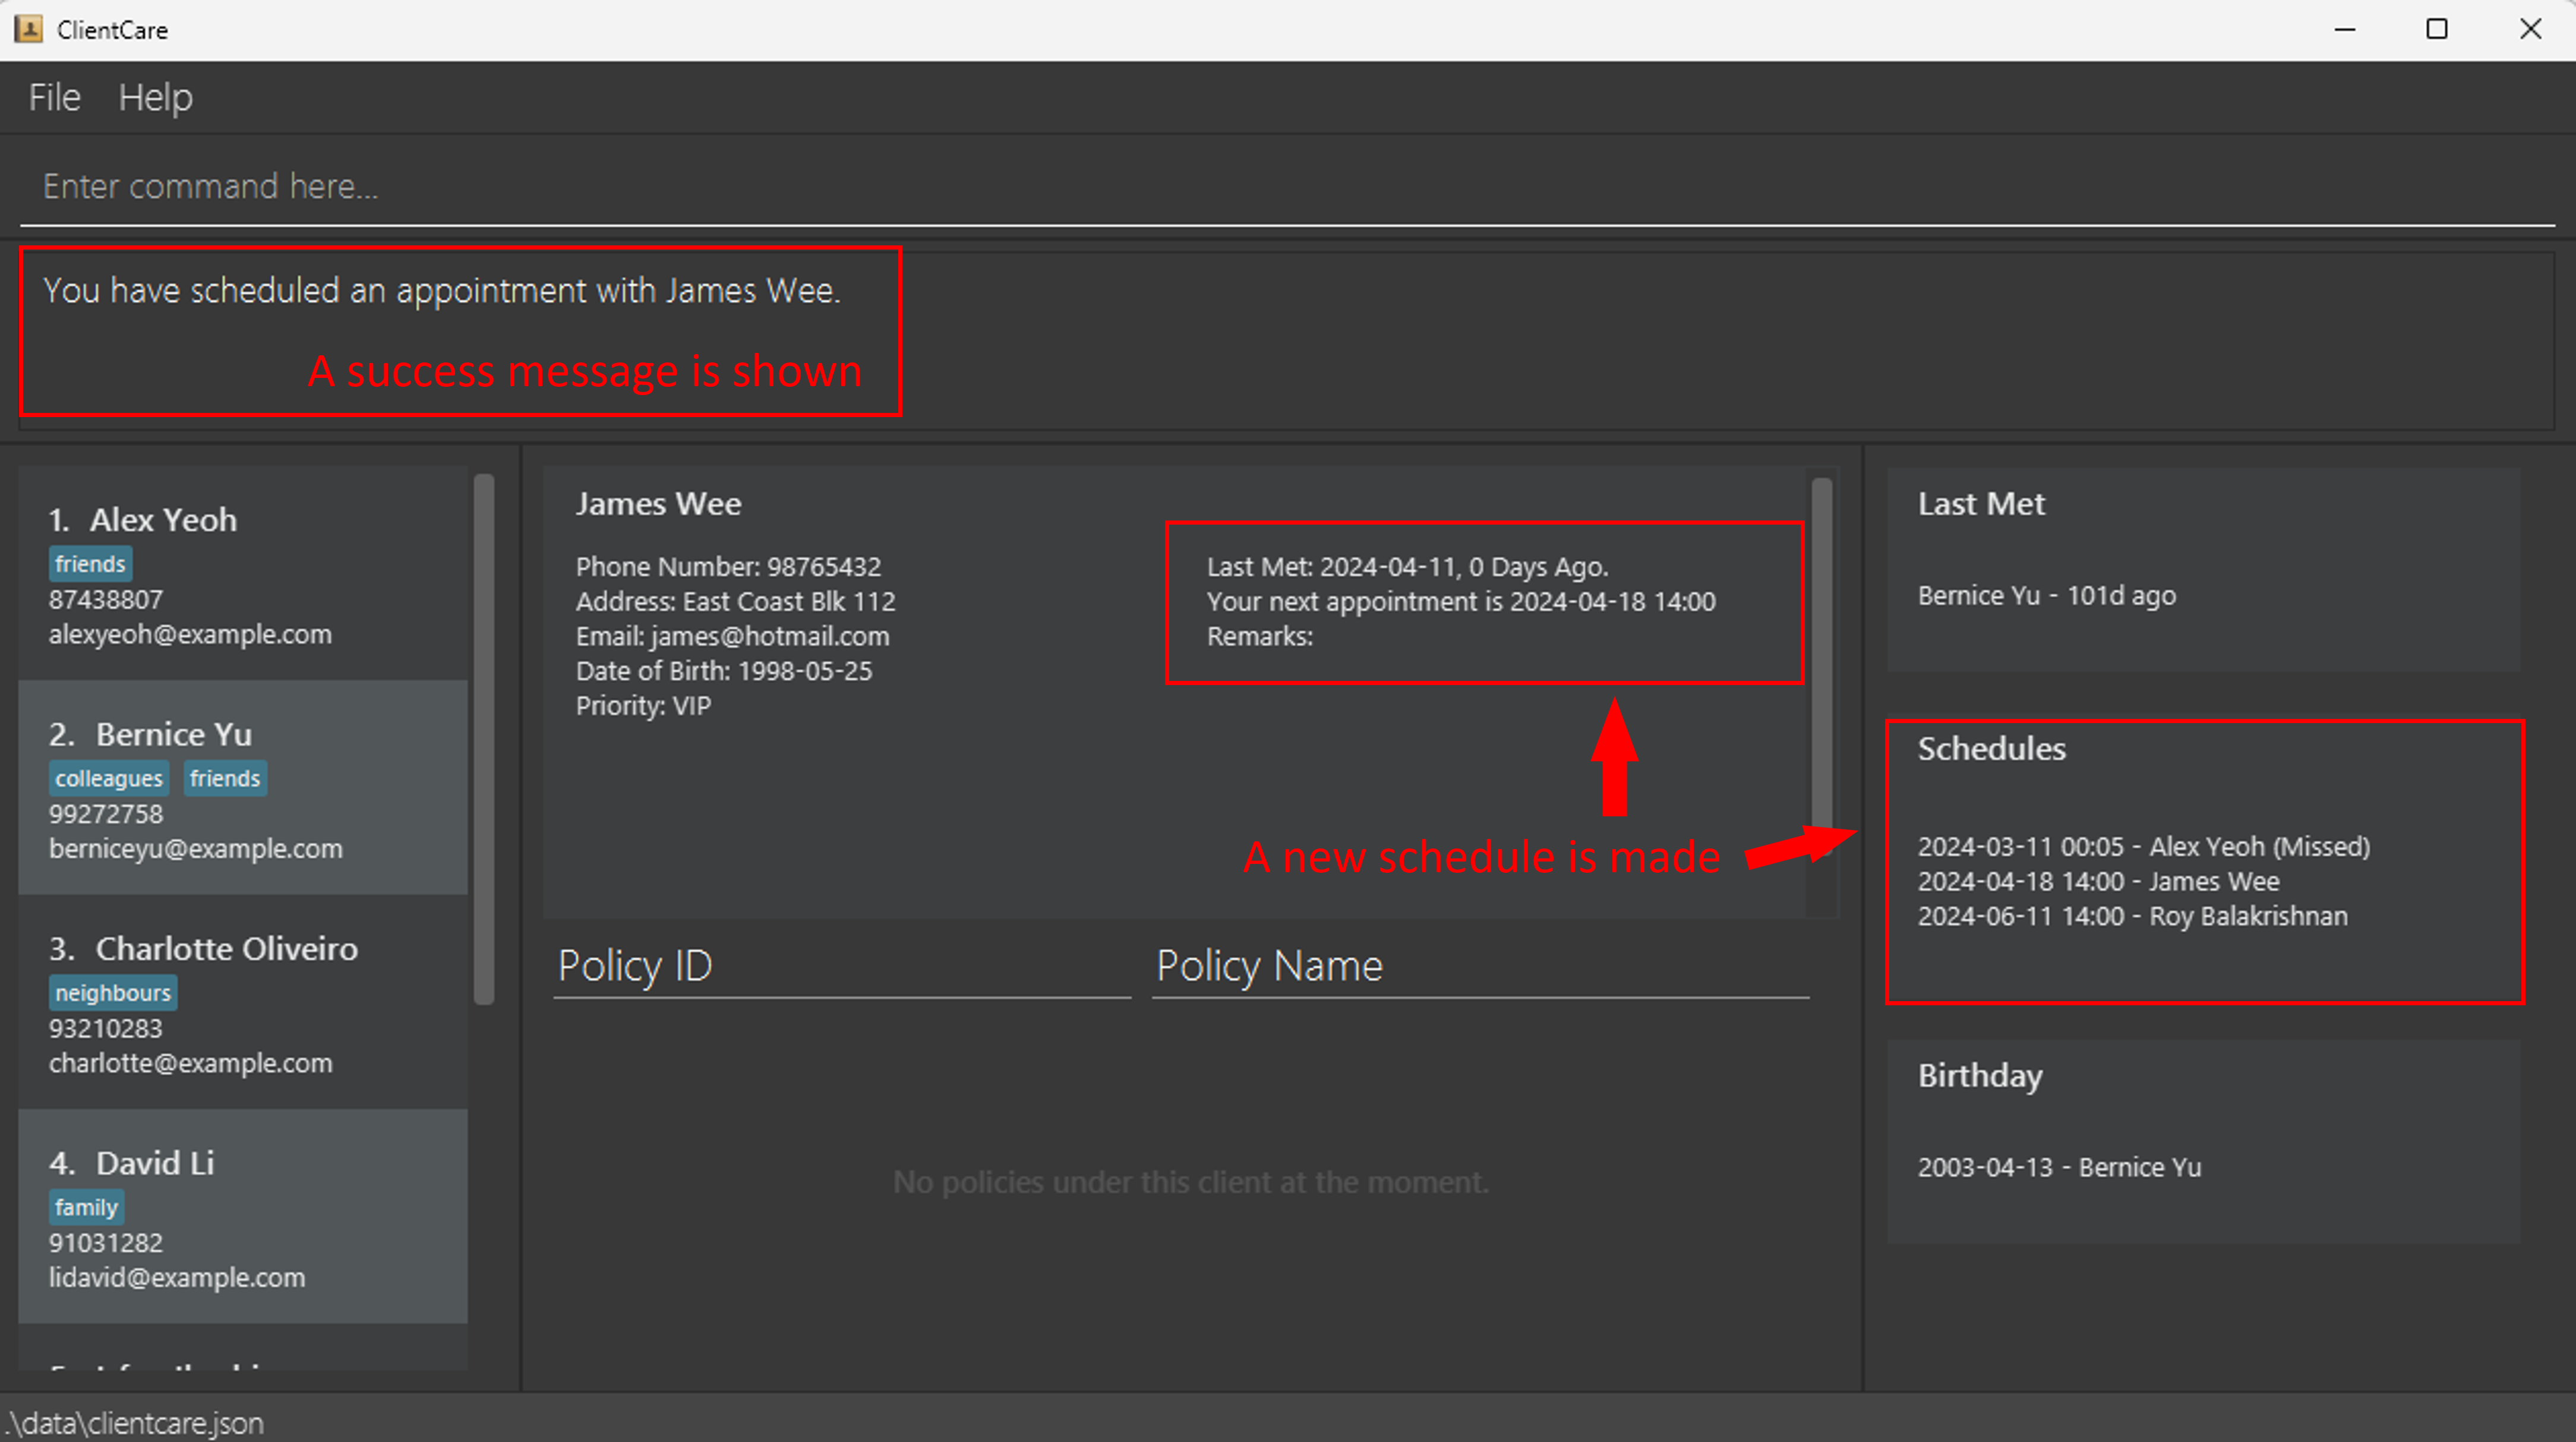
- Our schedule with James has been updated in both Client Details and Schedule Display!
- Now let's get interesting. What happens if we encounter an error?
ClientCare will show us the error along with the correct command format in the Feedback Display.
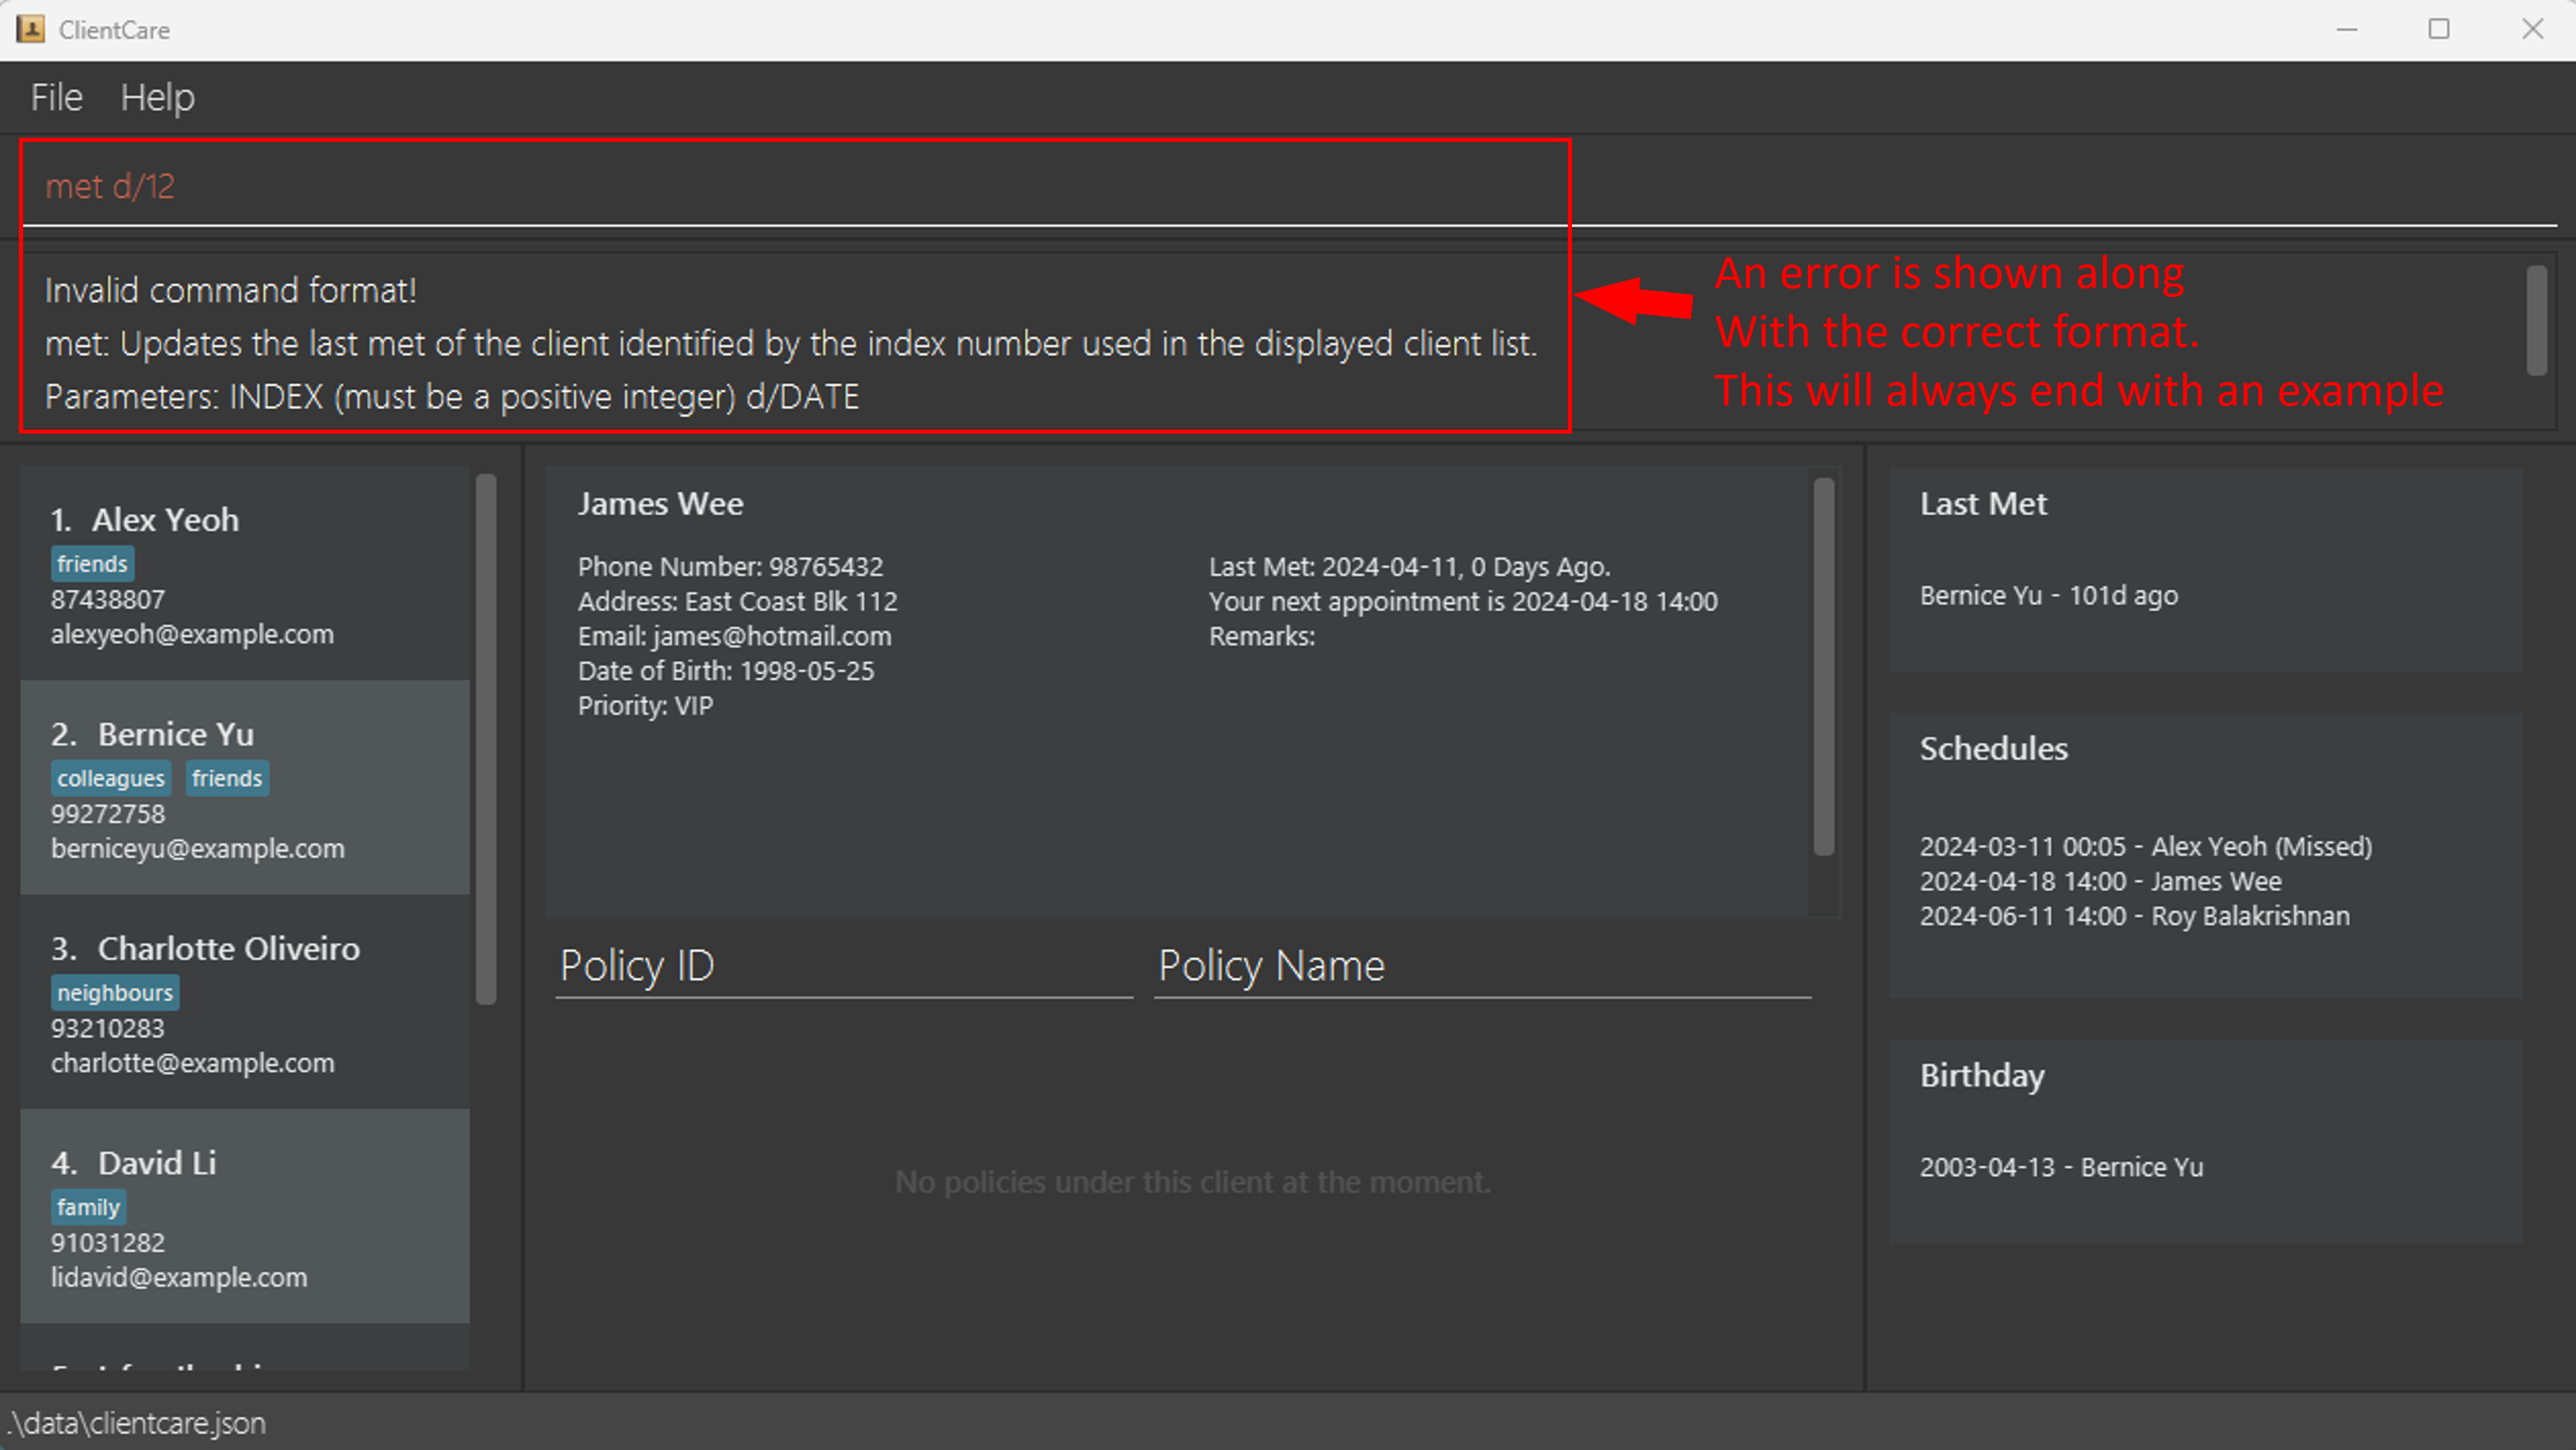
Note: The Feedback Display may be unable to show the entire error message at once. You can scroll down in the Feedback Display to see the whole message. All error messages due to invalid formatting will end with an example.
Features
Dive right into ClientCare's full list of features. This section guides you through all of ClientCare's commands.
For easy reference, similar features are grouped into the same subsections as shown below:
Client related commands
ClientCare is all about managing your clients. ClientCare will help you keep track of all your clients and their details, so you never have to lose a contact again.
ClientCare offers the following commands to help you manage your clients:
- Adding a client:
add - Deleting a client:
delete - Editing a client:
edit - Listing all clients:
list - Viewing a client:
view - Finding a client:
find - Adding notes to a client:
remark - Clearing all clients:
clear - Sorting your clients:
sort
Adding a client: add
The first step for any insurance agent is to find clients! You can add your new client to the client list with add.
Format: add n/NAME c/PHONE_NUMBER e/EMAIL a/ADDRESS d/BIRTHDAY p/PRIORITY [t/TAG]…
Note: A client can have any number of tags (including 0). For example, t/owesMoney t/friends is allowed.
All other fields (except for tags) cannot have duplicate fields. For example, c/1234567 c/7654321 is not allowed.
Note: The name of the client is case-sensitive. John and john will be regarded as different people.
Fields usage for client details:
| Field | Usage | Example |
|---|---|---|
| 'n/NAME' | All names in the system must be unique and names are case sensitive | n/John Doe |
| 'c/PHONE_NUMBER' | Phone numbers should only contain numbers, and it should be at least 3 digits long | c/98765432 |
| 'e/EMAIL' | Email should be in the format of local-part@domain | e/johndoe@email.com |
| 'a/ADDRESS' | Address can take any text value | a/311, Clementi Ave 2, #02-25 |
| 'd/BIRTHDAY' | Birthday should be in the format of YYYY-MM-DD | d/1990-01-01 |
| 'p/PRIORITY' | Priority can be low, medium, high, vip, or l, m, h, v (Case Insensitive) | p/medium, p/MEDIUM, p/m, p/M |
| 't/TAG' | Tags can be any text value | t/friends |
Examples:
add n/John Doe c/98765432 e/johnd@example.com a/311, Clementi Ave 2, #02-25 d/1990-01-01 p/low t/friends t/owesMoneyadd n/Betsy Crowe t/friend p/vip e/betsycrowe@example.com a/Hougang Road 12 c/1234567 t/buddy d/1979-03-04
Tip: If you are missing information for some fields, you can enter placeholder values like e/placeholder@email.com!
Before Command:
Suppose you just met a new client! Let's add James Wee to your client list and his following details:
- Phone Number: 98765432
- Email: james@hotmail.com
- Address: East Coast Blk 112
- Birthday: 25 May 1998
- Priority: VIP
Type the following into the Command Input:
add n/James Wee c/98765432 e/james@hotmail.com a/East Coast Blk 112 d/1998-05-25 p/vip
After Command:
You have now added James Wee to our Client List! ClientCare shows a success message in the Feedback Display too.
Deleting a client: delete
While you can have new clients, it is also possible to lose existing clients. Hopefully, that does not happen often!
You can delete a specified client from the client list with delete.
Format: delete INDEX
- Deletes the client at the specified
INDEX. - The index refers to the index number shown in the displayed client list.
- The index must be a positive integer 1, 2, 3, …
Examples:
listfollowed bydelete 2deletes the 2nd client in the client list.find Betsyfollowed bydelete 1deletes the 1st client in the results of thefindcommand.
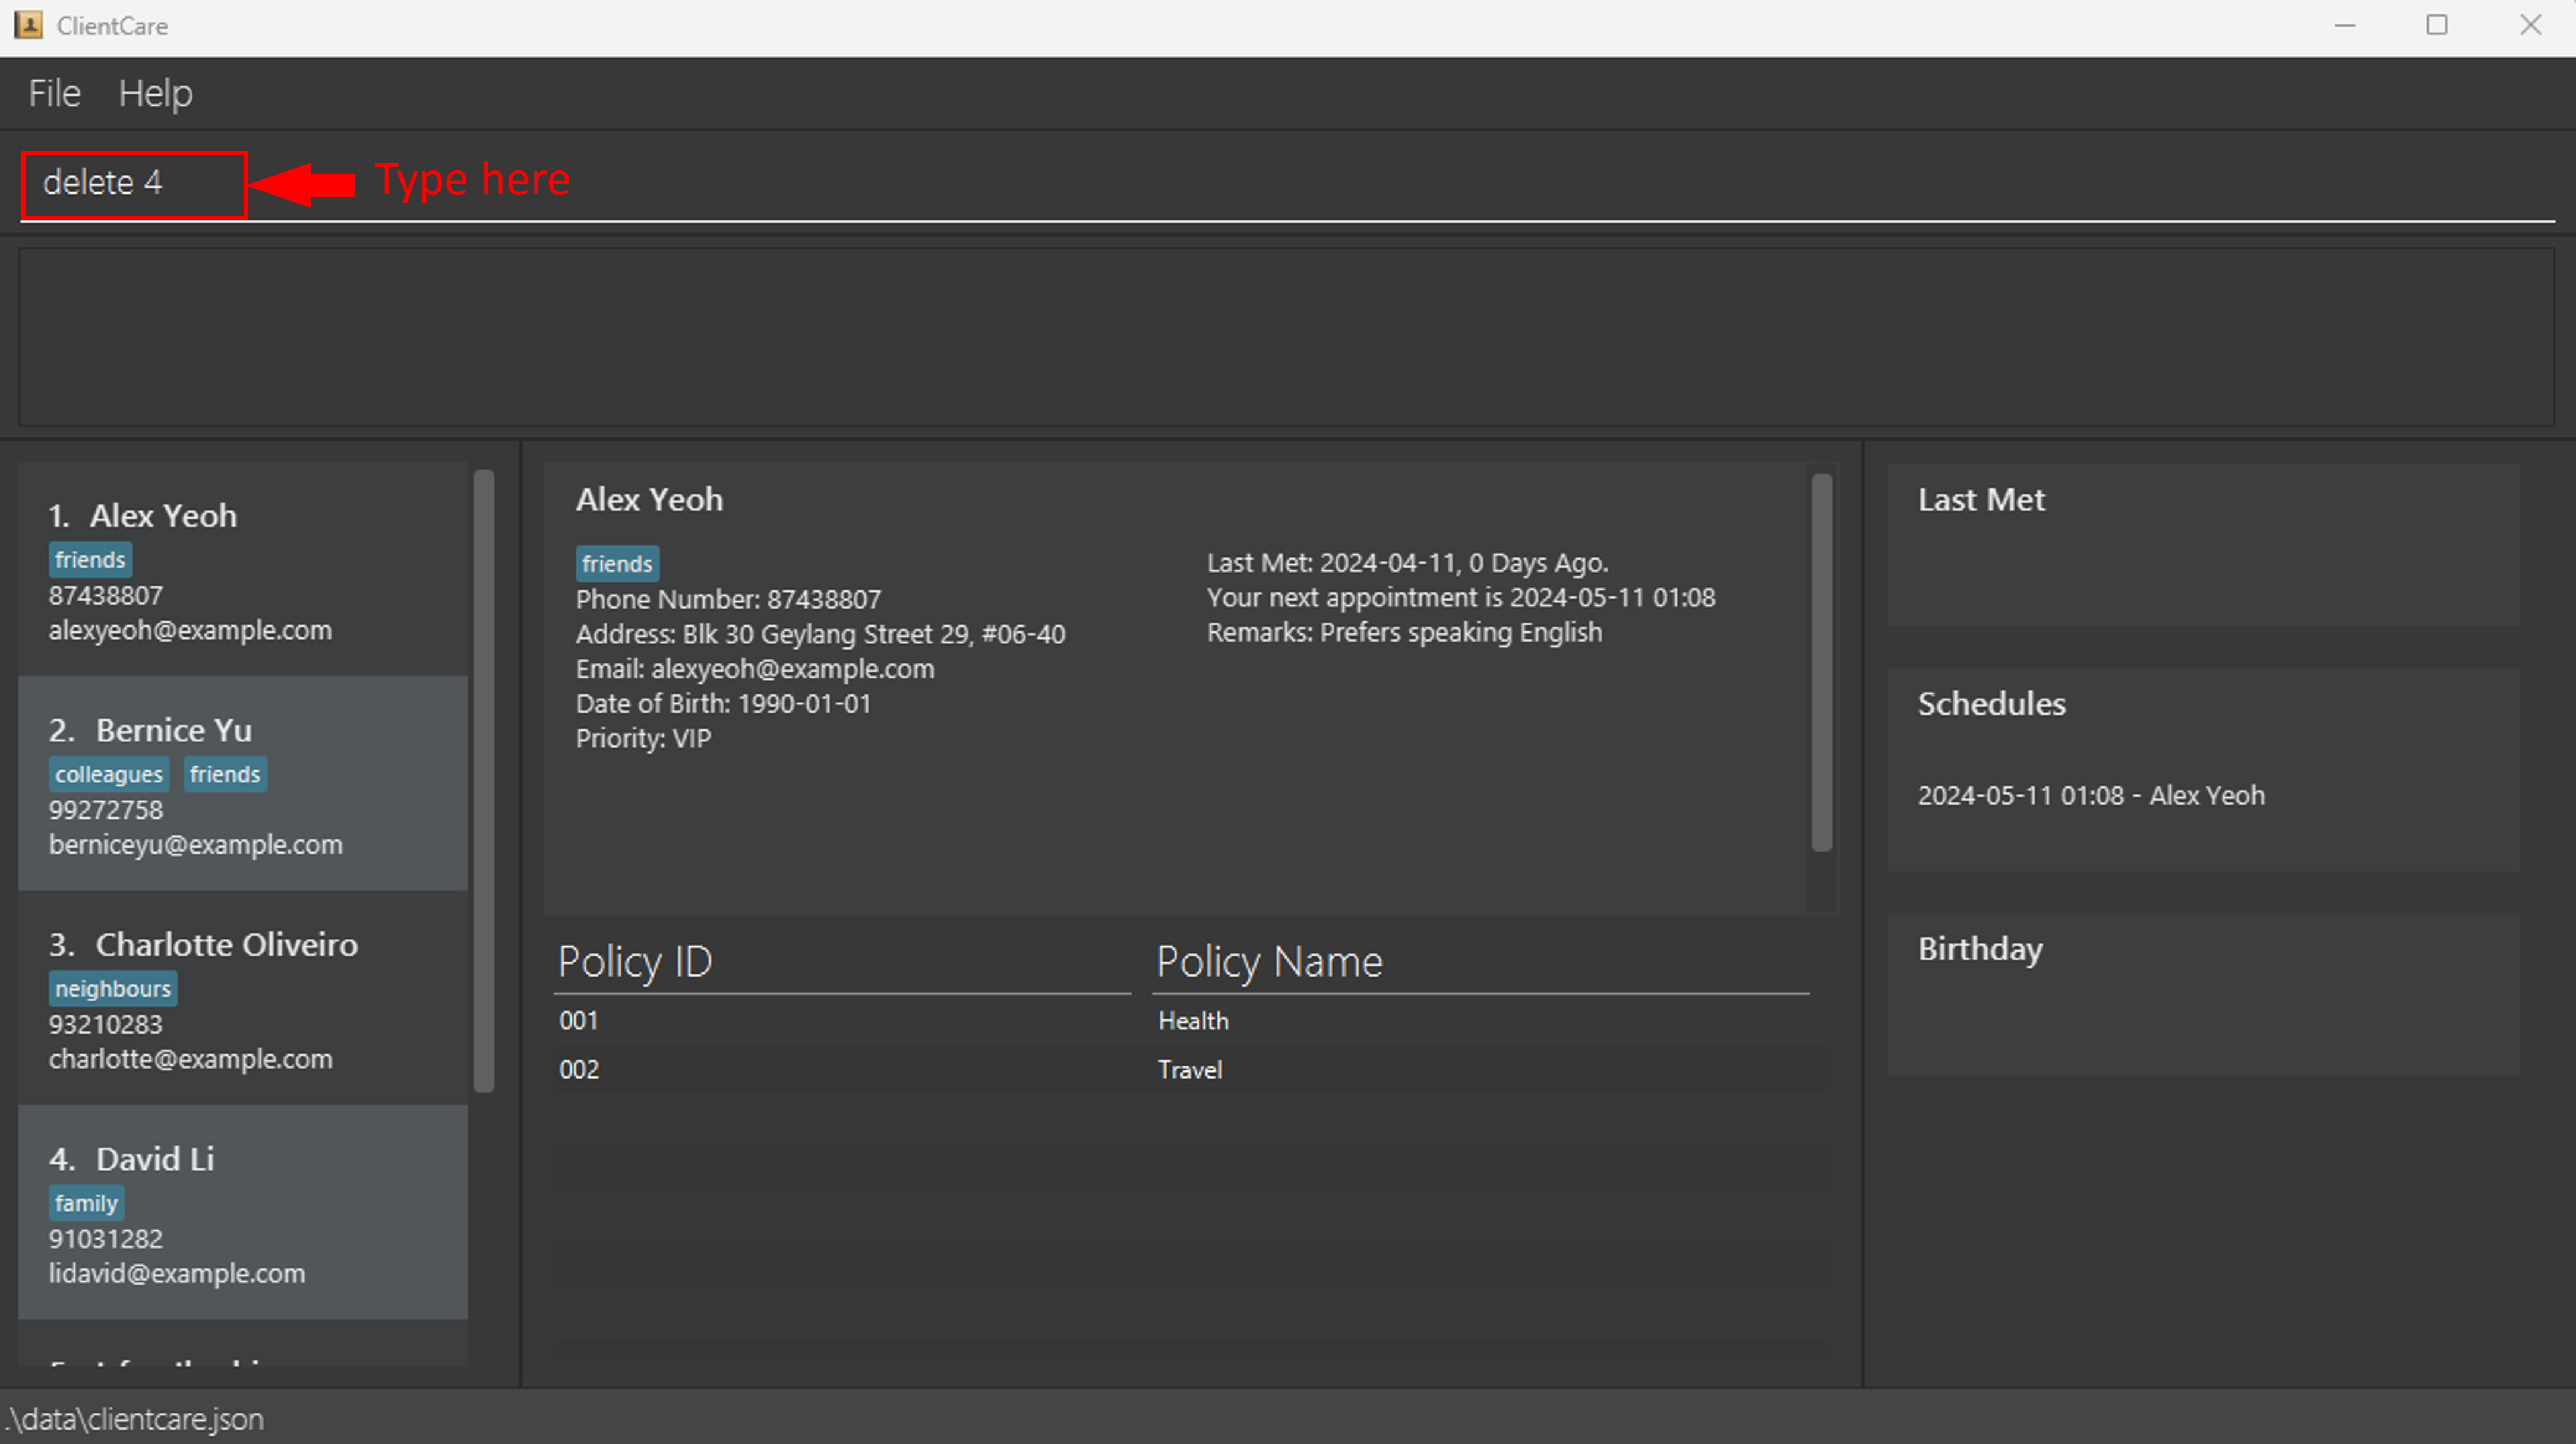
Before Command:
Suppose David Li is no longer your client. He is number 4 on our client list as seen on the left.
Type the following into the Command Input: delete 4
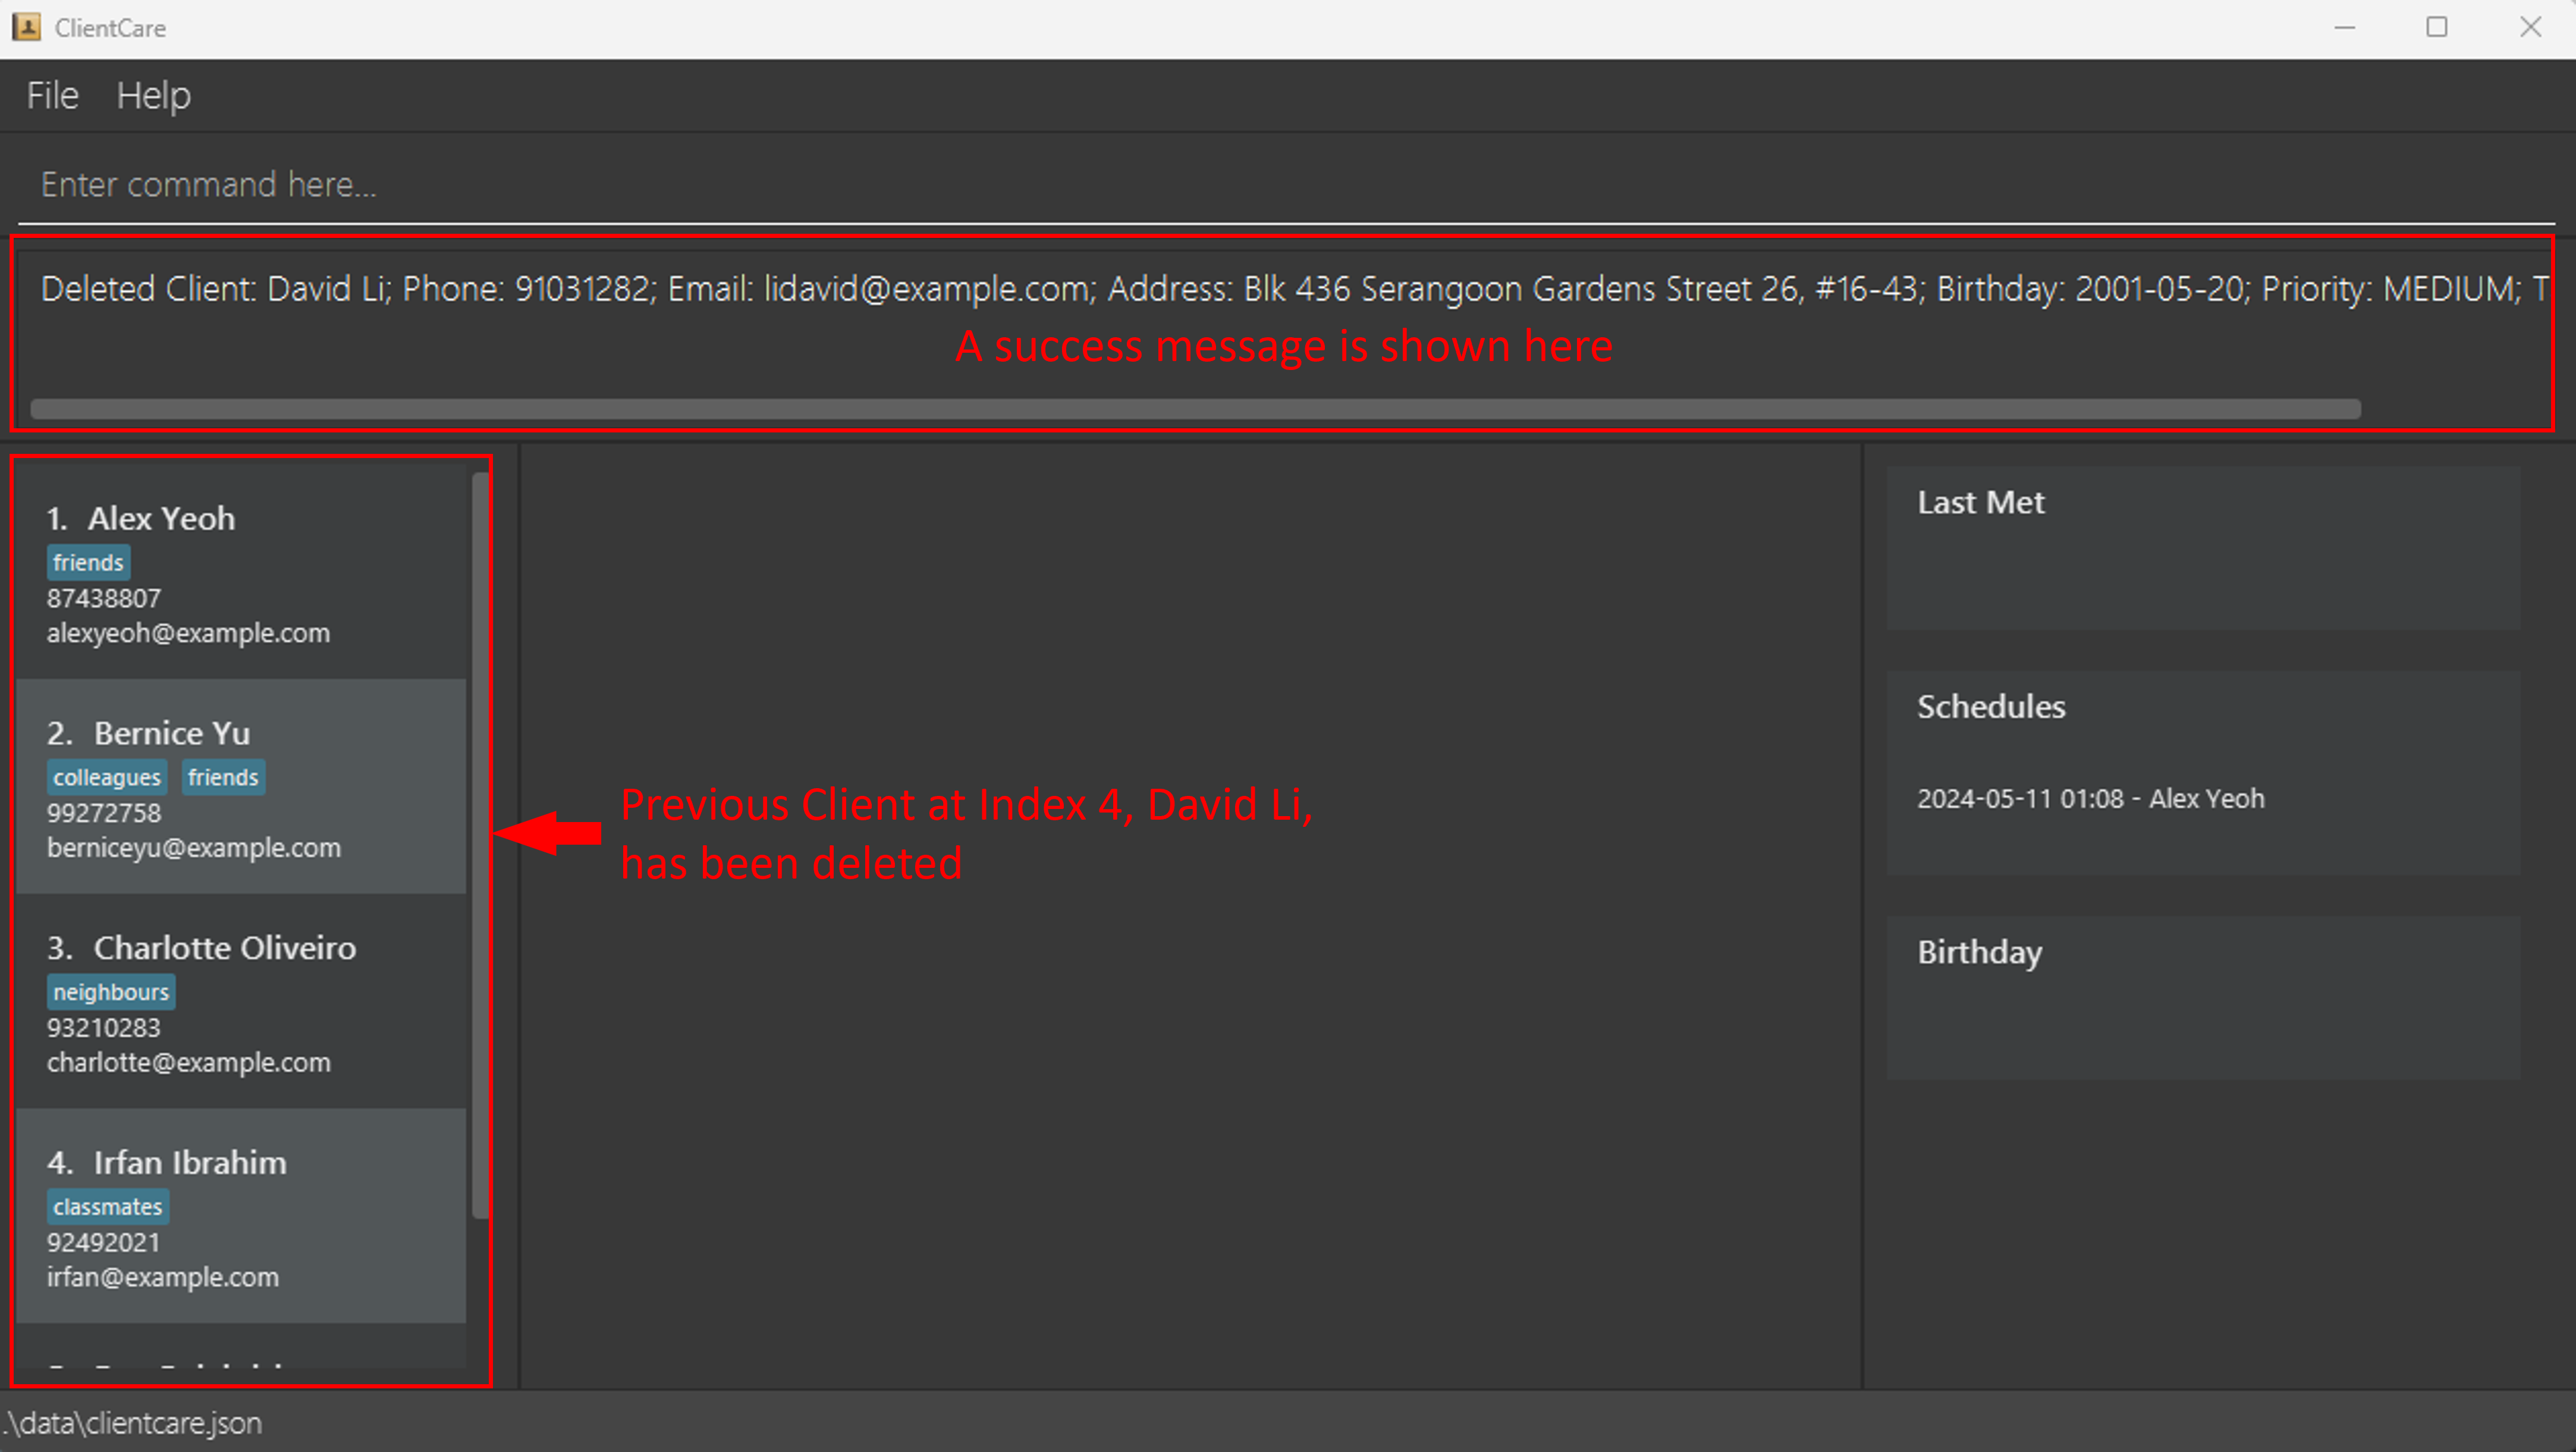
After Command:
You have now removed David Li from our client list! ClientCare shows a success message in the Feedback Display too.
Editing a client: edit
Client information is always changing! If you ever need to update your client's particulars, you can edit an existing client with edit.
Format: edit INDEX [n/NAME] [c/PHONE] [e/EMAIL] [a/ADDRESS] [d/BIRTHDAY] [p/PRIORITY] [t/TAG]…
- Edits the client at the specified
INDEX. The index refers to the index number shown in the displayed client list. The index must be a positive integer 1, 2, 3, … - At least one of the optional fields must be provided.
- Existing values will be updated to the input values.
- When editing tags, the existing tags of the client will be removed i.e. adding of tags is not cumulative.
- You can remove all the client’s tags by typing
t/without specifying any tags after it. - Refer to the Adding a client section for the usage of the fields.
Examples:
edit 1 c/91234567 e/johndoe@example.comEdits the phone number and email address of the 1st client to be91234567andjohndoe@example.comrespectively.edit 2 n/Betsy Crower t/Edits the name of the 2nd client to beBetsy Crowerand clears all existing tags.
Before Command:
Suppose you want to edit James Wee's name. He is number 7 on our client list as seen on the left.
Type the following into the Command Input: edit 7 n/James Wee Tan Pi

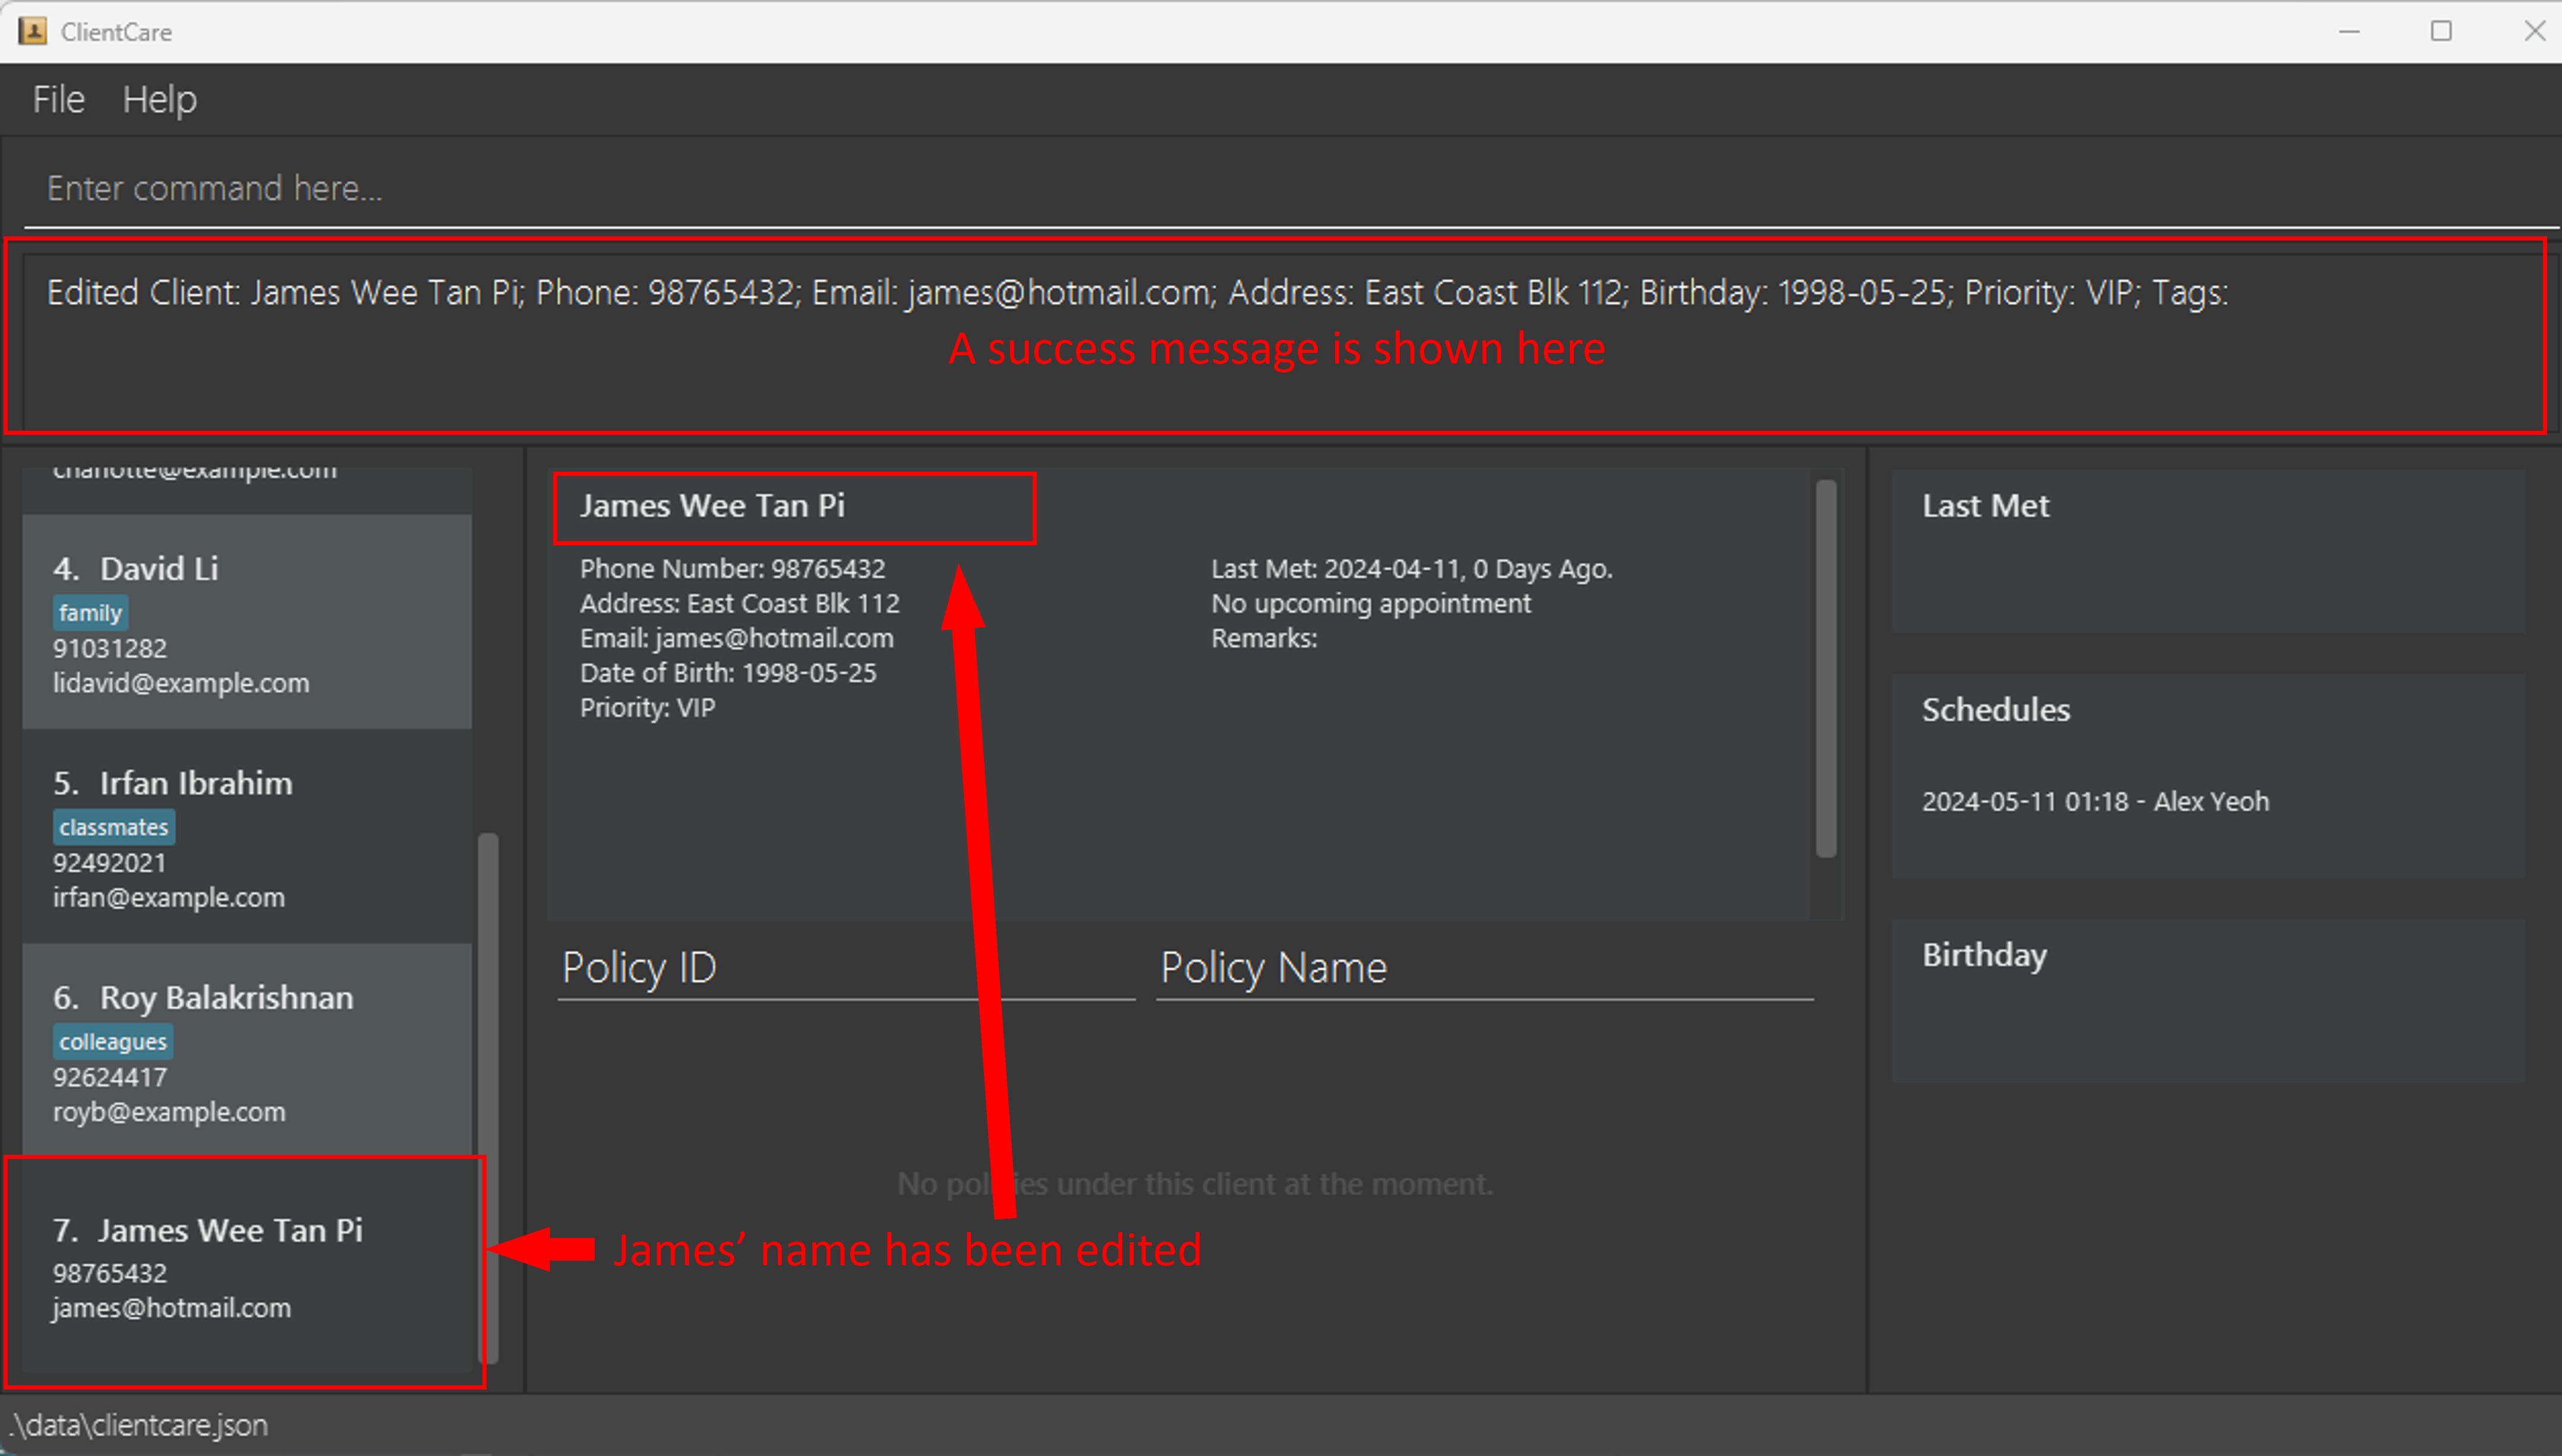
After Command:
You have updated James' name! ClientCare shows a success message in the Feedback Display too.
Listing all clients: list
After applying certain filter or finding commands, you can see all your clients again with list.
Format: list
- Extraneous fields will be ignored. For example,
list allwill be interpreted aslist.
Before Command:
Suppose after finding or filtering clients, you want to see all our clients again.
Type the following into the Command Input: list
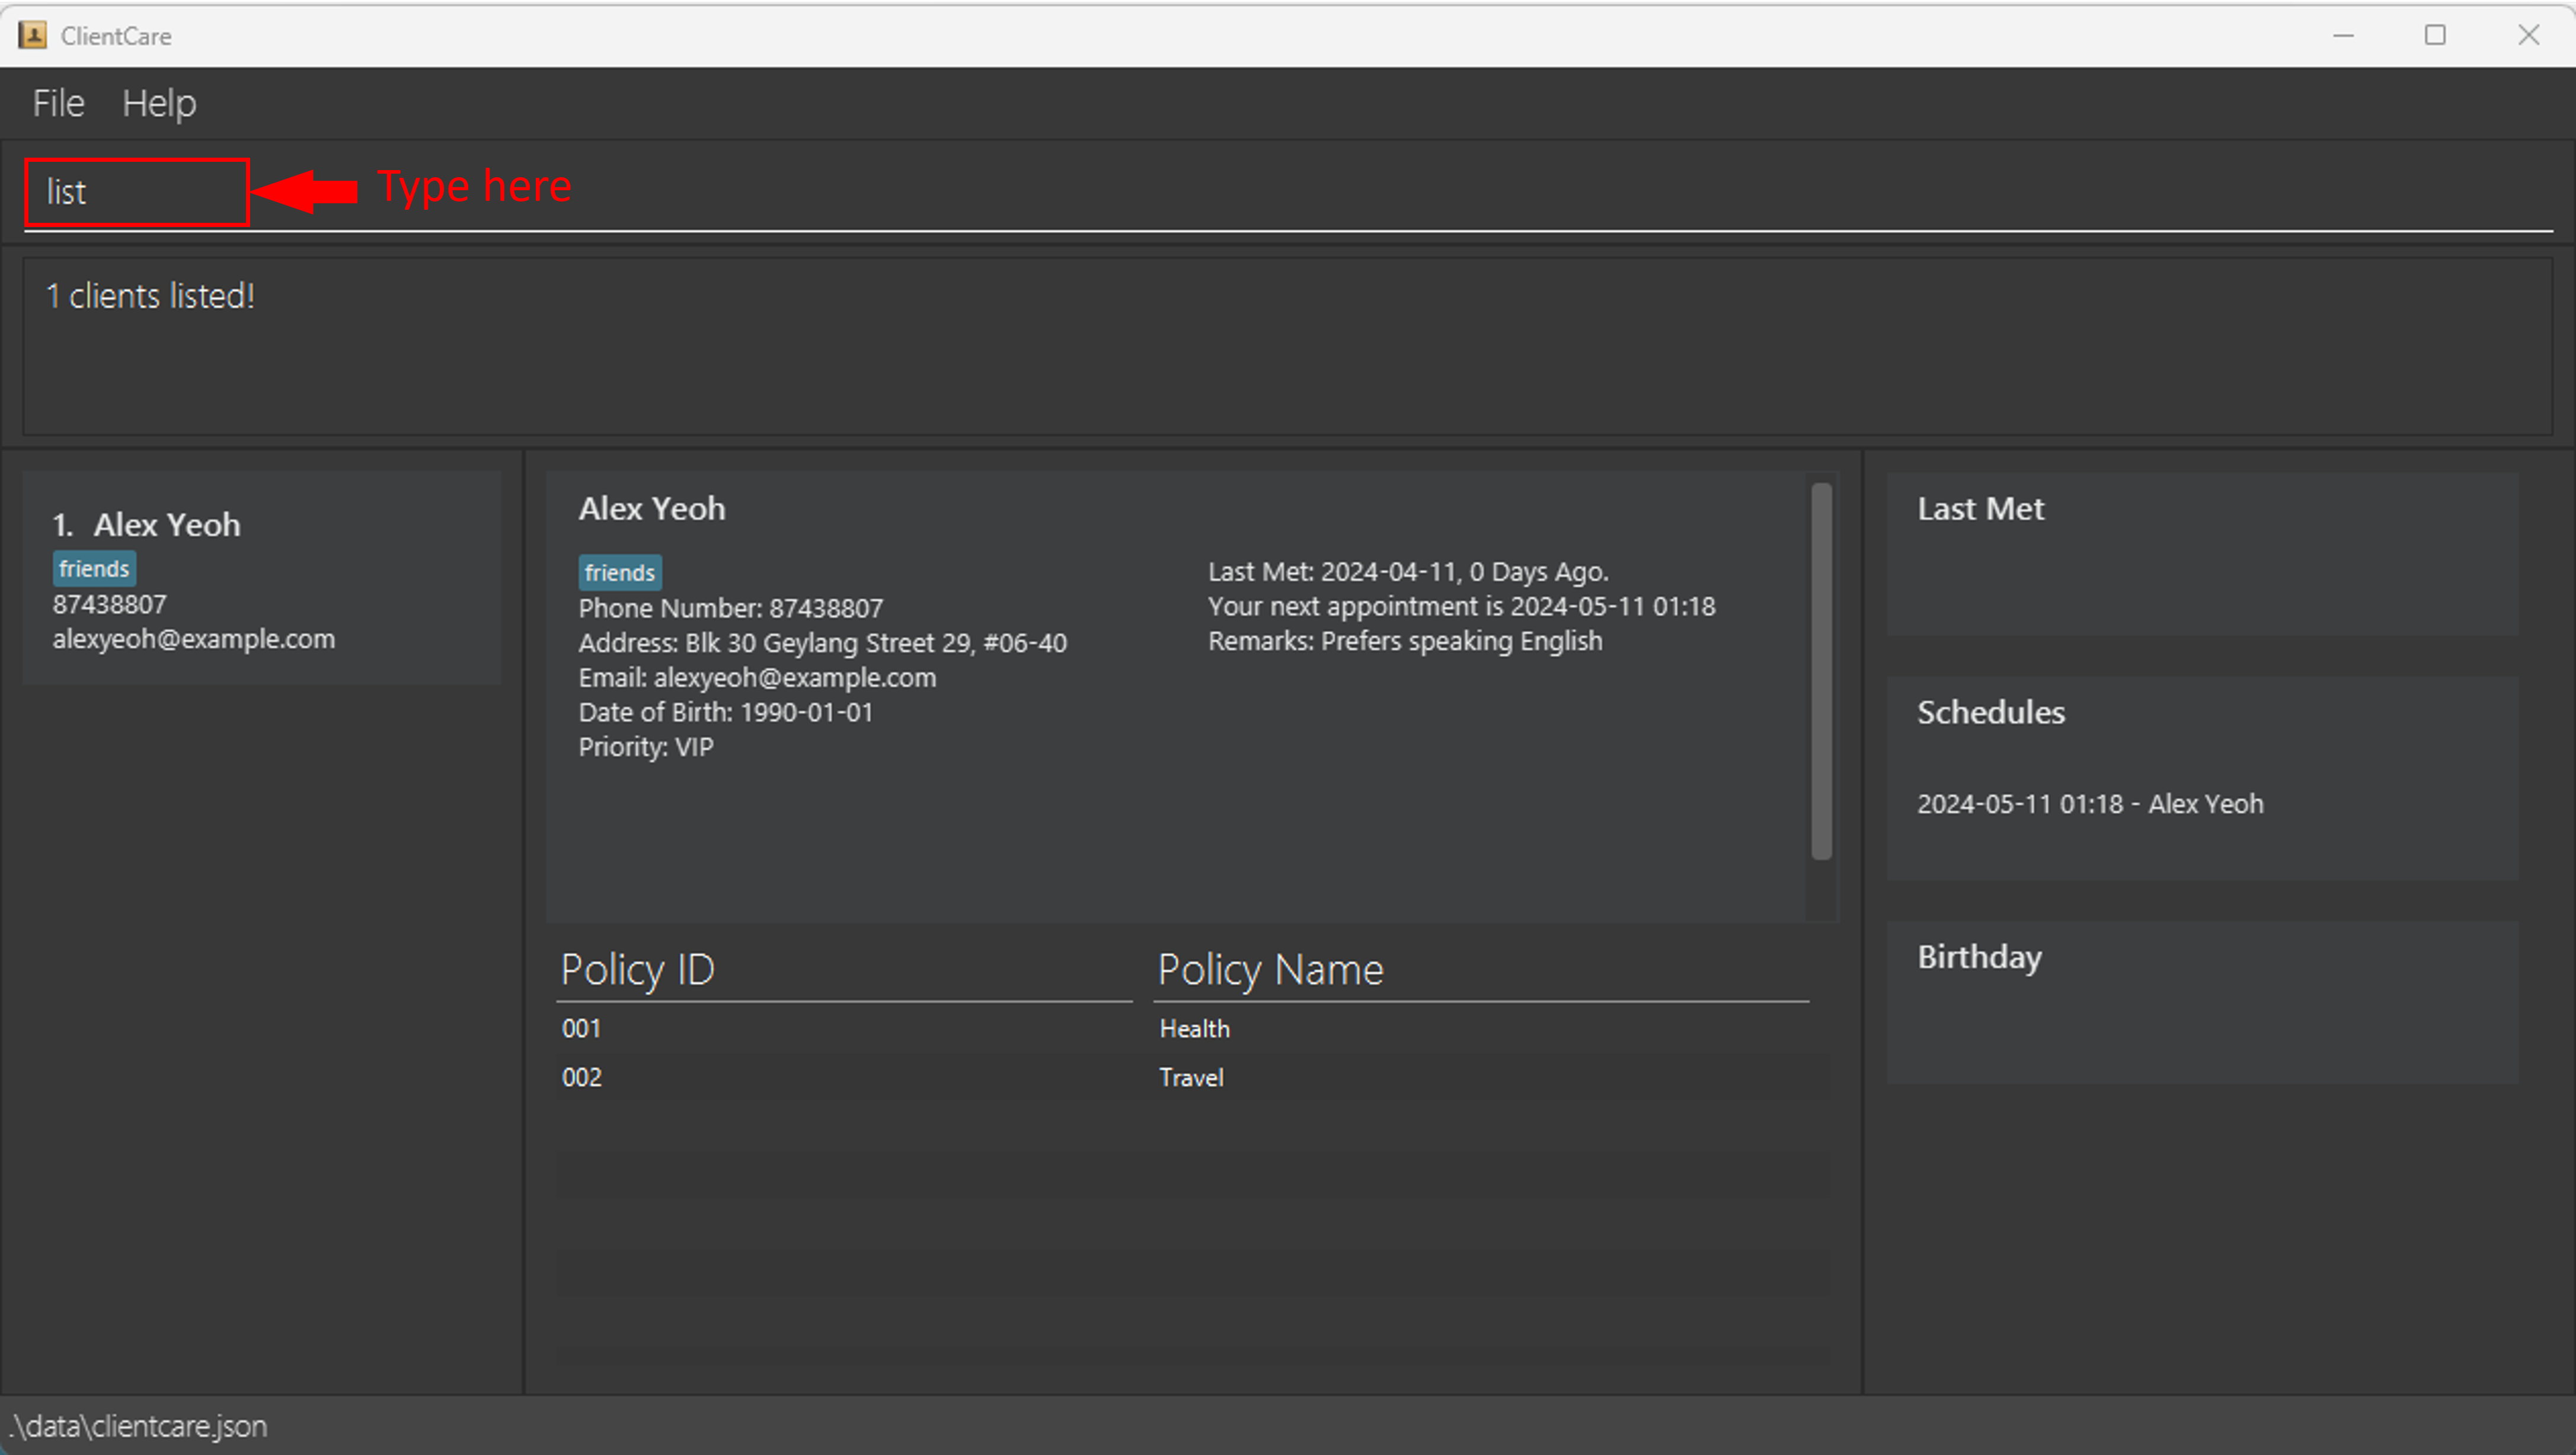
After Command:
All your clients are now listed on the client list! ClientCare shows a success message in the Feedback Display too.

Viewing a client: view
There are times when you would want to view a client's details and his policies in detail. You can do so with view.
Format: view INDEX
- Views the client at the specified
INDEX. - The index refers to the index number shown in the displayed client list.
- The index must be a positive integer 1, 2, 3, …
Examples:
listfollowed byview 2views the 2nd client in the client list.find Betsyfollowed byview 1views the 1st client in the results of thefindcommand.
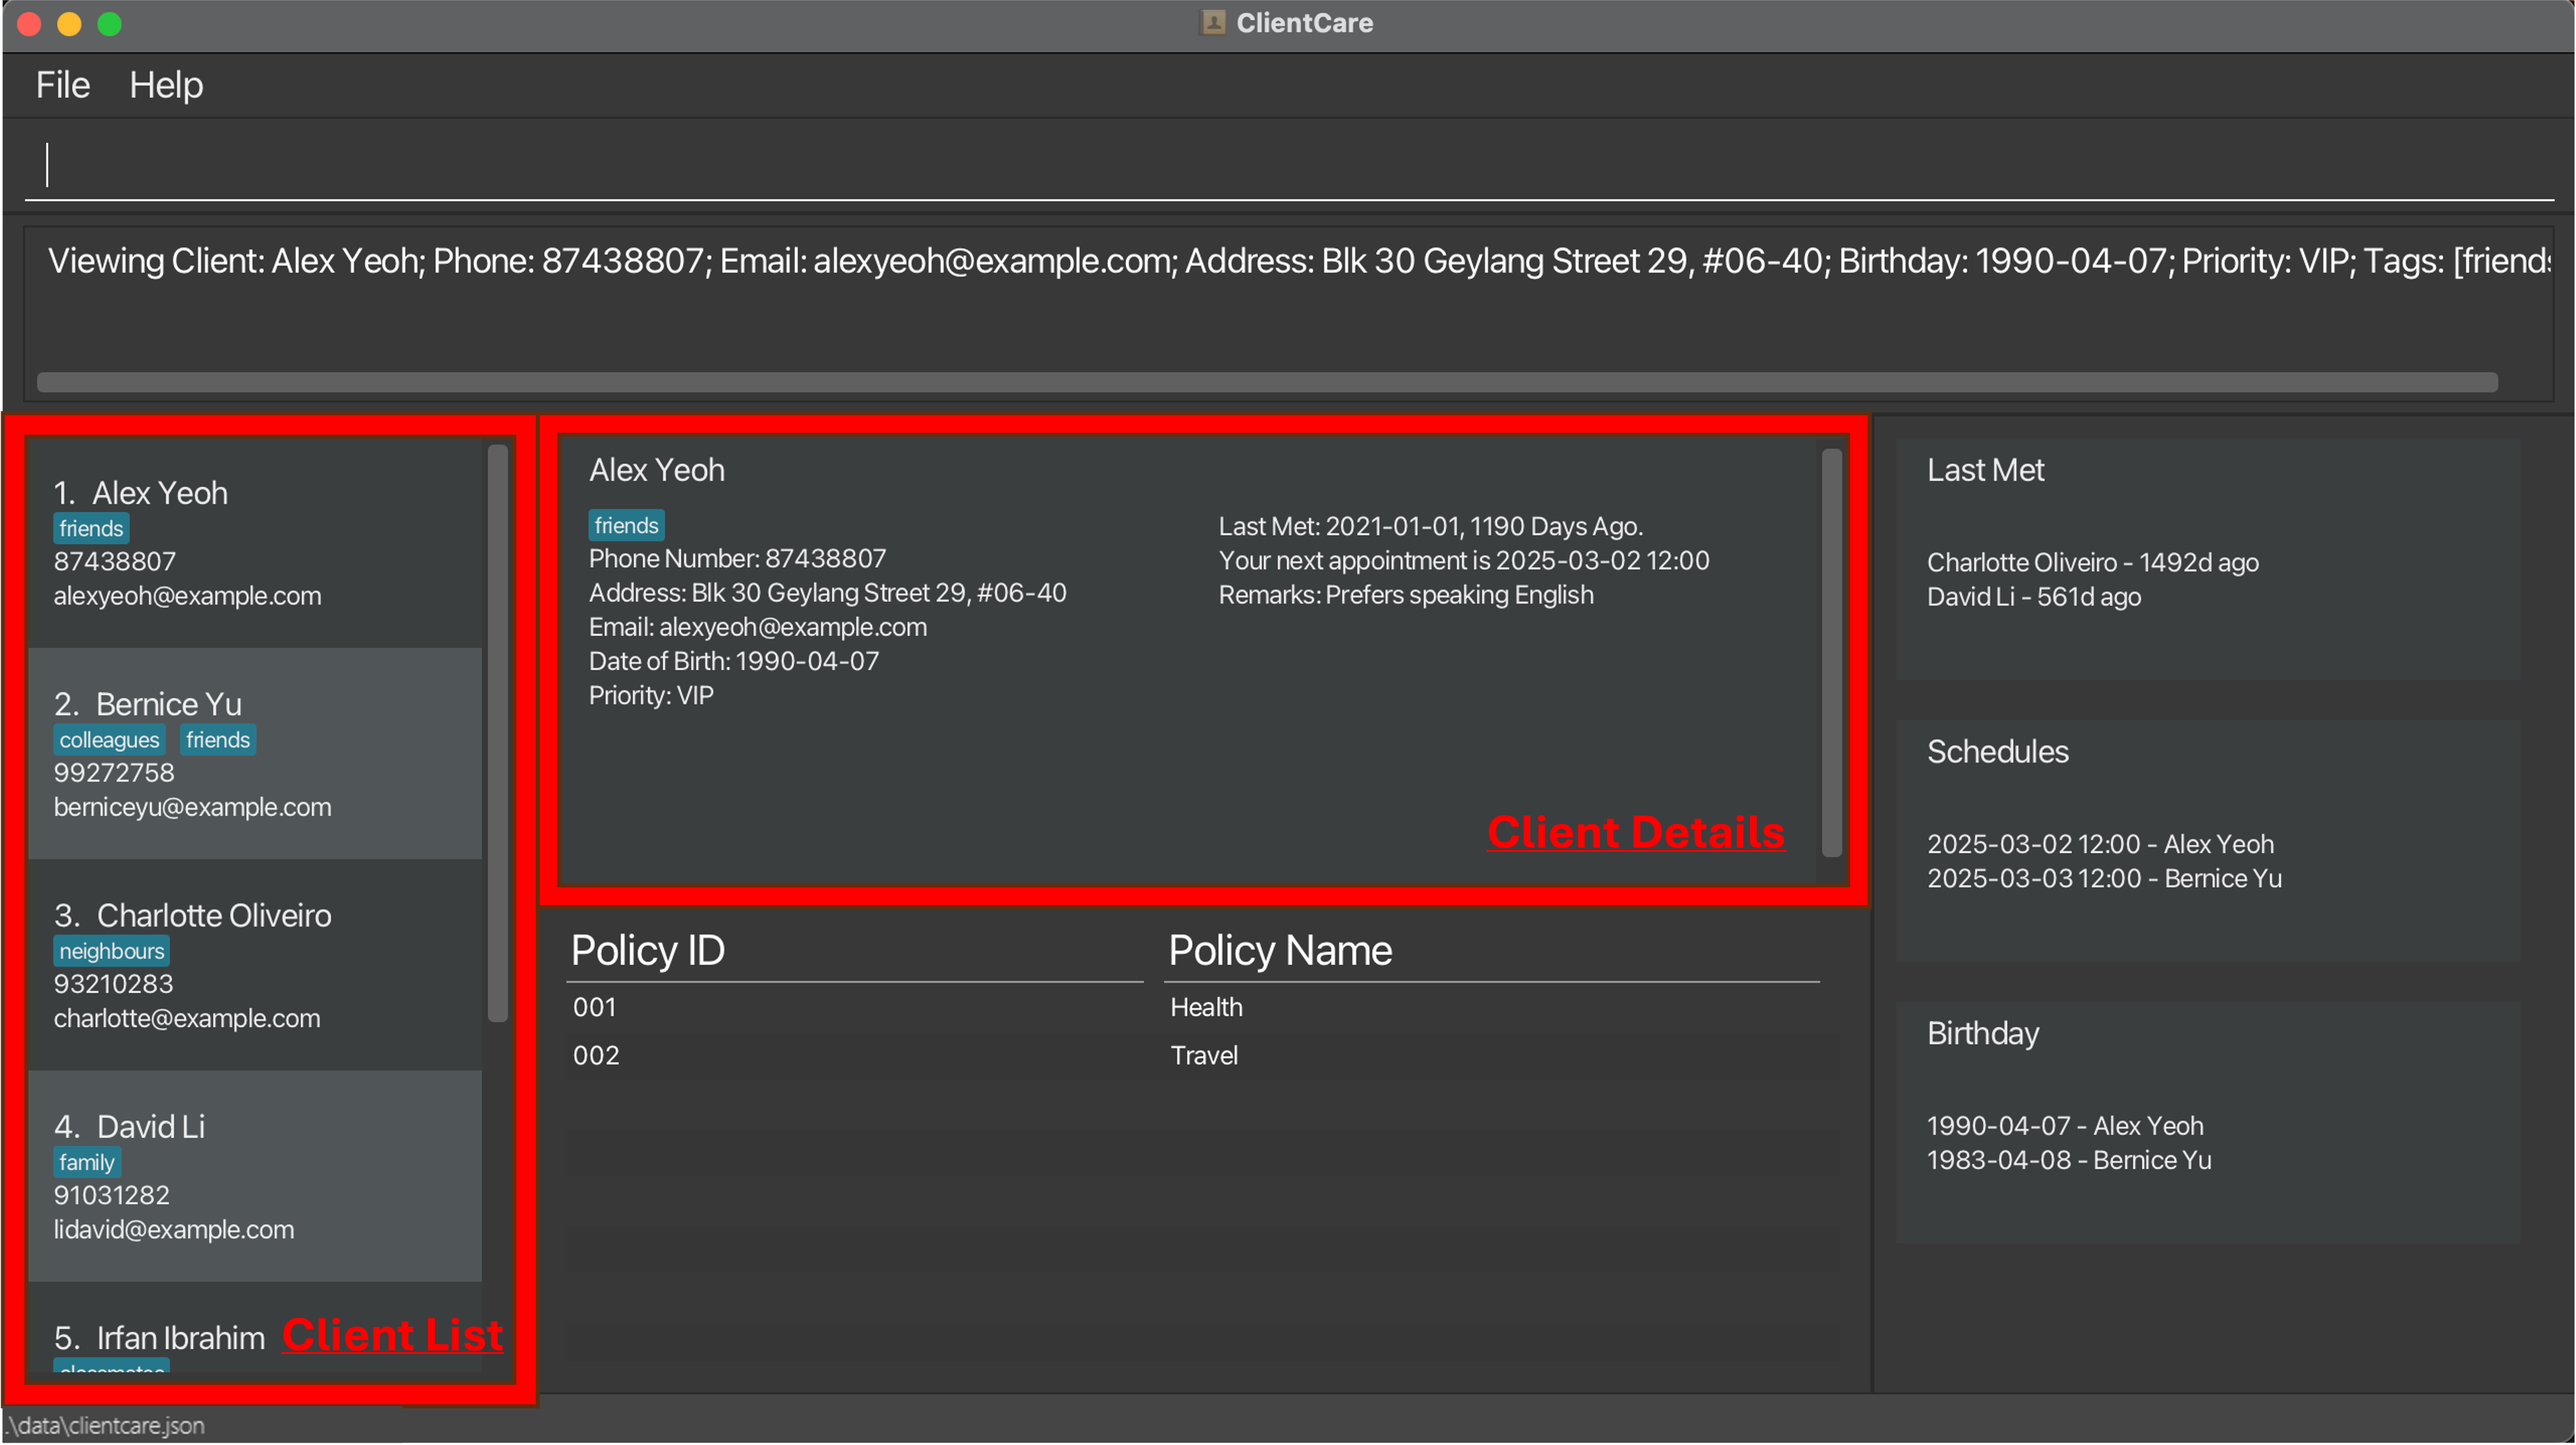
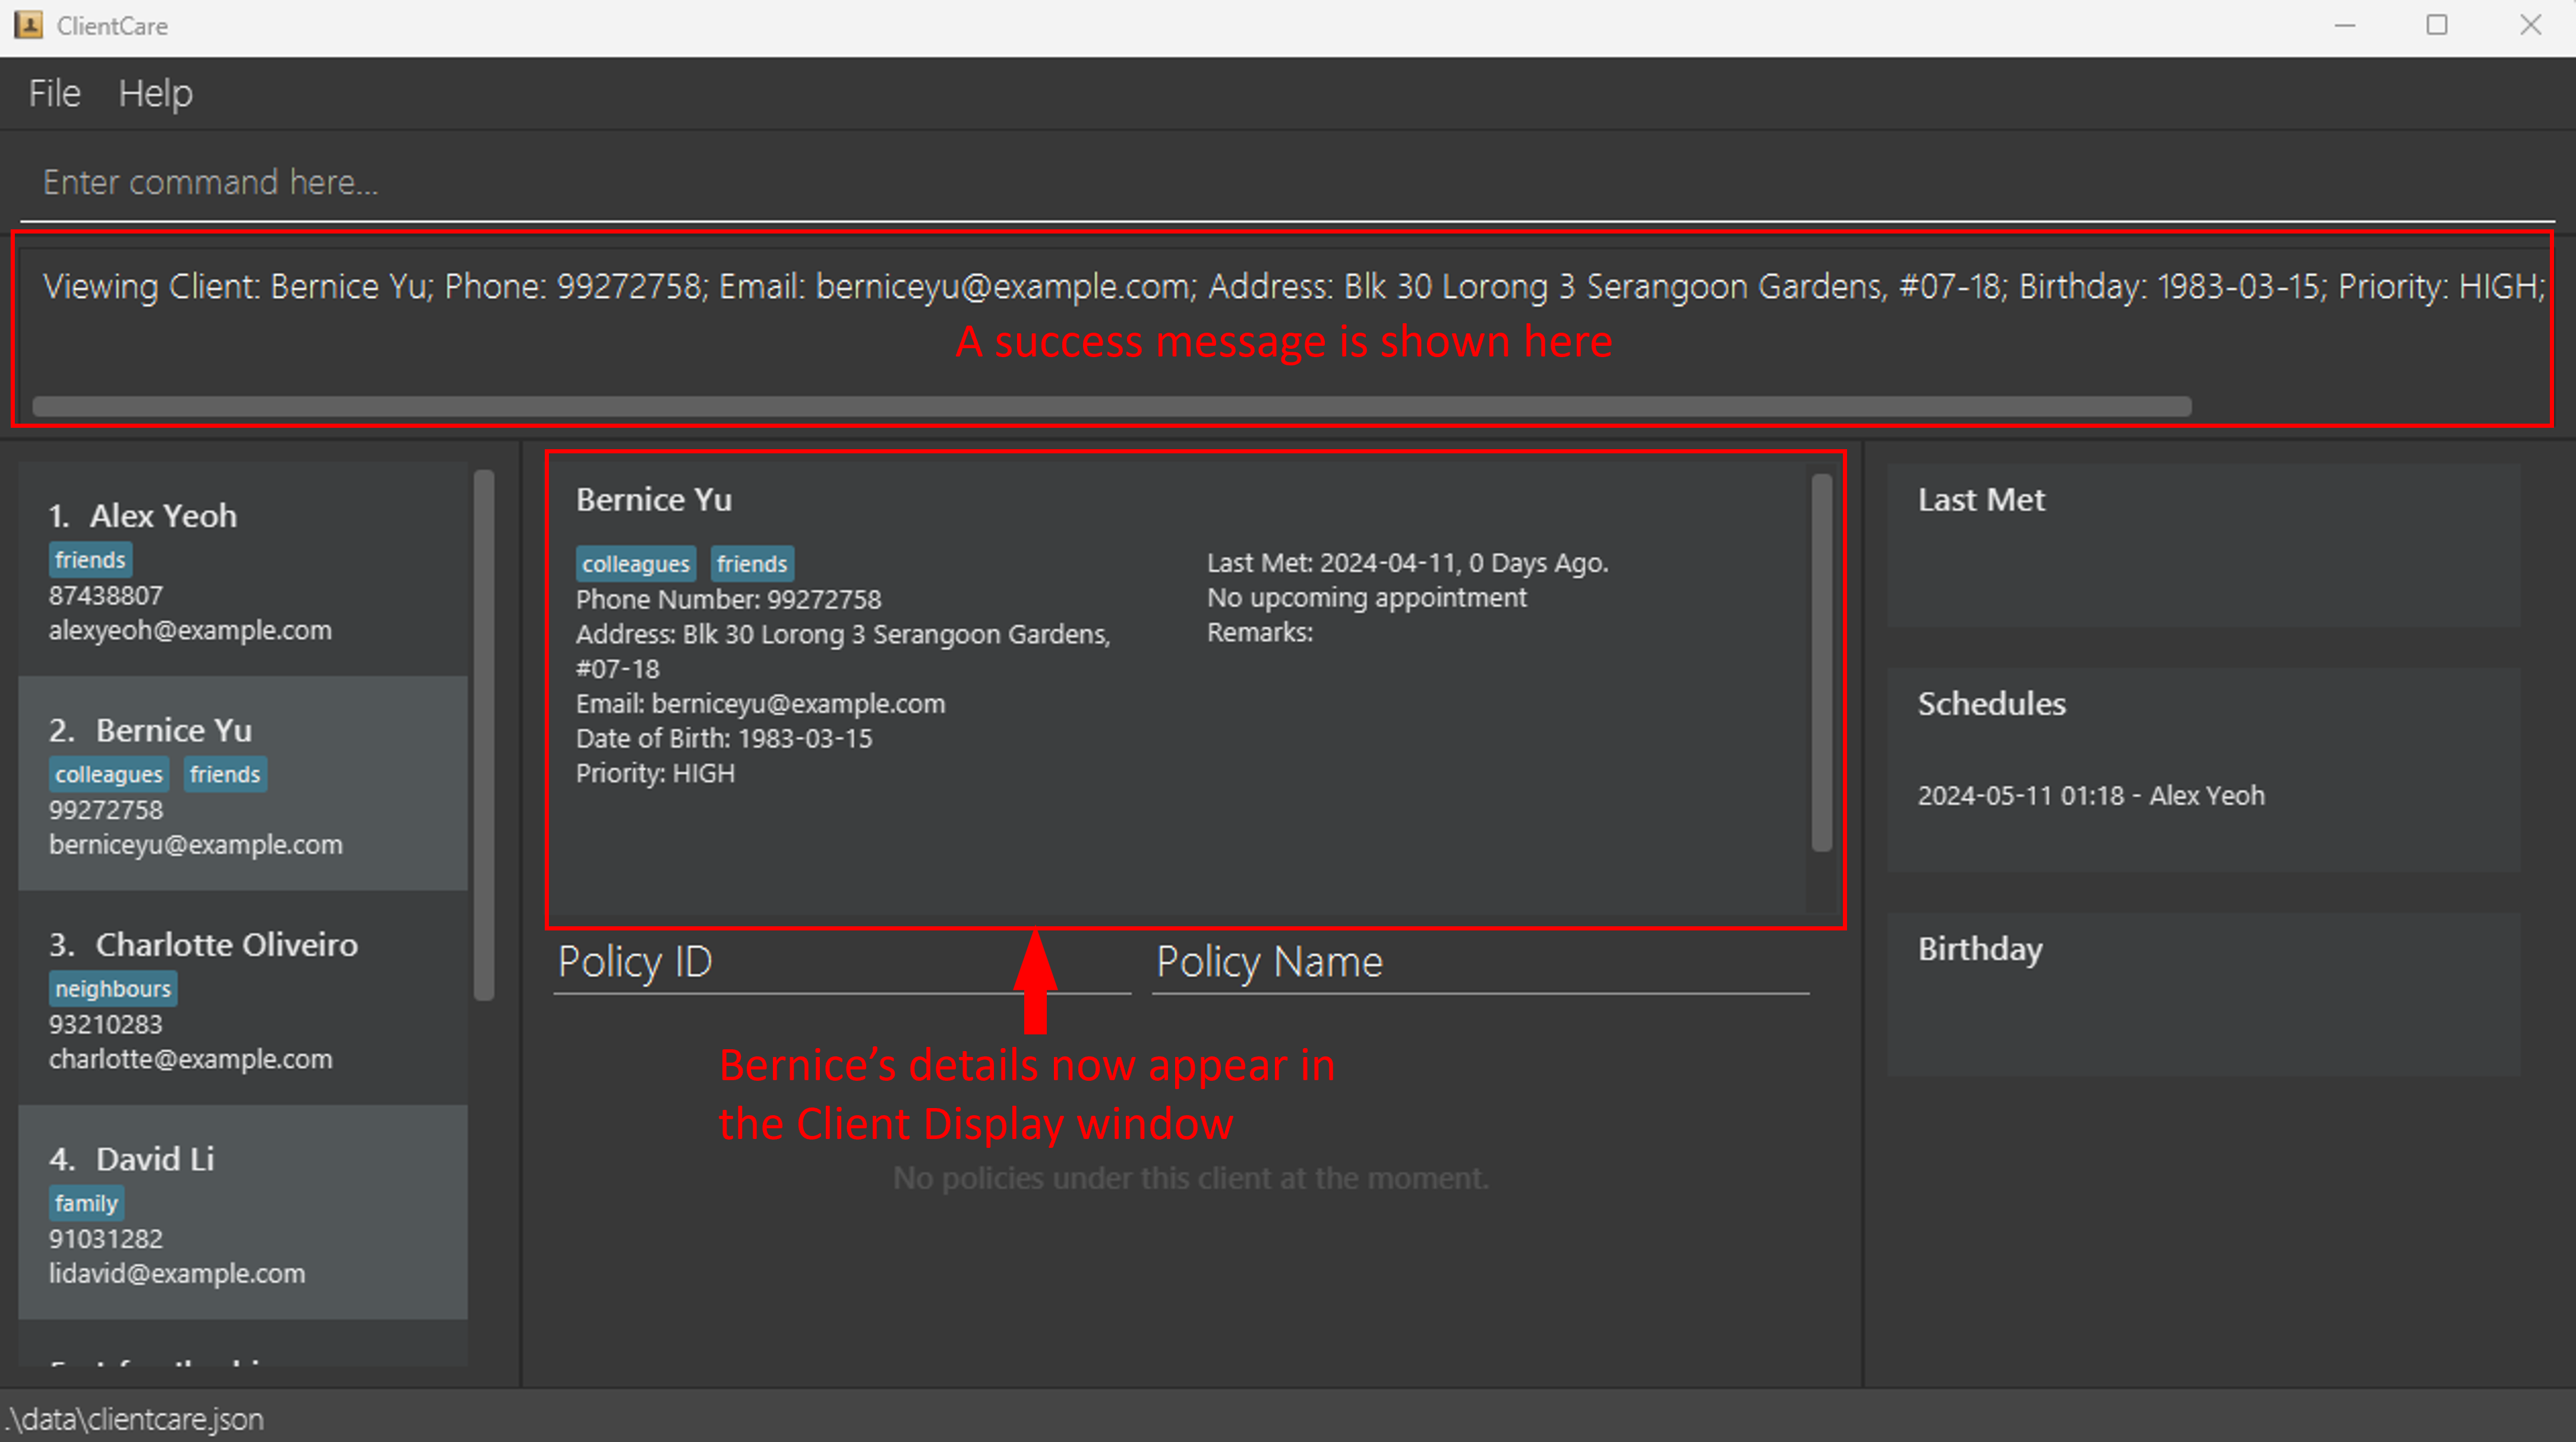
Before Command:
Suppose you want to see Bernice Yu's particulars in greater detail. Bernice Yu is number 2 on the client list.
Type the following into the Command Input: view 2
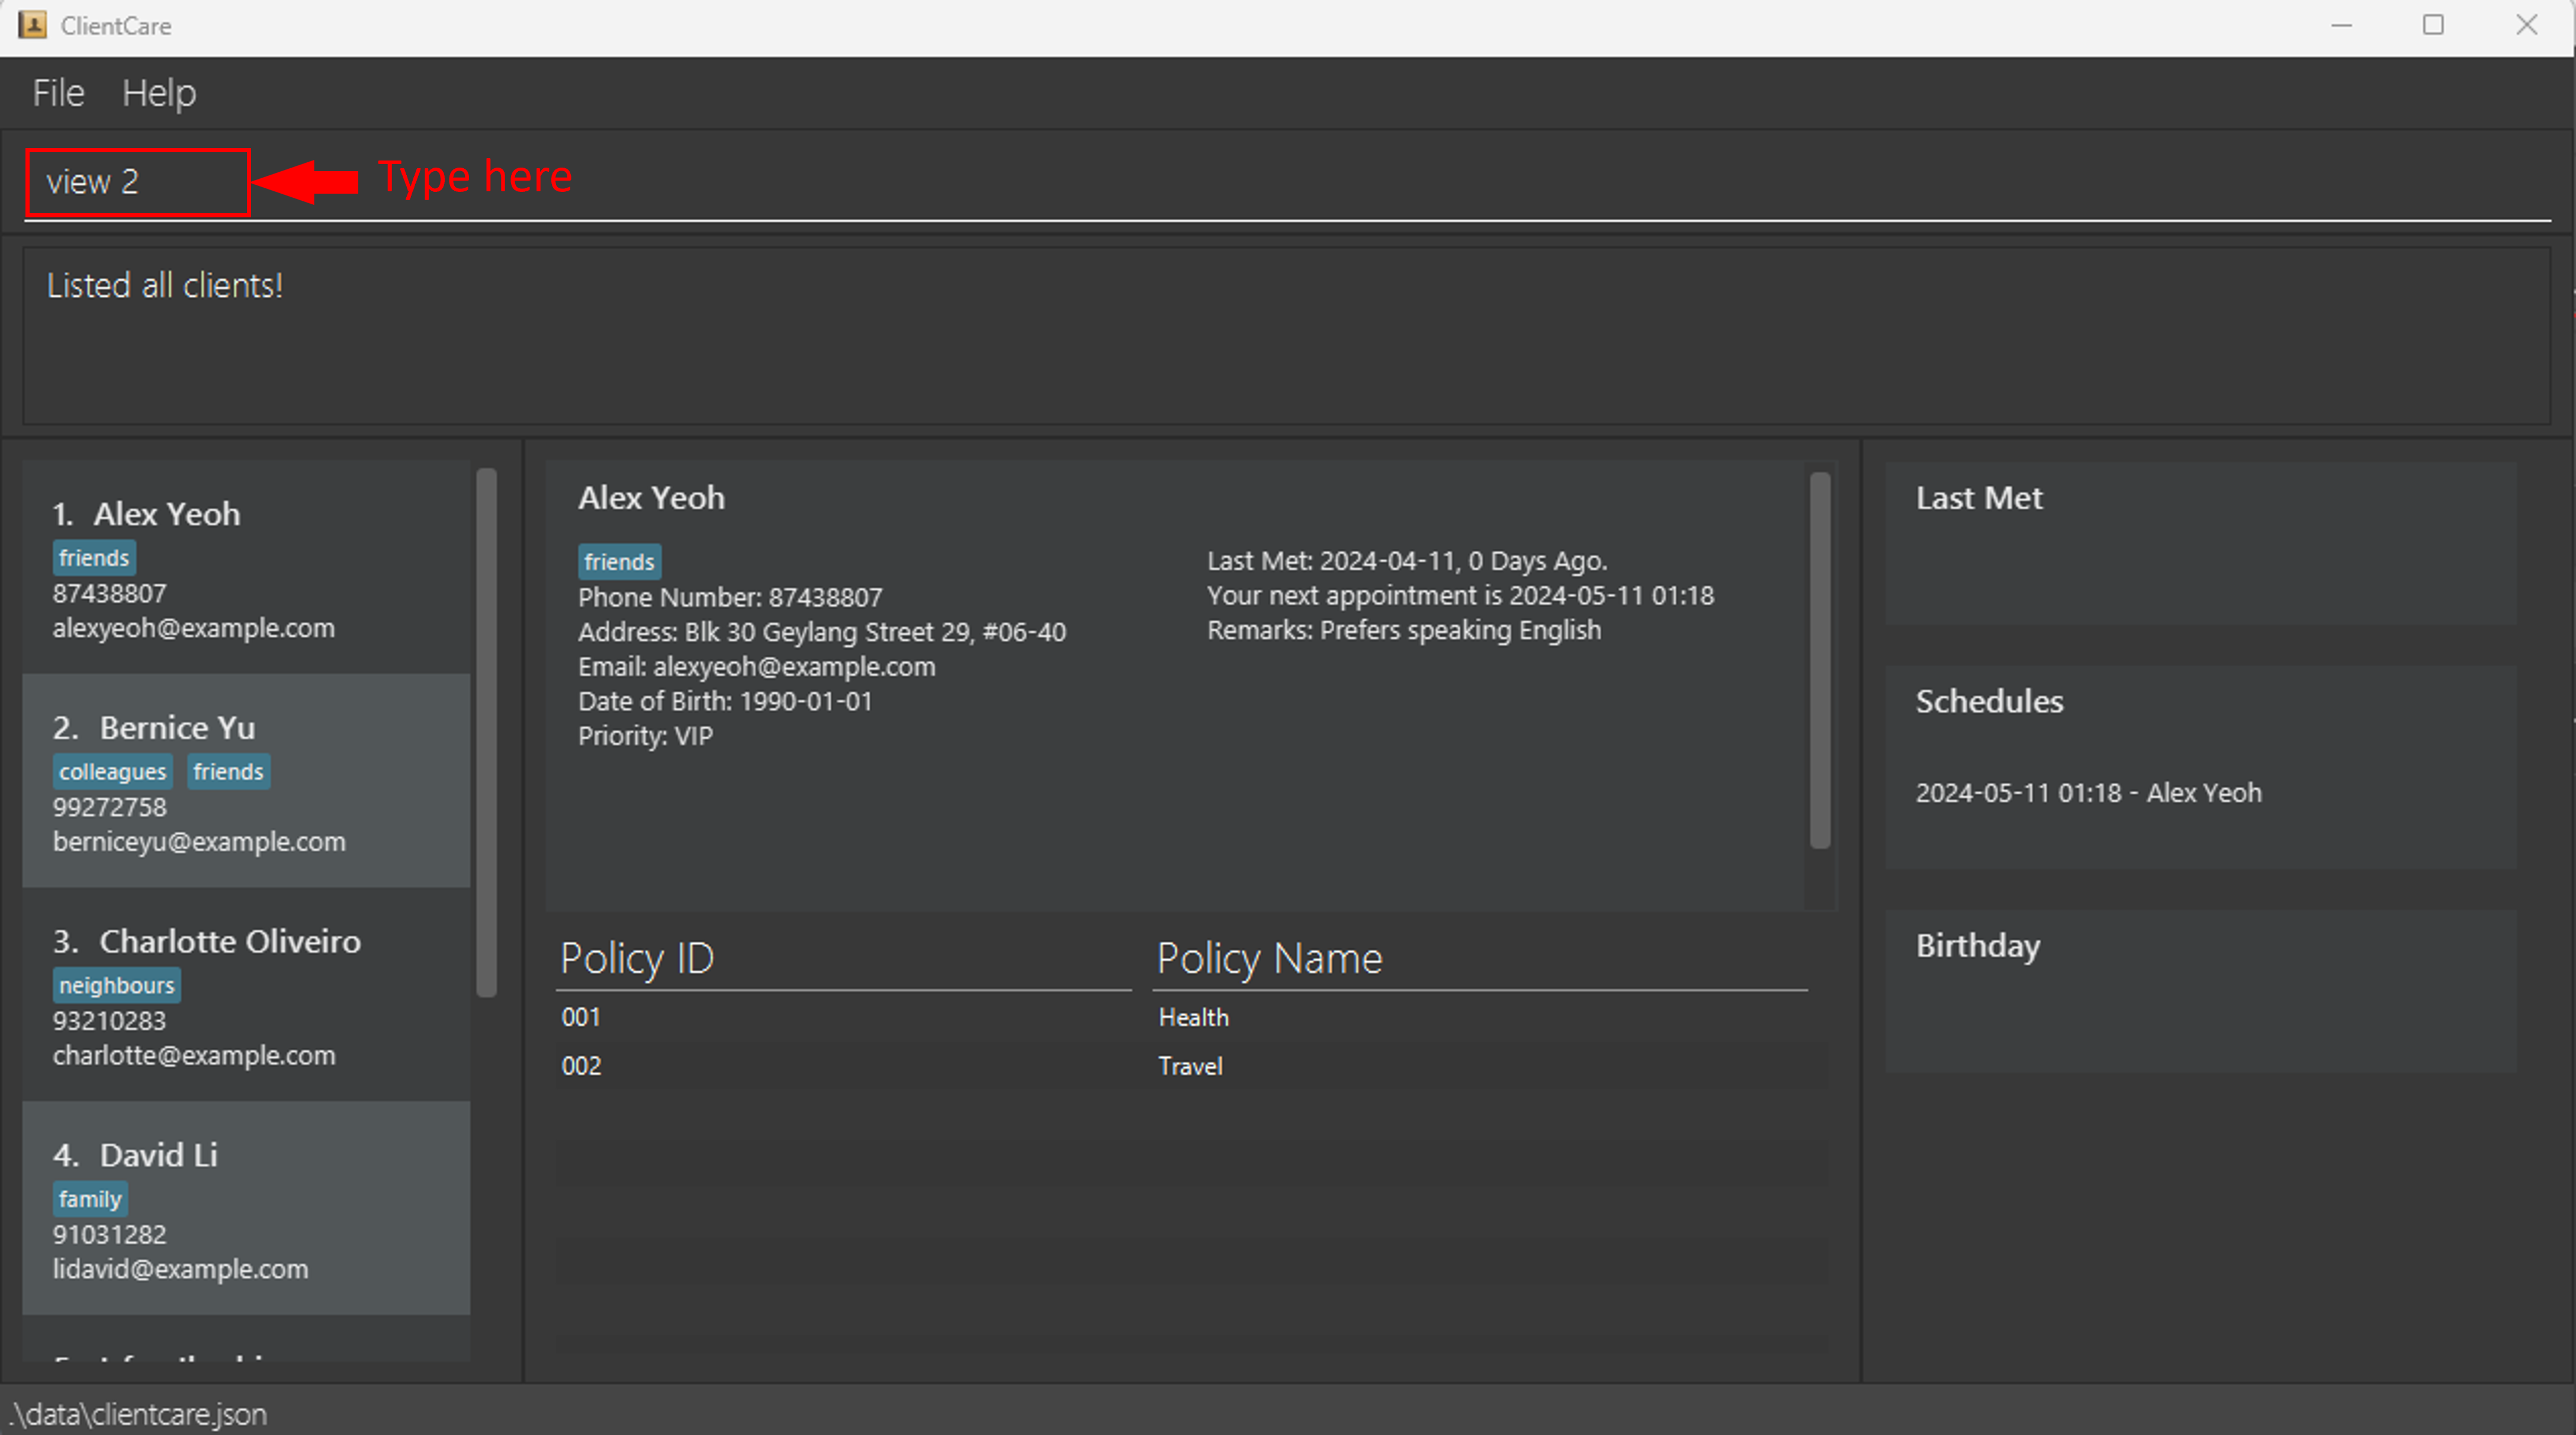
After Command:
You can now see Bernice Yu's particulars appearing in the Client Display window! ClientCare shows a success message in the Feedback Display too.
Finding client by name: find
Is your client list too long? You can look for a client with find.
Client whose names contain any of the given keywords will show up!
Format: find KEYWORD [MORE_KEYWORDS]...
- The search is case-insensitive. e.g
hanswill matchHans. - The order of the keywords does not matter. e.g.
Hans Bowill matchBo Hans. - Only the name is searched.
- Only full words will be matched e.g.
Hanwill not matchHans.
Examples:
find JohnreturnsjohnandJohn Doefind alex davidreturnsAlex Yeoh,David Li
Tip: You can use find to more easily find the client you want for commands that require a client INDEX!
Before Command:
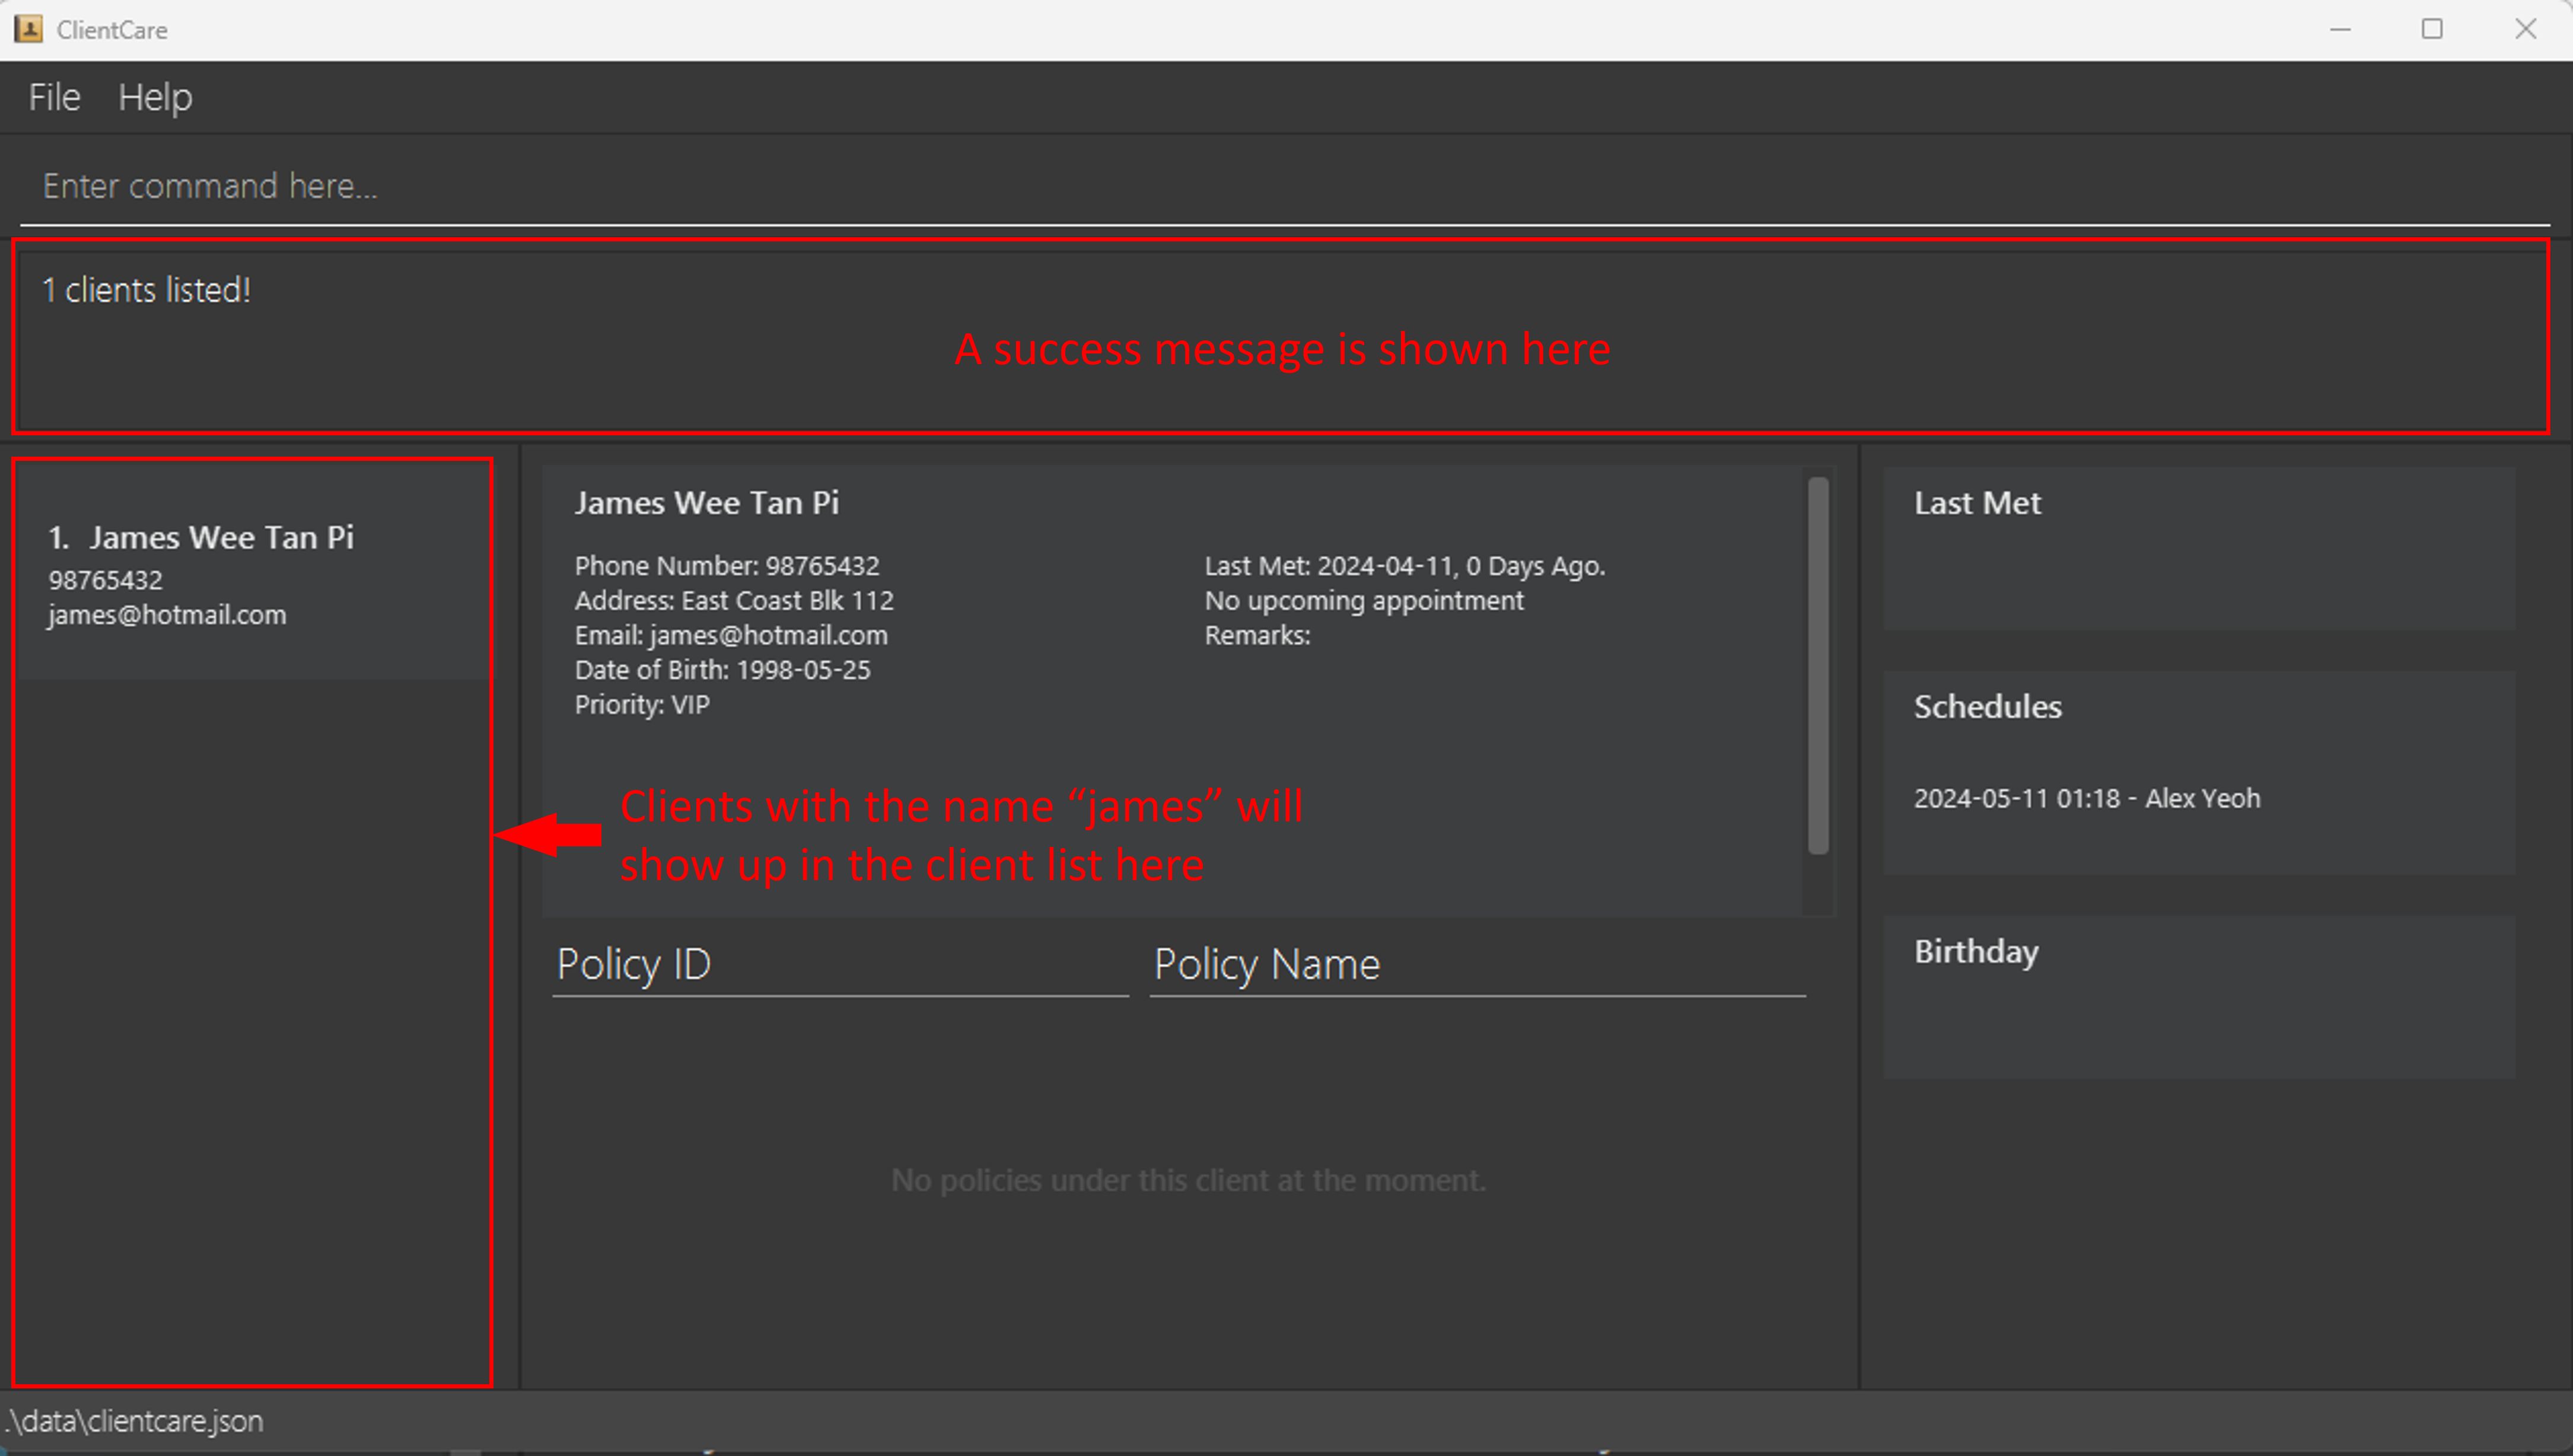
Suppose you want to find James in your client list.
Type the following into the Command Input: find james
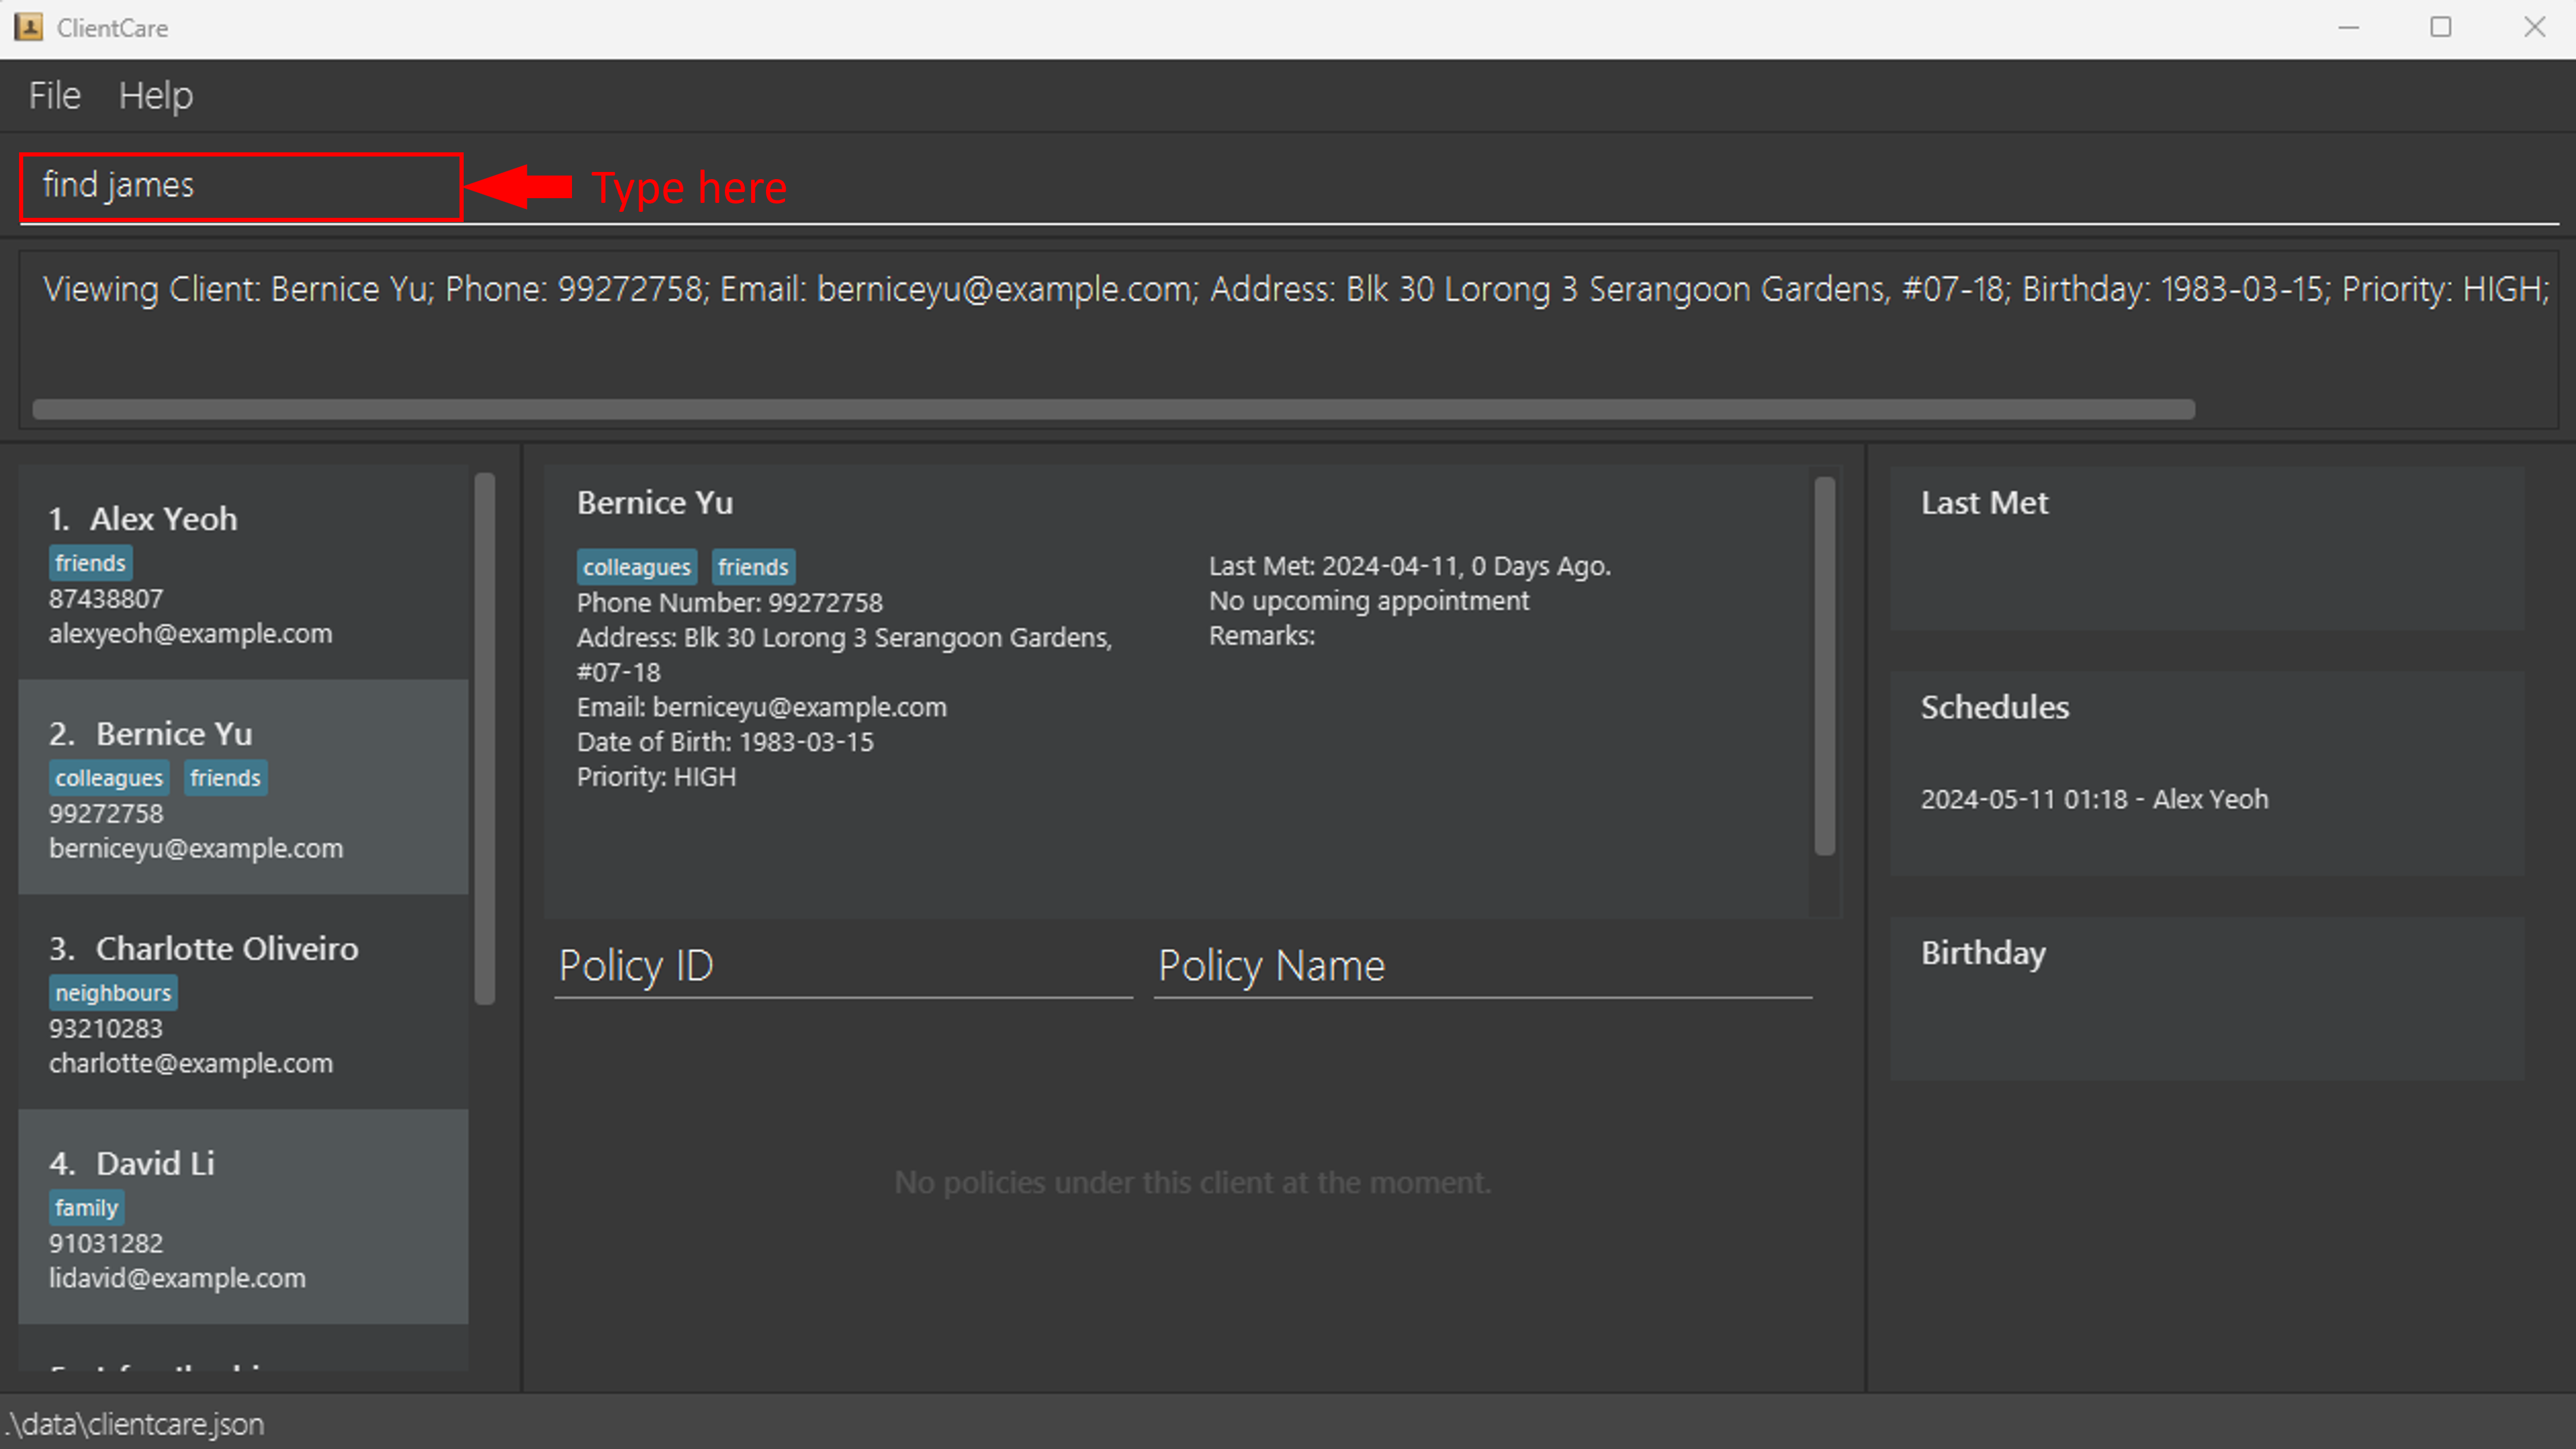
After Command:
All clients whose name contains the word "james" will now show up in the client list. ClientCare shows a success message in the Feedback Display too.
Adding notes to a client: remark
Need to remember certain information about a client such as his preference or health conditions?
You can add notes to each client with remark. If a current remark exists, it will be replaced with the new remark.
Format: remark INDEX [r/REMARK]
- Adds a note to the client at the specified
INDEX. - The index refers to the index number shown in the displayed client list.
- The index must be a positive integer 1, 2, 3, …
- If
r/REMARKis not present, or if nothing is typed afterr/, the current remark for the client will be removed.
Examples:
remark 2 r/Has 2 school-age children and 1 elderly dependentadds a remark for the 2nd client in the client list.remark 1orremark 1 r/deletes the remark for the 1st client in the client list.
Tip: If you make a typo in your remark, you don't have to delete everything again! Just add a second prefix, for example: remark 1 r/Speeks Enngliish r/Speaks English will only save Speaks English.
Note: ClientCare allows you to put up to about 550 characters for REMARK before characters are truncated in fullscreen. The limit might vary depending on your screen size, so do check if the remark is fully displayed.
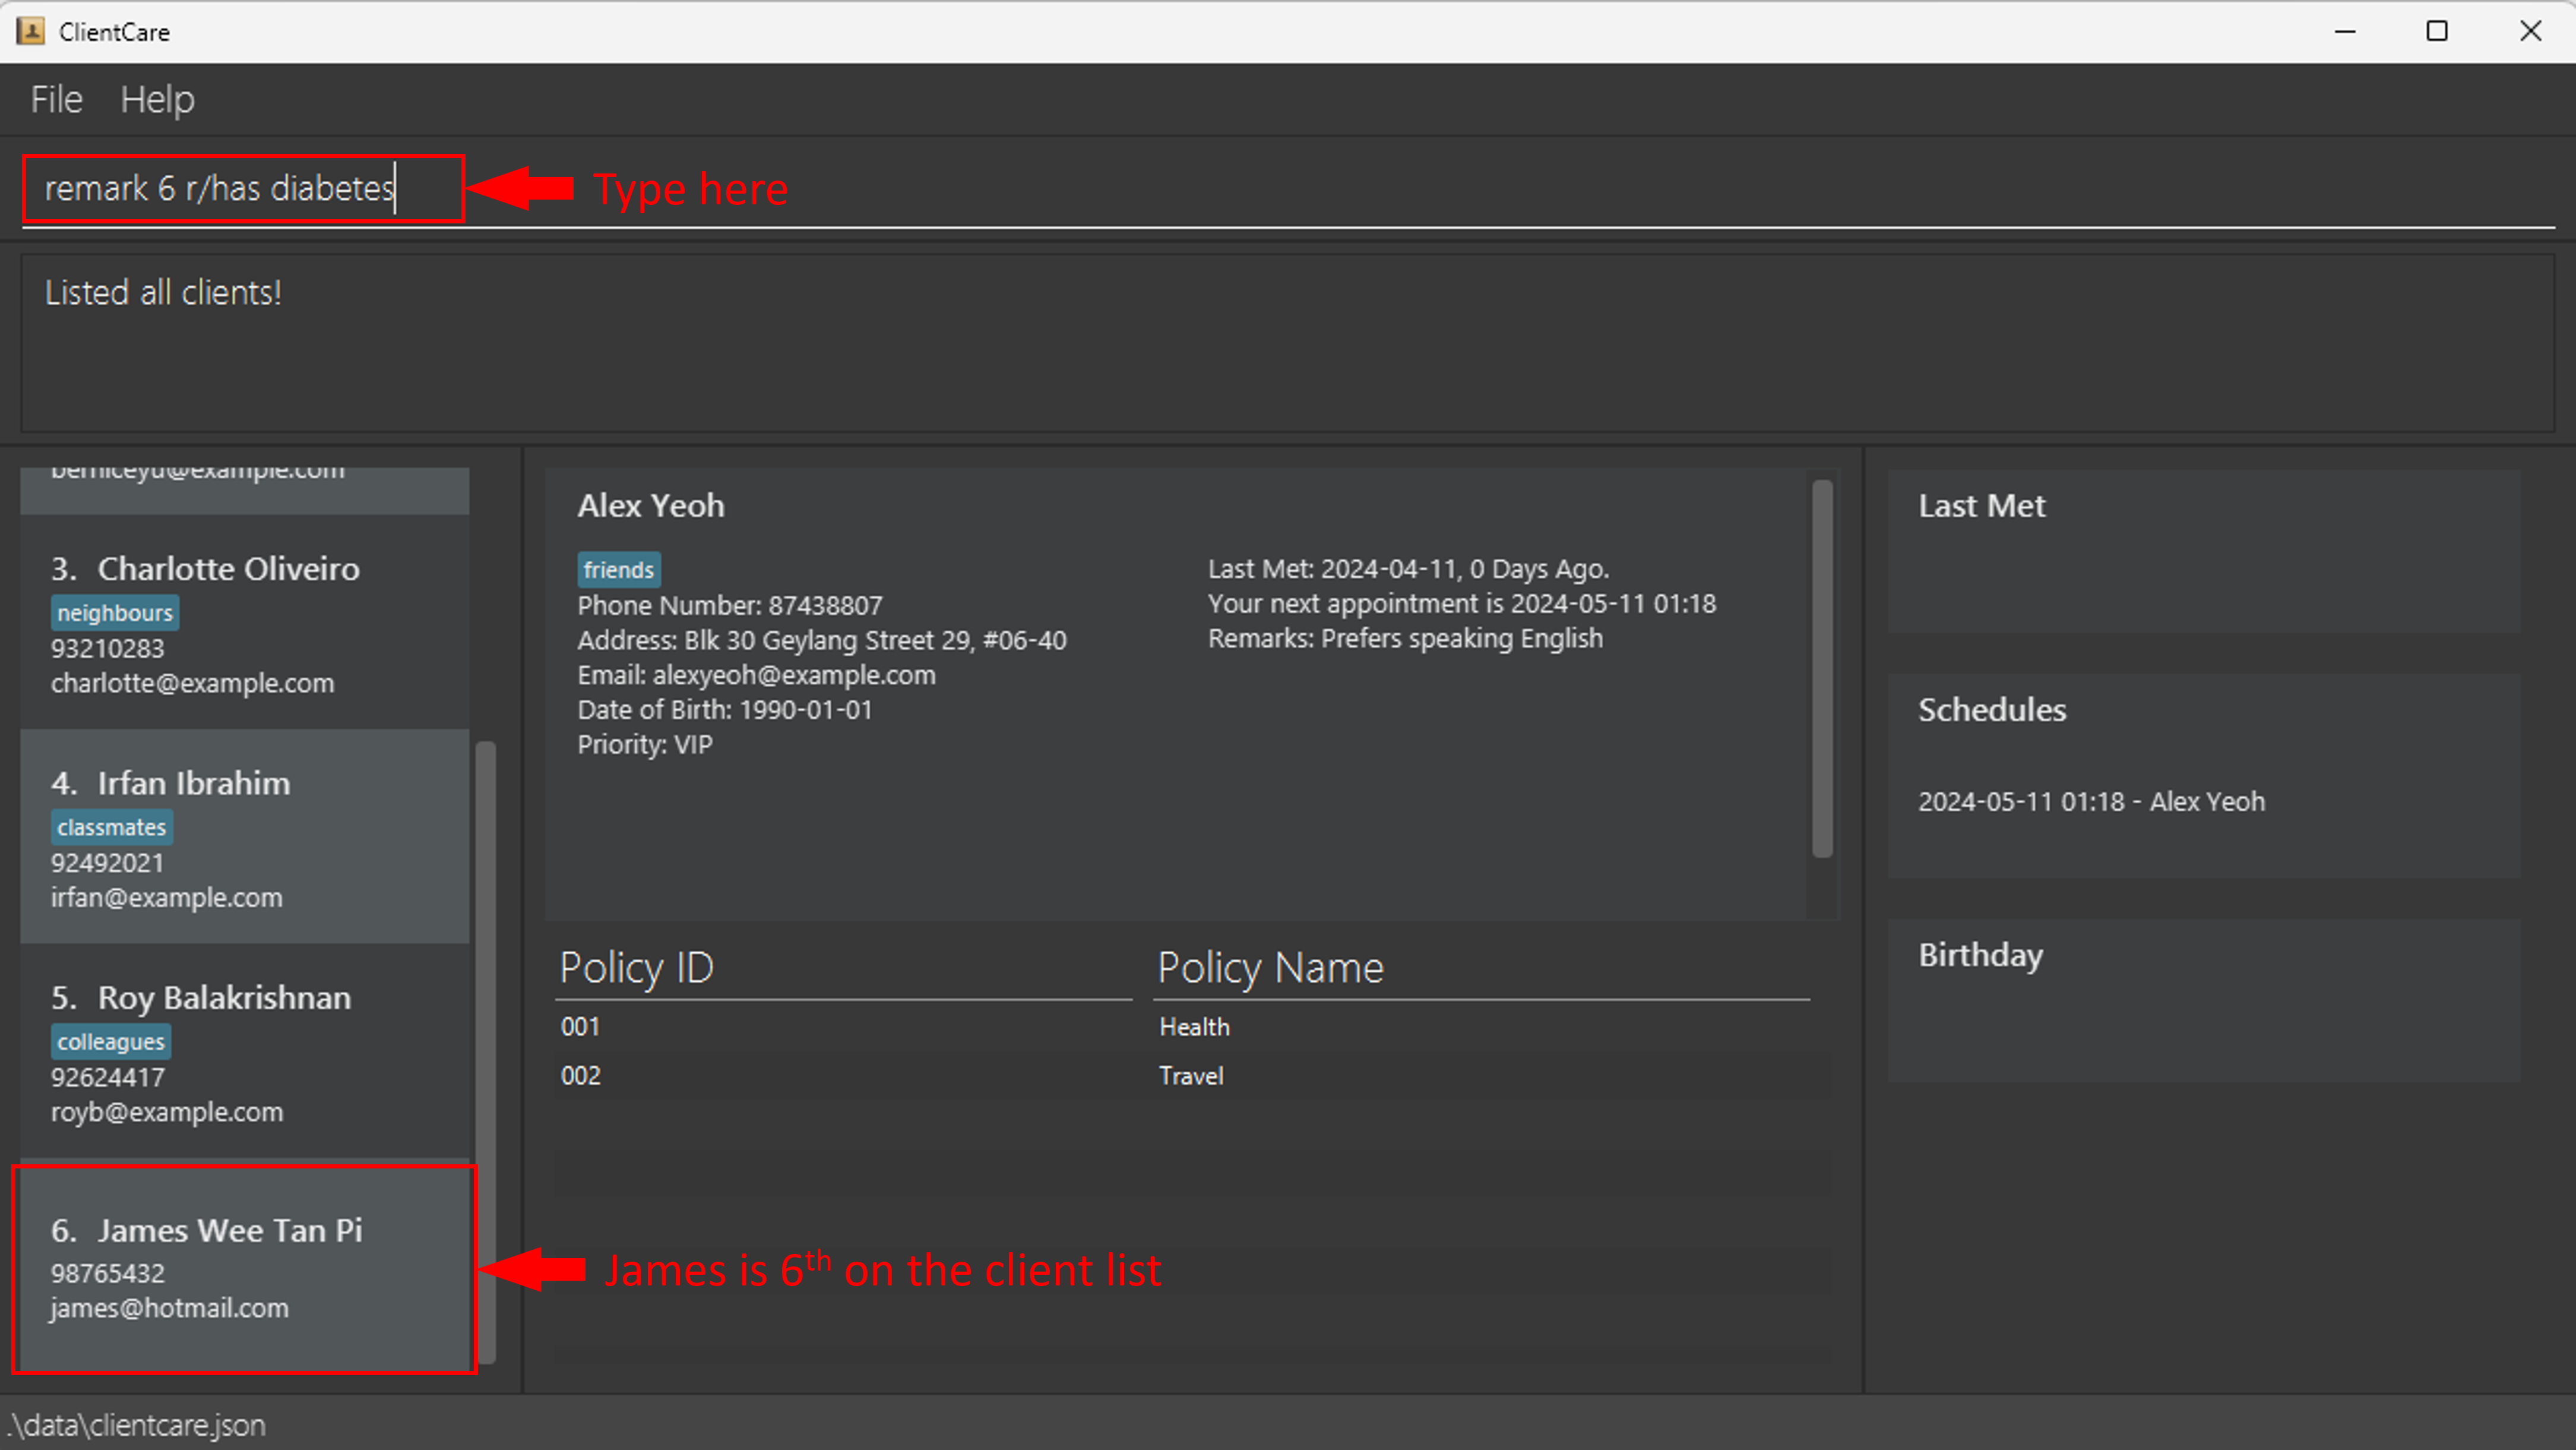
Before Command:
Suppose you want to add a note about James that he has diabetes. James is number 6 on the client list.
Type the following into the Command Input: remark 6 r/has diabetes
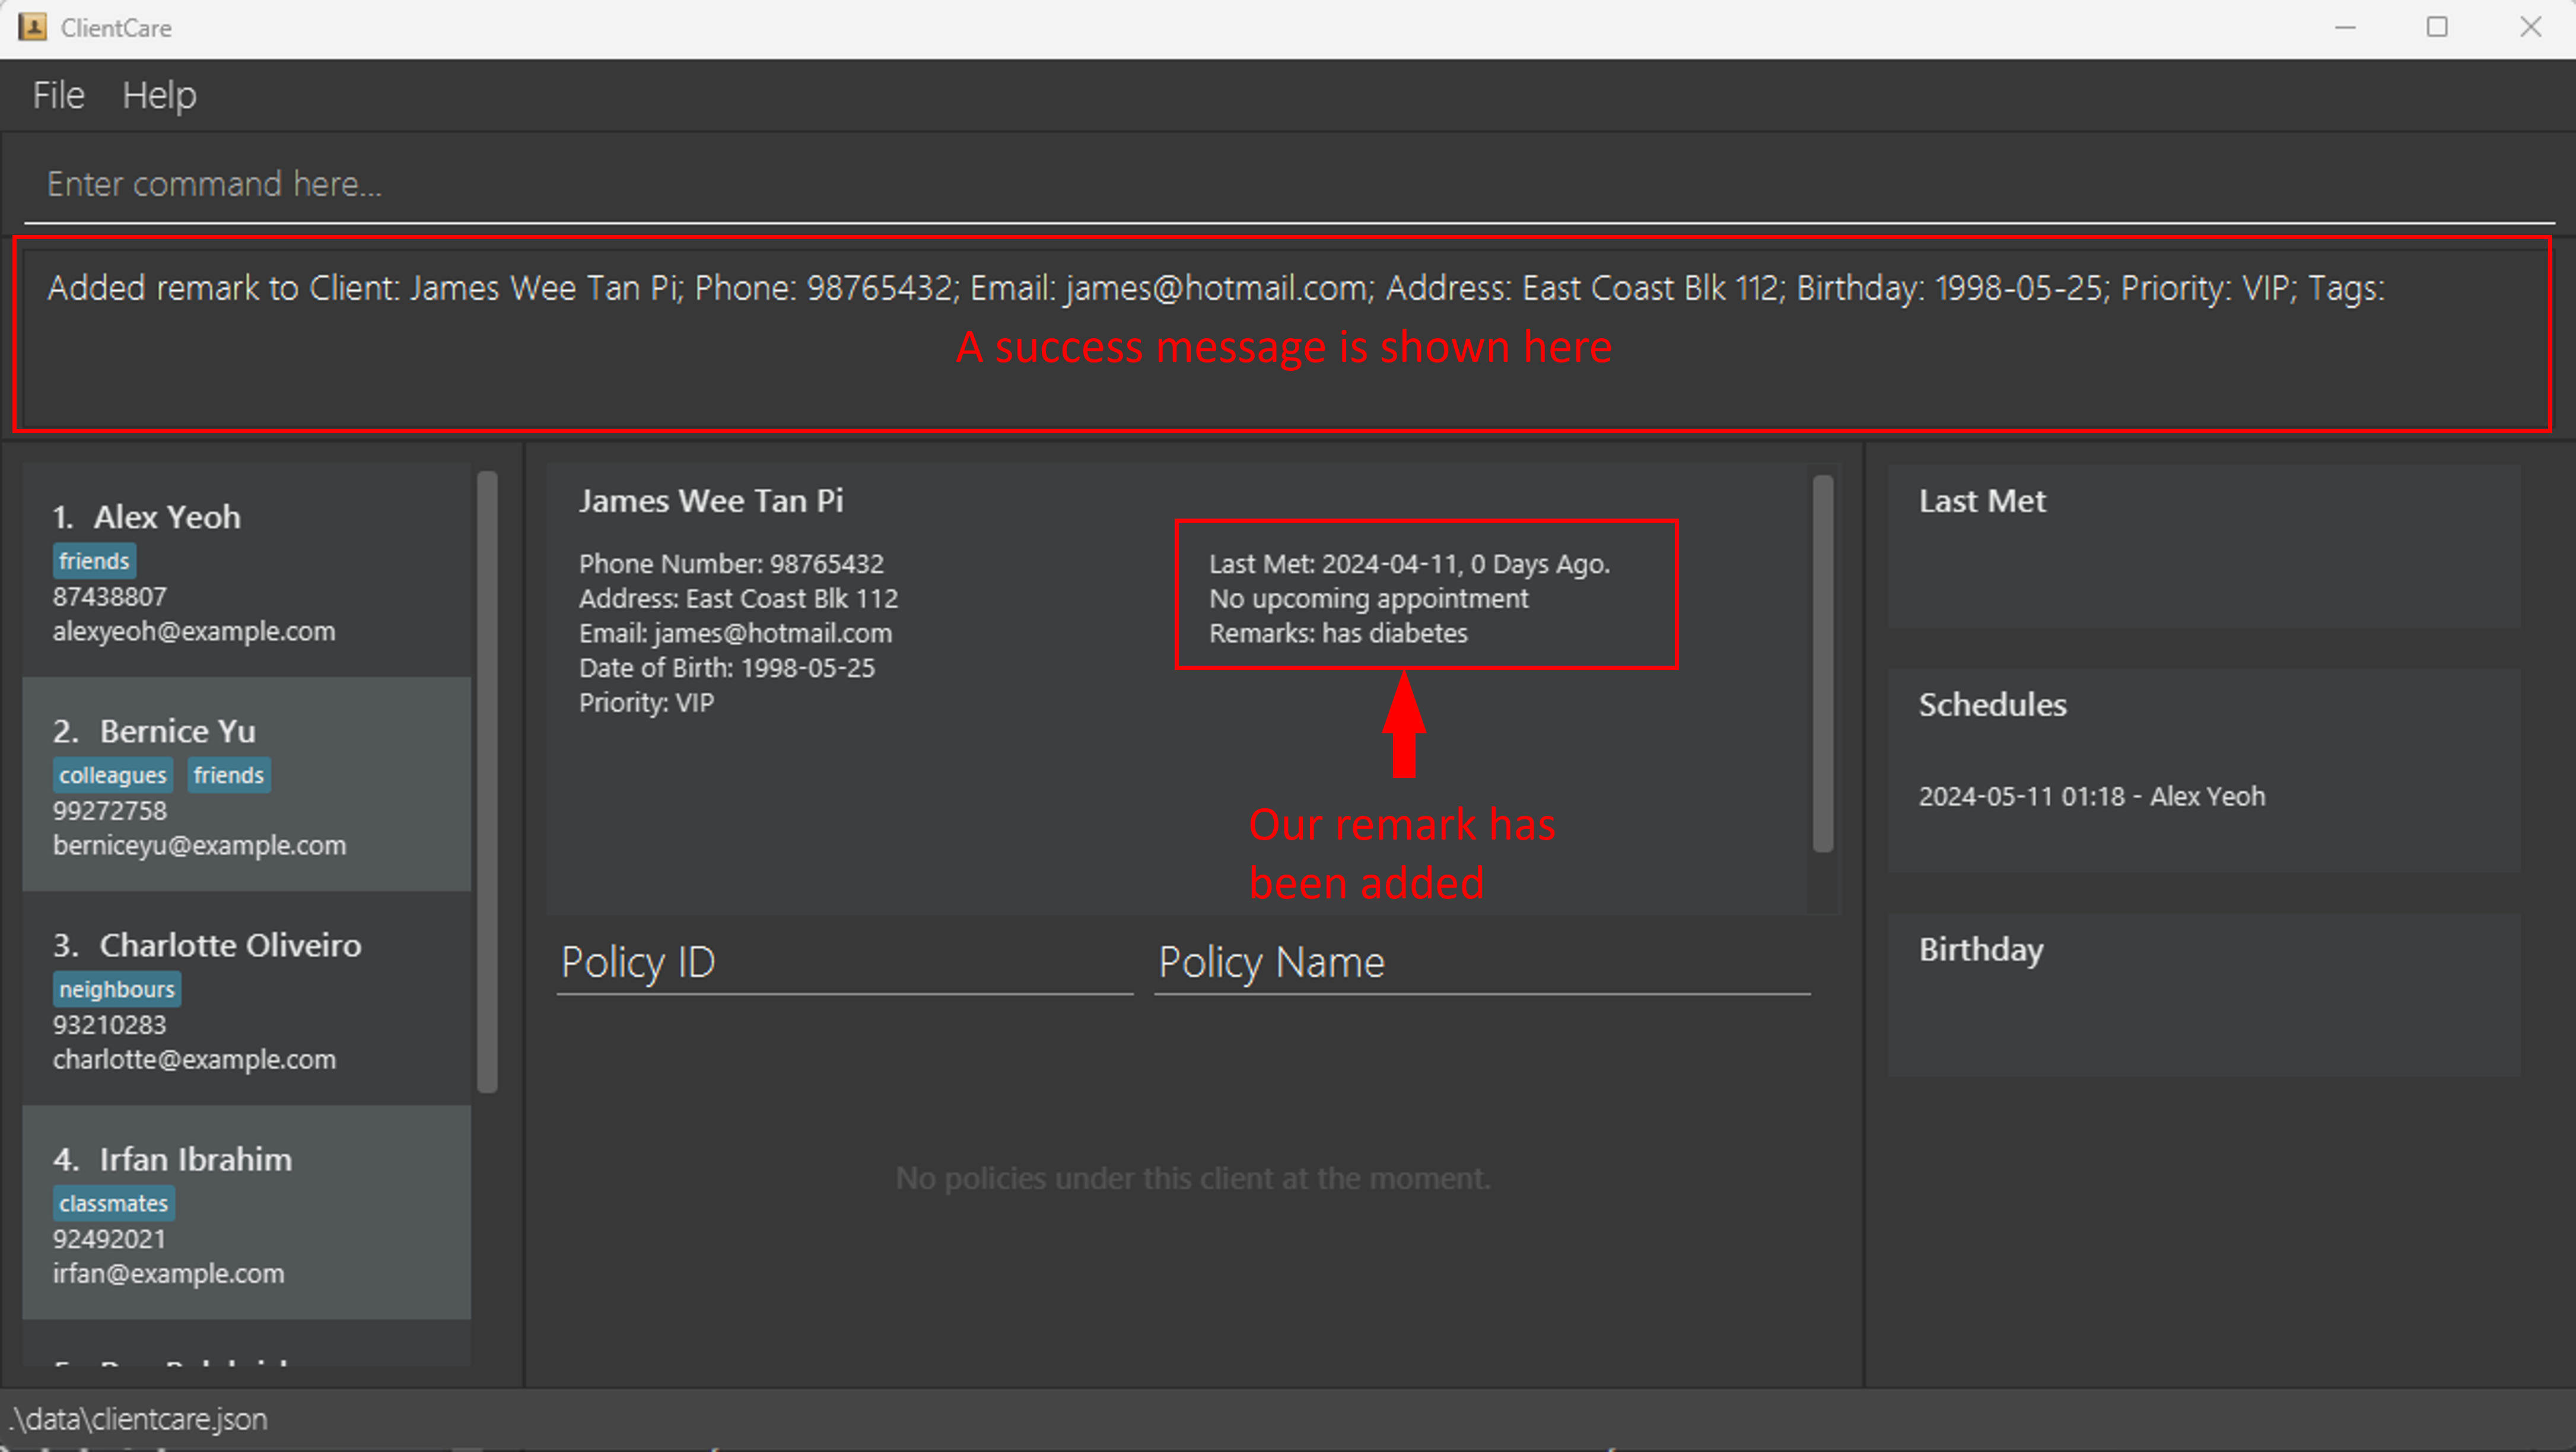
After Command:
Your new remark about James can now be seen at the Client Display window! ClientCare shows a success message in the Feedback Display too.
Clearing all entries: clear
Do you want to clear the sample clients from ClientCare or start from scratch?
You can clear all the clients from the client list with clear.
Format: clear
- Extraneous fields will be ignored. For example,
clear allwill be interpreted asclear.
CAUTION: Clearing is irreversible and will NOT have a confirmation screen
Before Command:
Suppose you want to remove all the sample client data from ClientCare.
Type the following into the Command Input: clear
![]()
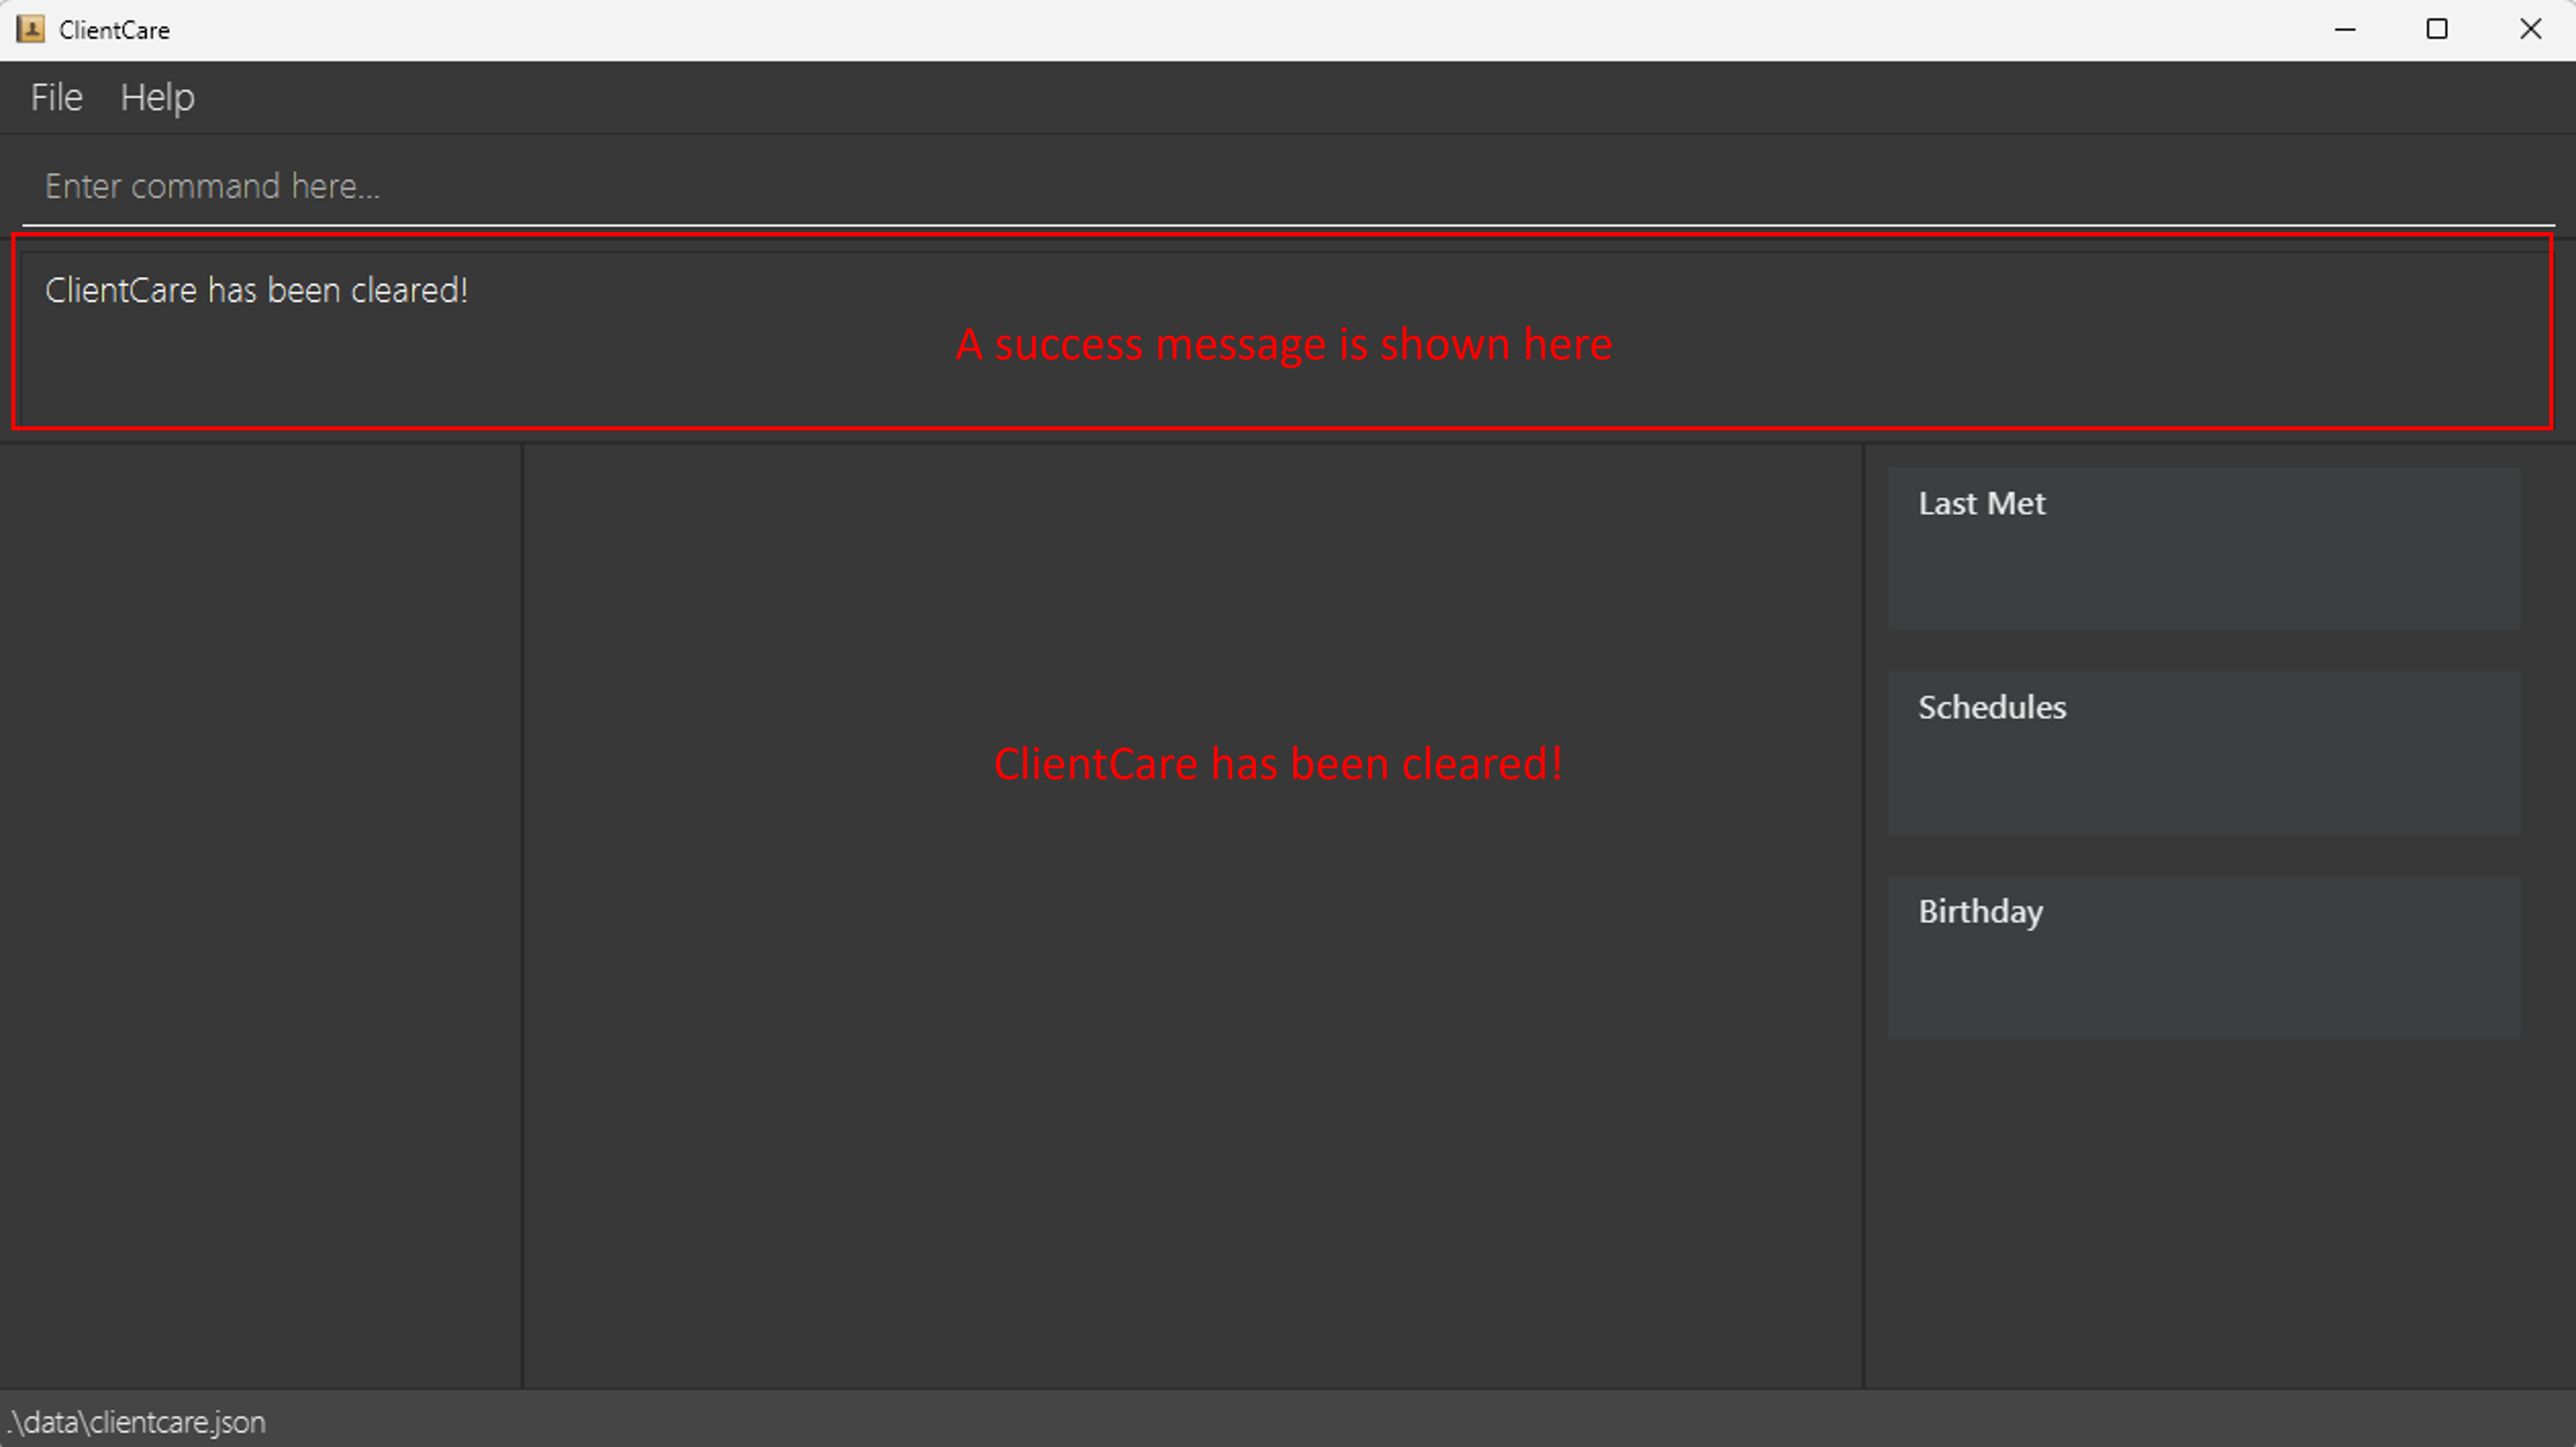
After Command:
ClientCare has been cleared! ClientCare shows a success message in the Feedback Display too.
Sorting the client list: sort
Want to see all your VIP clients first? You can sort the client list with sort:
Format: sort CRITERIA o/ORDER
- Sorts the client list by the specified
CRITERIA. SortingCRITERIAis case-insensitive. - Sorting
CRITERIAcan bename,birthday,priority. - Sorting
ORDERis specified byORDERand can beascfor ascending ordescfor descending. SortingORDERis case-insensitive
Examples:
sort name o/ascsorts the client list by name in ascending order.sort priority o/descsorts the client list by priority in descending order.sort birthday o/ascsorts the client list by birthday date in ascending order.
Before Command:
Suppose you want to sort the client list by priority where the most important clients appear first.
Type the following into the Command Input: sort priority o/desc

After Command:
Clients of a higher priority will now show up first! ClientCare shows a success message in the Feedback Display too.

Schedule related commands
Not sure what is happening next? Fear not, ClientCare can help manage your schedule too!
ClientCare reminds you of your upcoming appointments as well as clients you have not met in a while. It also reminds you of your clients' birthday!
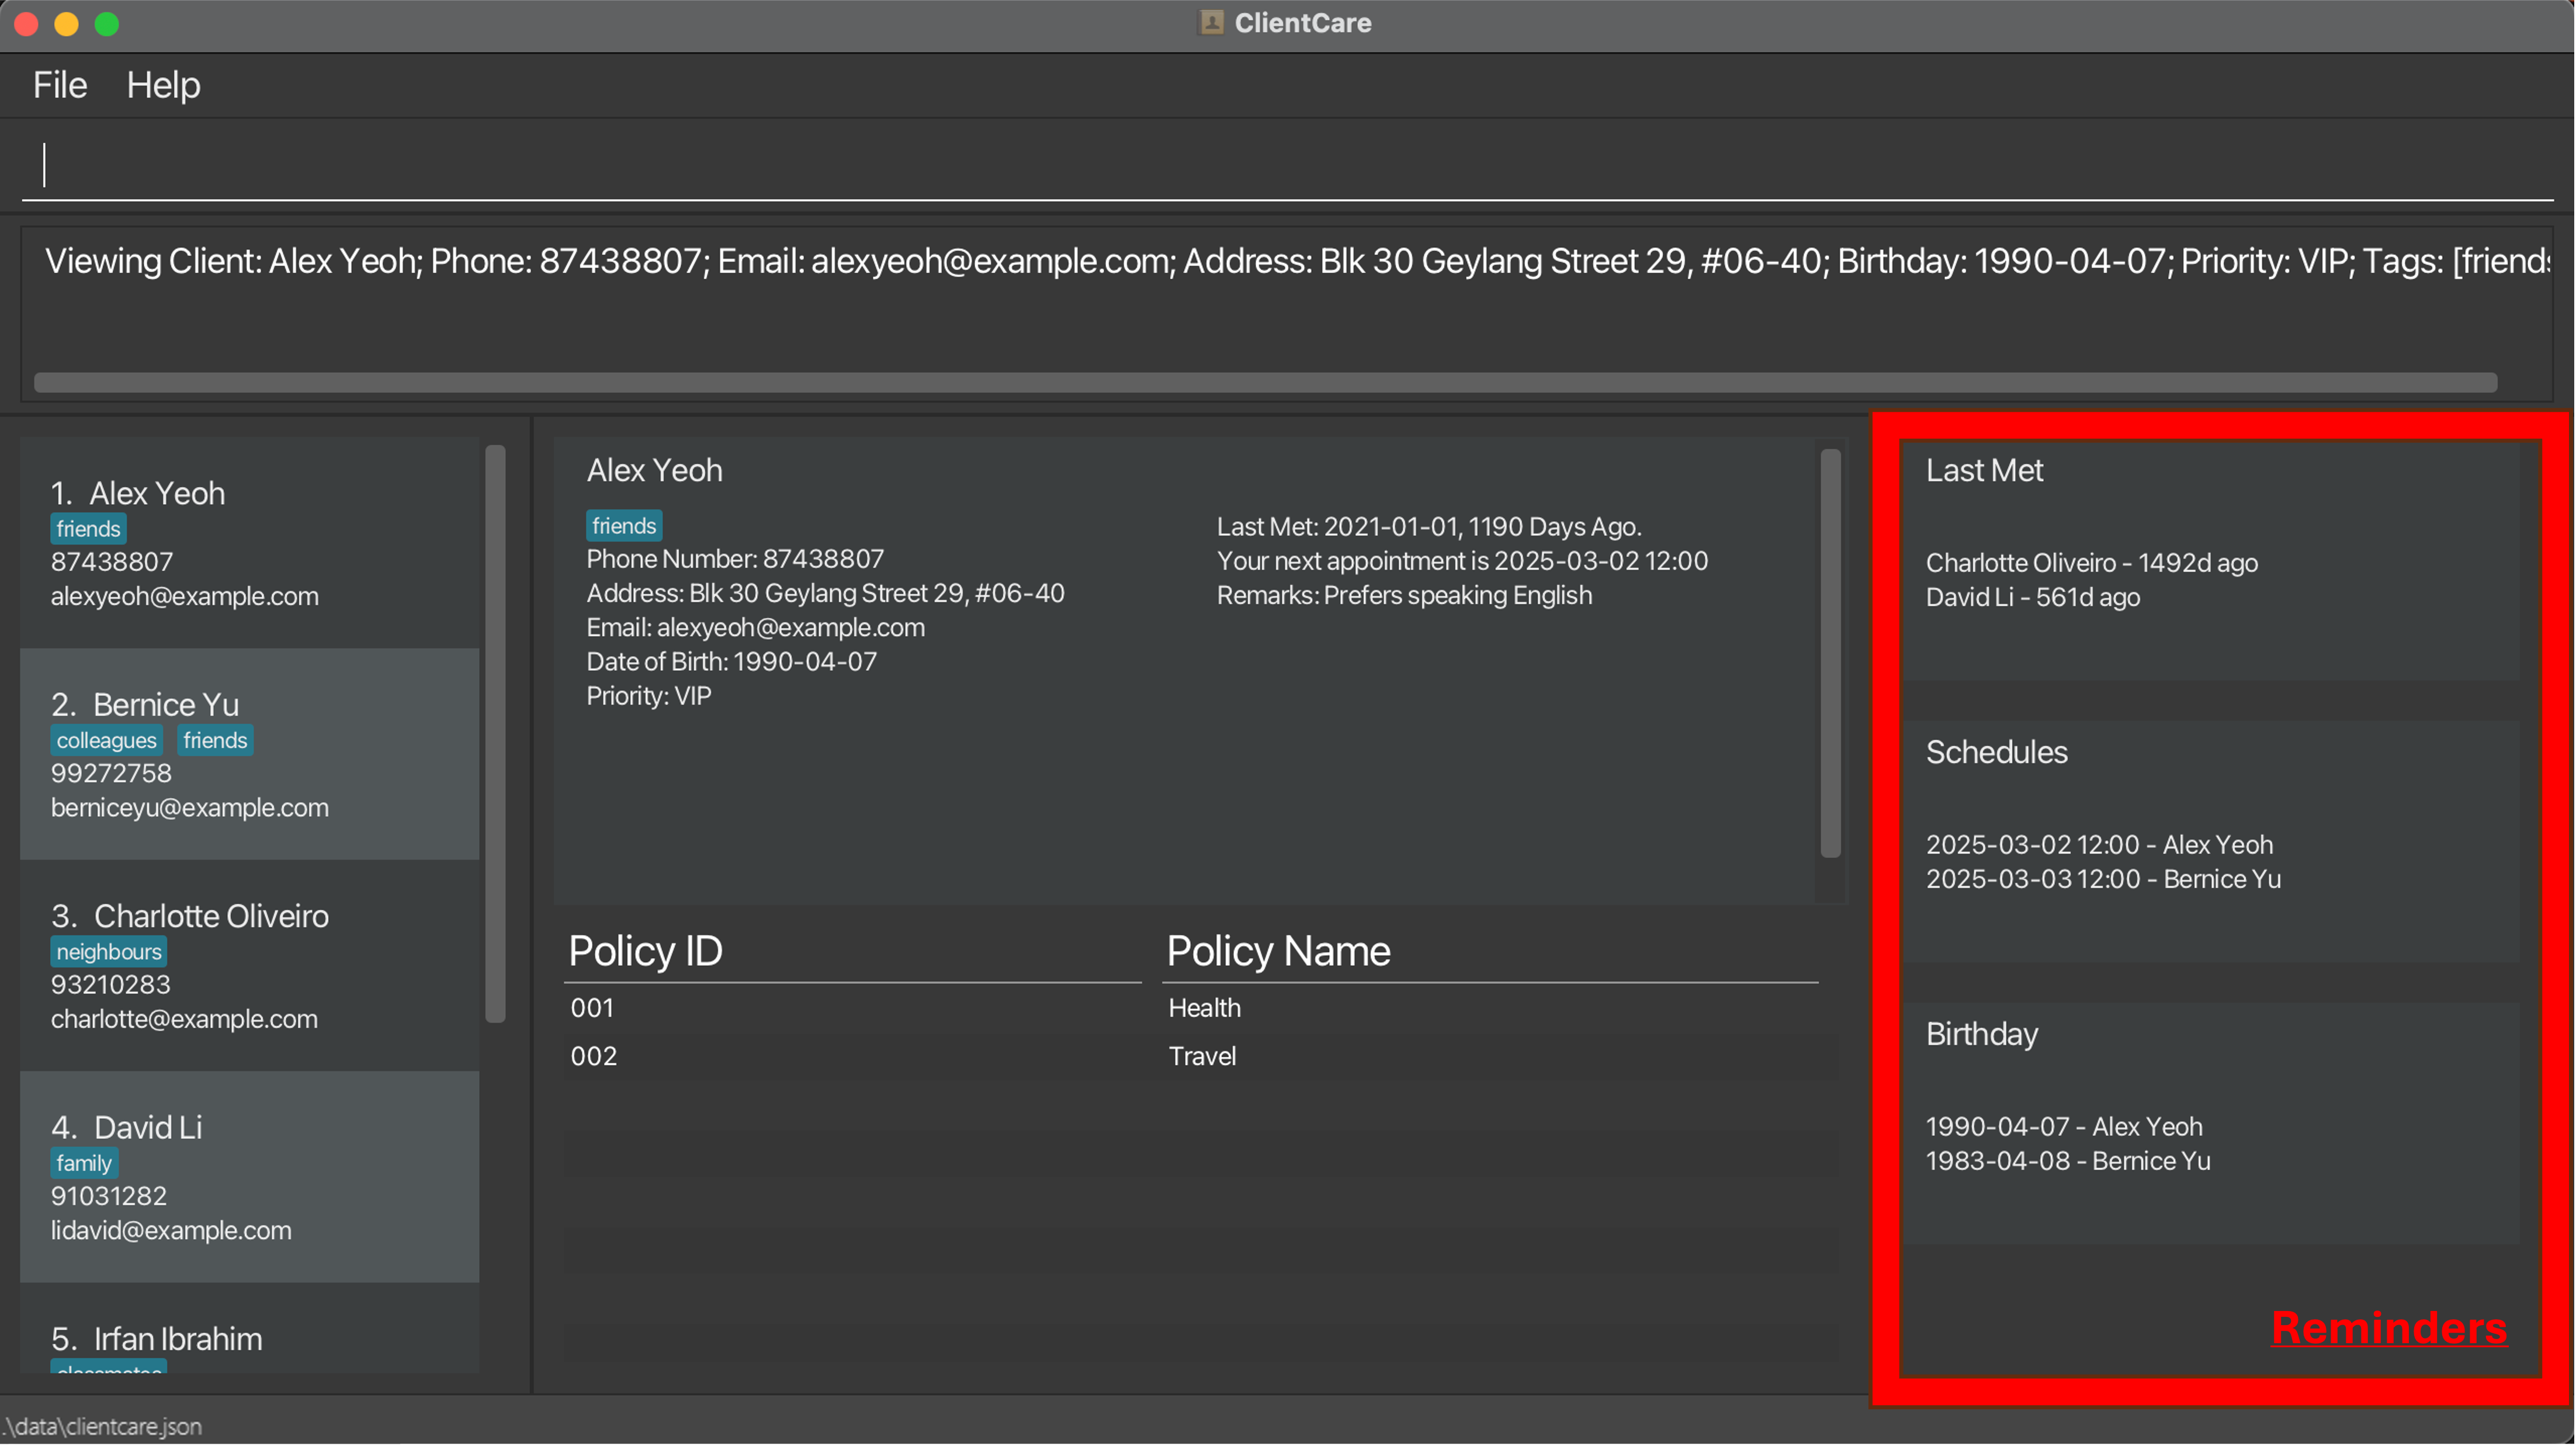
Last Met Display: Shows you the list of clients you have not met in a while (that do not have an active schedule). You can set the overdue period using set, which by default is 90 days.
Schedule Display: Shows you the list of clients you have an appointment with.
Birthday Display: Shows you the list of clients whose birthday is within the next 7 days.
ClientCare offers the following commands to help you manage your schedule:
- Updating last met:
met - Setting last met overdue period:
set - Scheduling appointments:
schedule - Marking appointments:
mark
Updating last met: met
Just met up with a client? You can update the last met date you had with your client with met.
Format: met INDEX d/DATE
- Updates the client at the specified
INDEX. - Using
markon a schedule will not update the last met date. - The index refers to the index number shown in the displayed client list.
- The index must be a positive integer 1, 2, 3, …
- The DATE format must be in YYYY-MM-DD. 7 May 2023 should be entered as 2023-05-07.
Examples:
met 2 d/2023-05-07updates the last met date of the 2nd client in the client list to 7 May 2023.met 7 d/2024-07-08updates the last met date of the 7th client in the client list to 8 July 2024.
Note: Clients will only show up in the Last Met Display if the number of days since the last meeting exceeds the period specified. By default, the period is 90 days.
If there is currently a schedule with the client, he will not show up in the Last Met Display. Rather, you will see him under the Schedule Display.
Note: ClientCare will not allow you to meet someone from a future date.
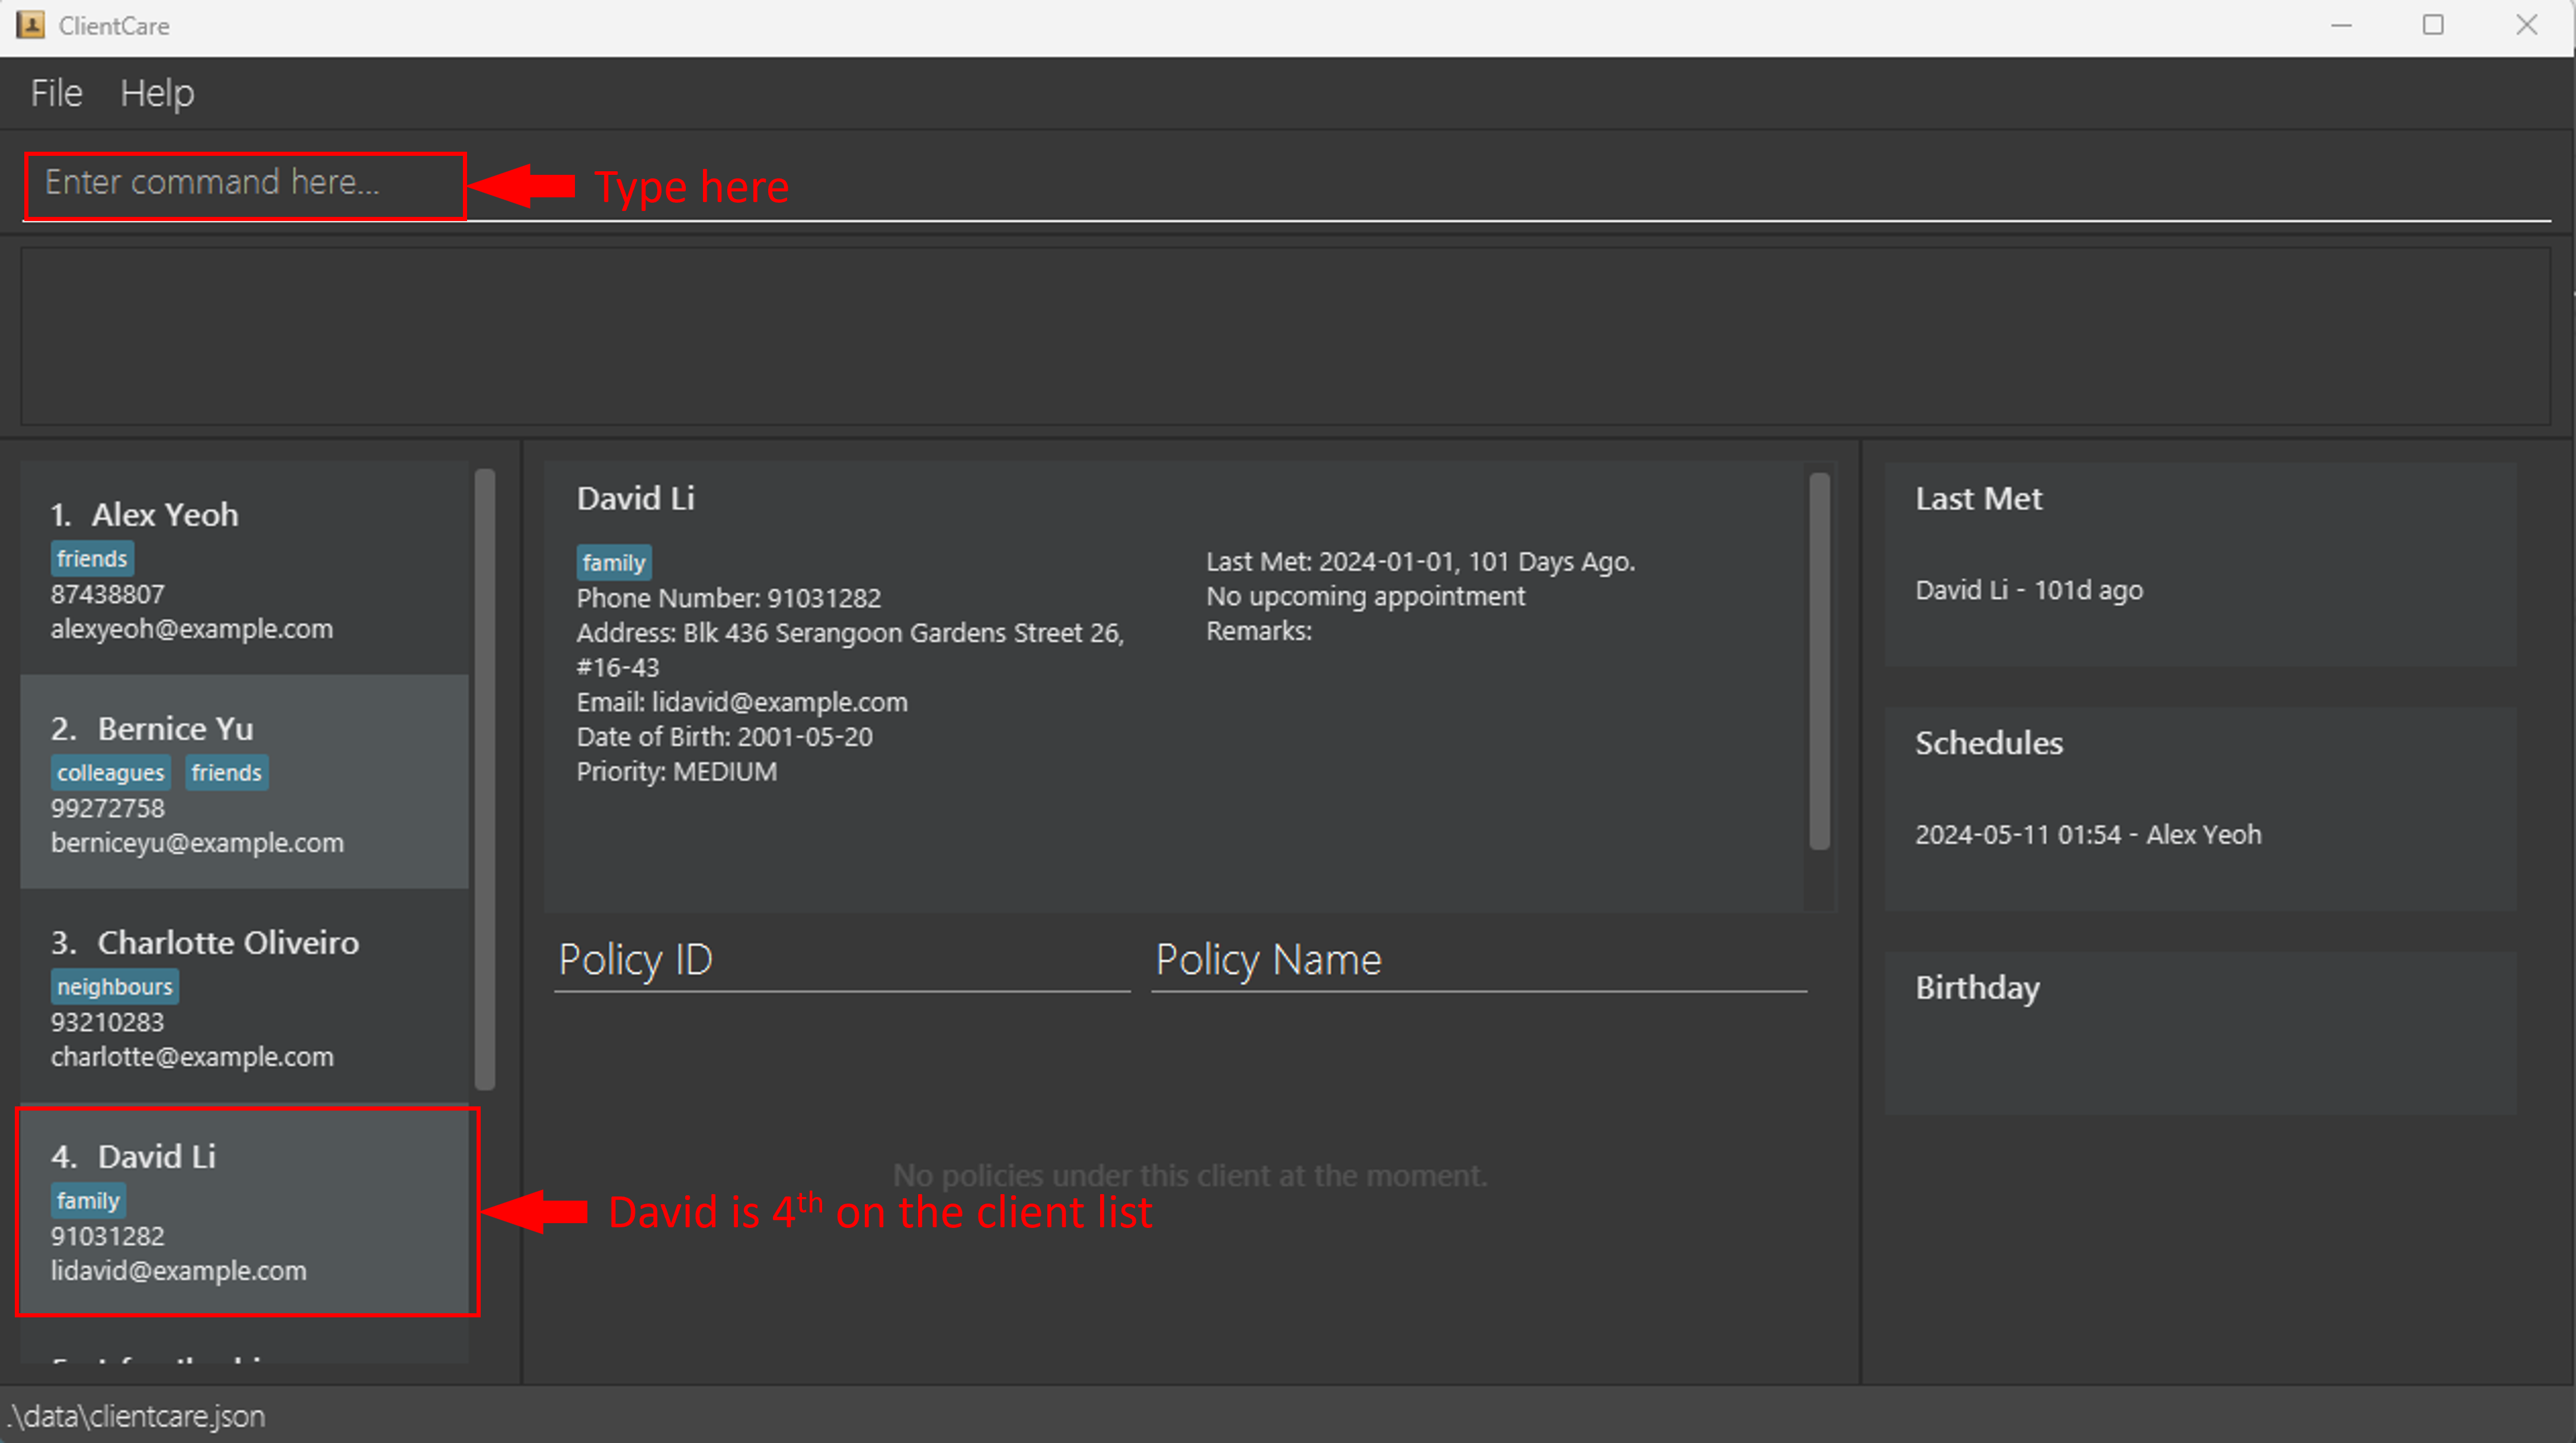
Before Command:
Suppose you just met up with David Li today! David Li is number 4 on the client list.
As of this guide, today is 2024-04-10, 10 April 2024.
Do change the date as required.
Type the following into the Command Input: met 4 d/2024-04-10
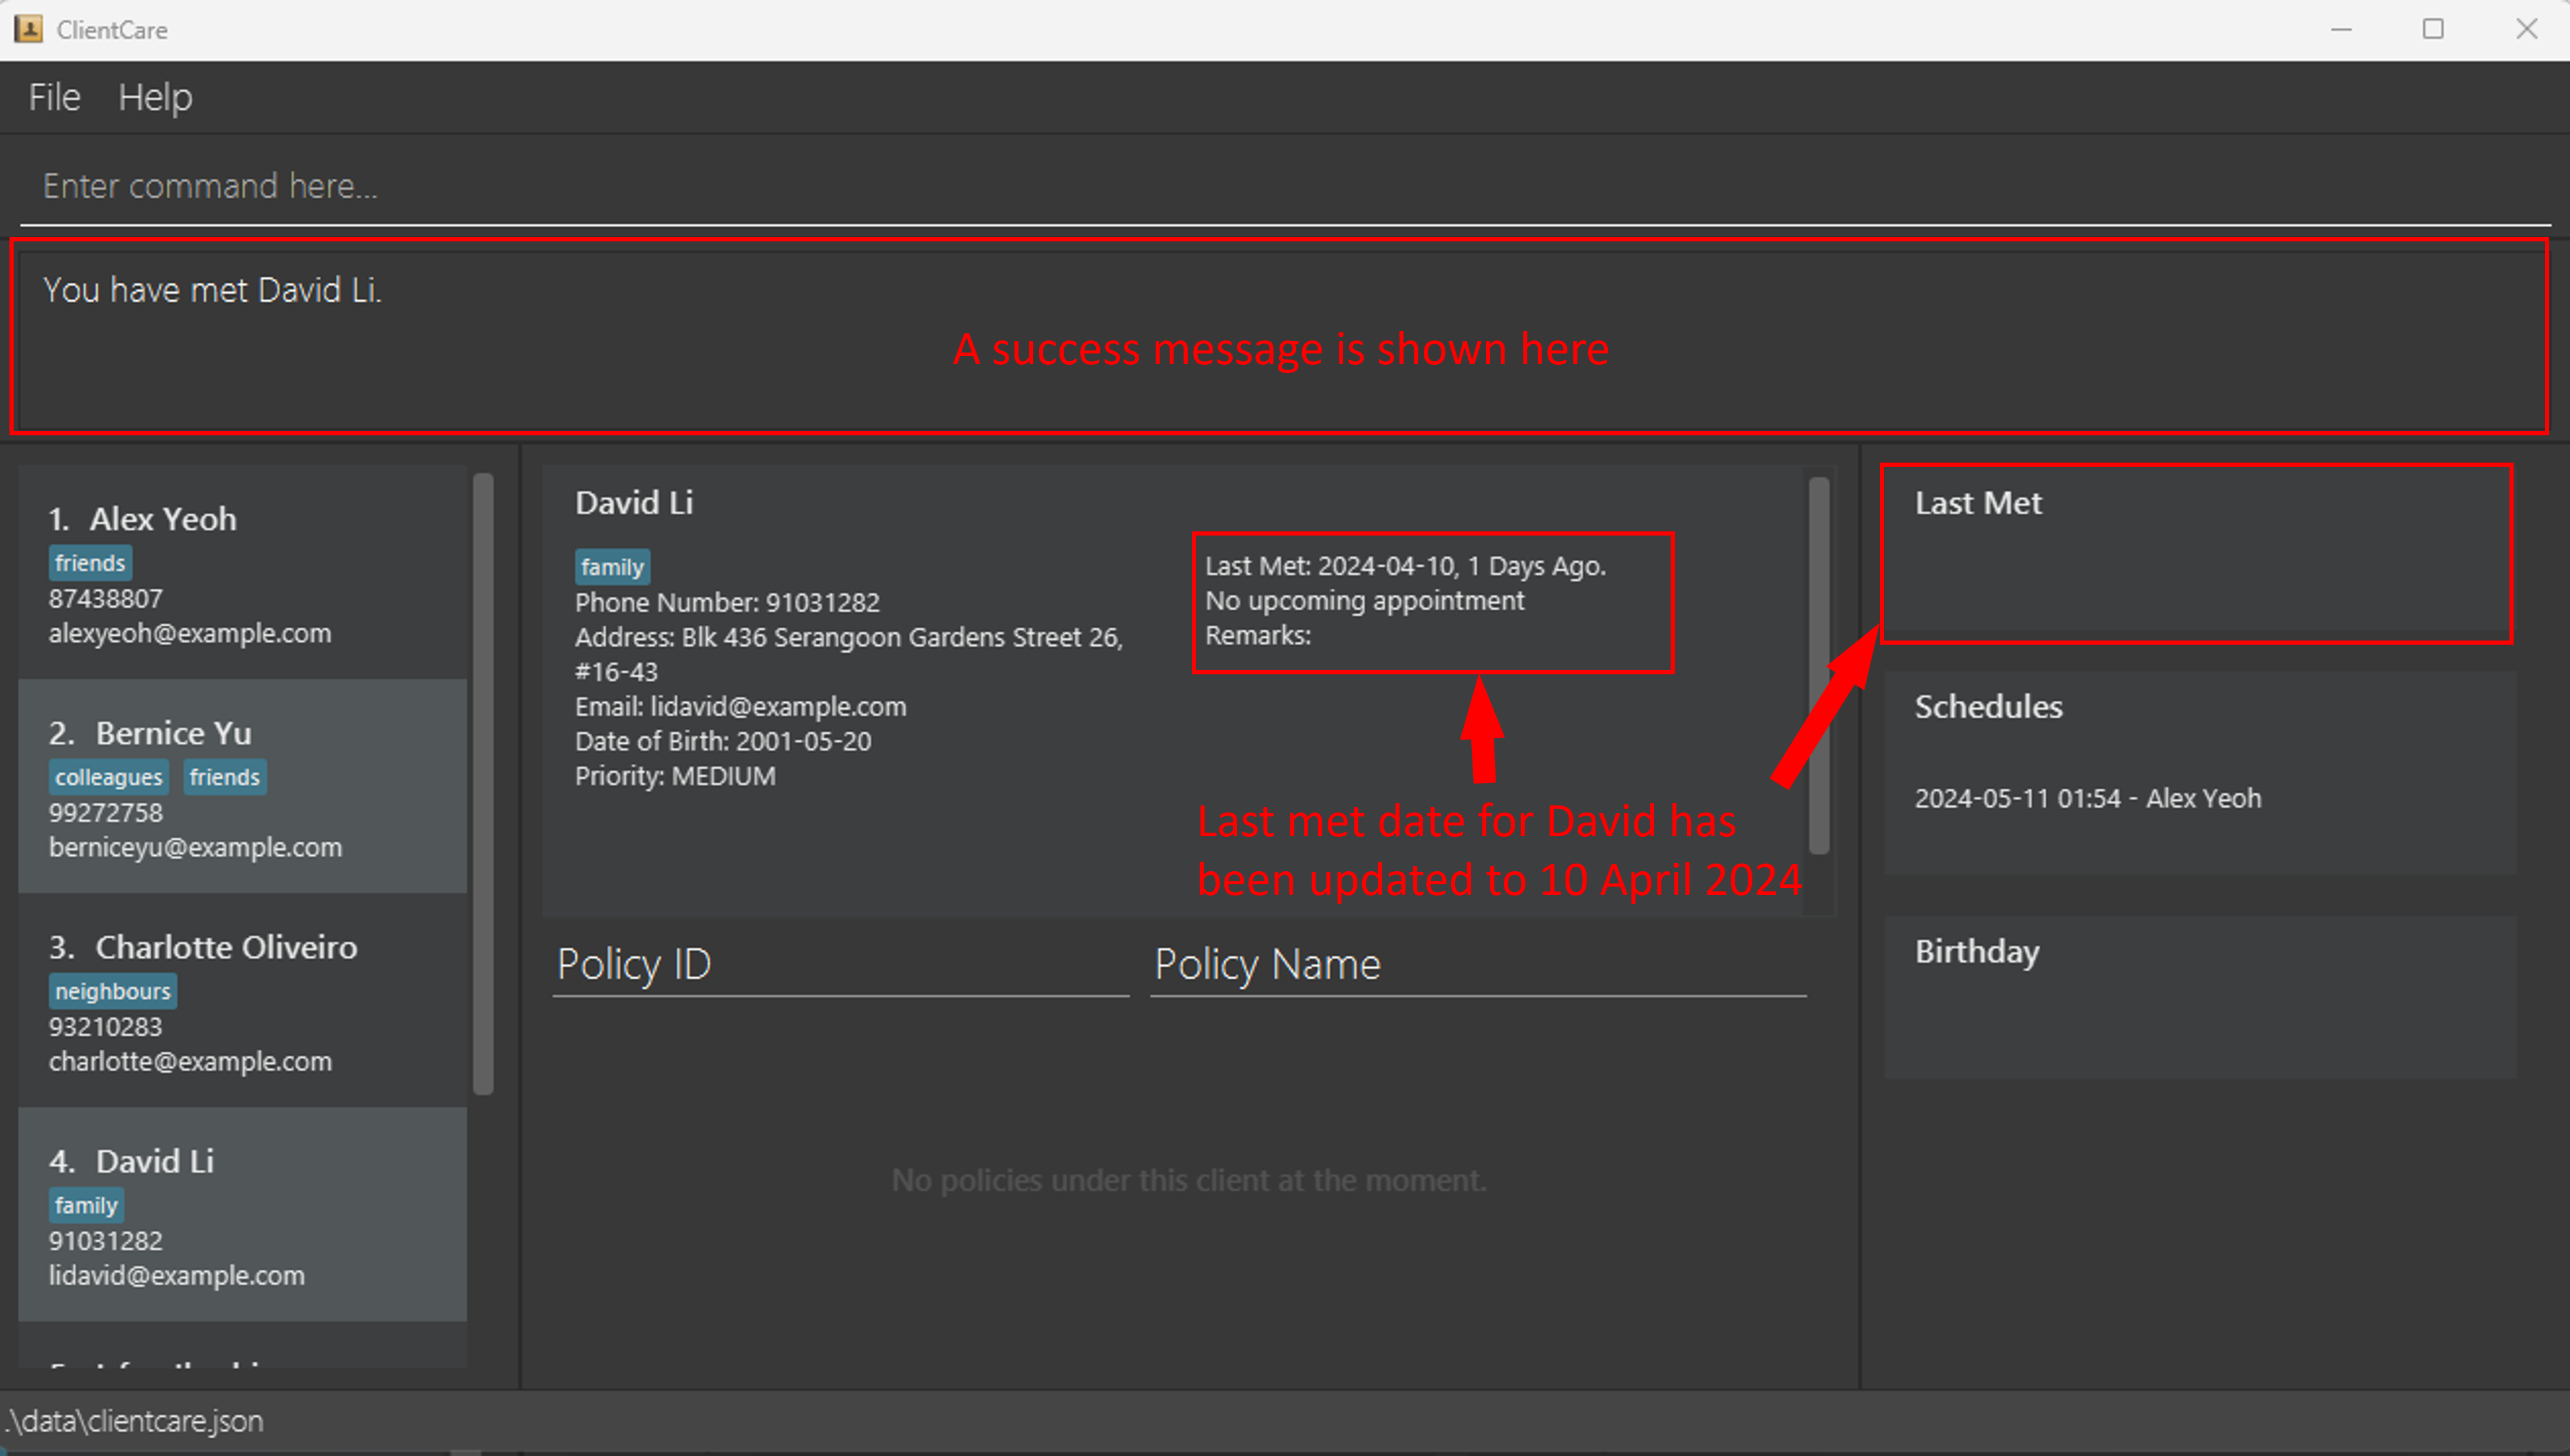
After Command:
David Li's last met date has been updated to 10 April 2024! ClientCare shows a success message in the Feedback Display too.
Setting last met overdue period: set
Feel that 90 days is too short or long of a period? You can set your own desired overdue duration with set.
Format: set NUMBER_OF_DAYS
- Sets the last met overdue to
NUMBER_OF_DAYS. - The number of days must be a non-negative integer 0, 1, 2, 3, …
Examples:
set 75updates the last met overdue duration to 75 days. Clients who you have not met in more than 75 days or no appointments are scheduled will show up in the Last Met reminder display.
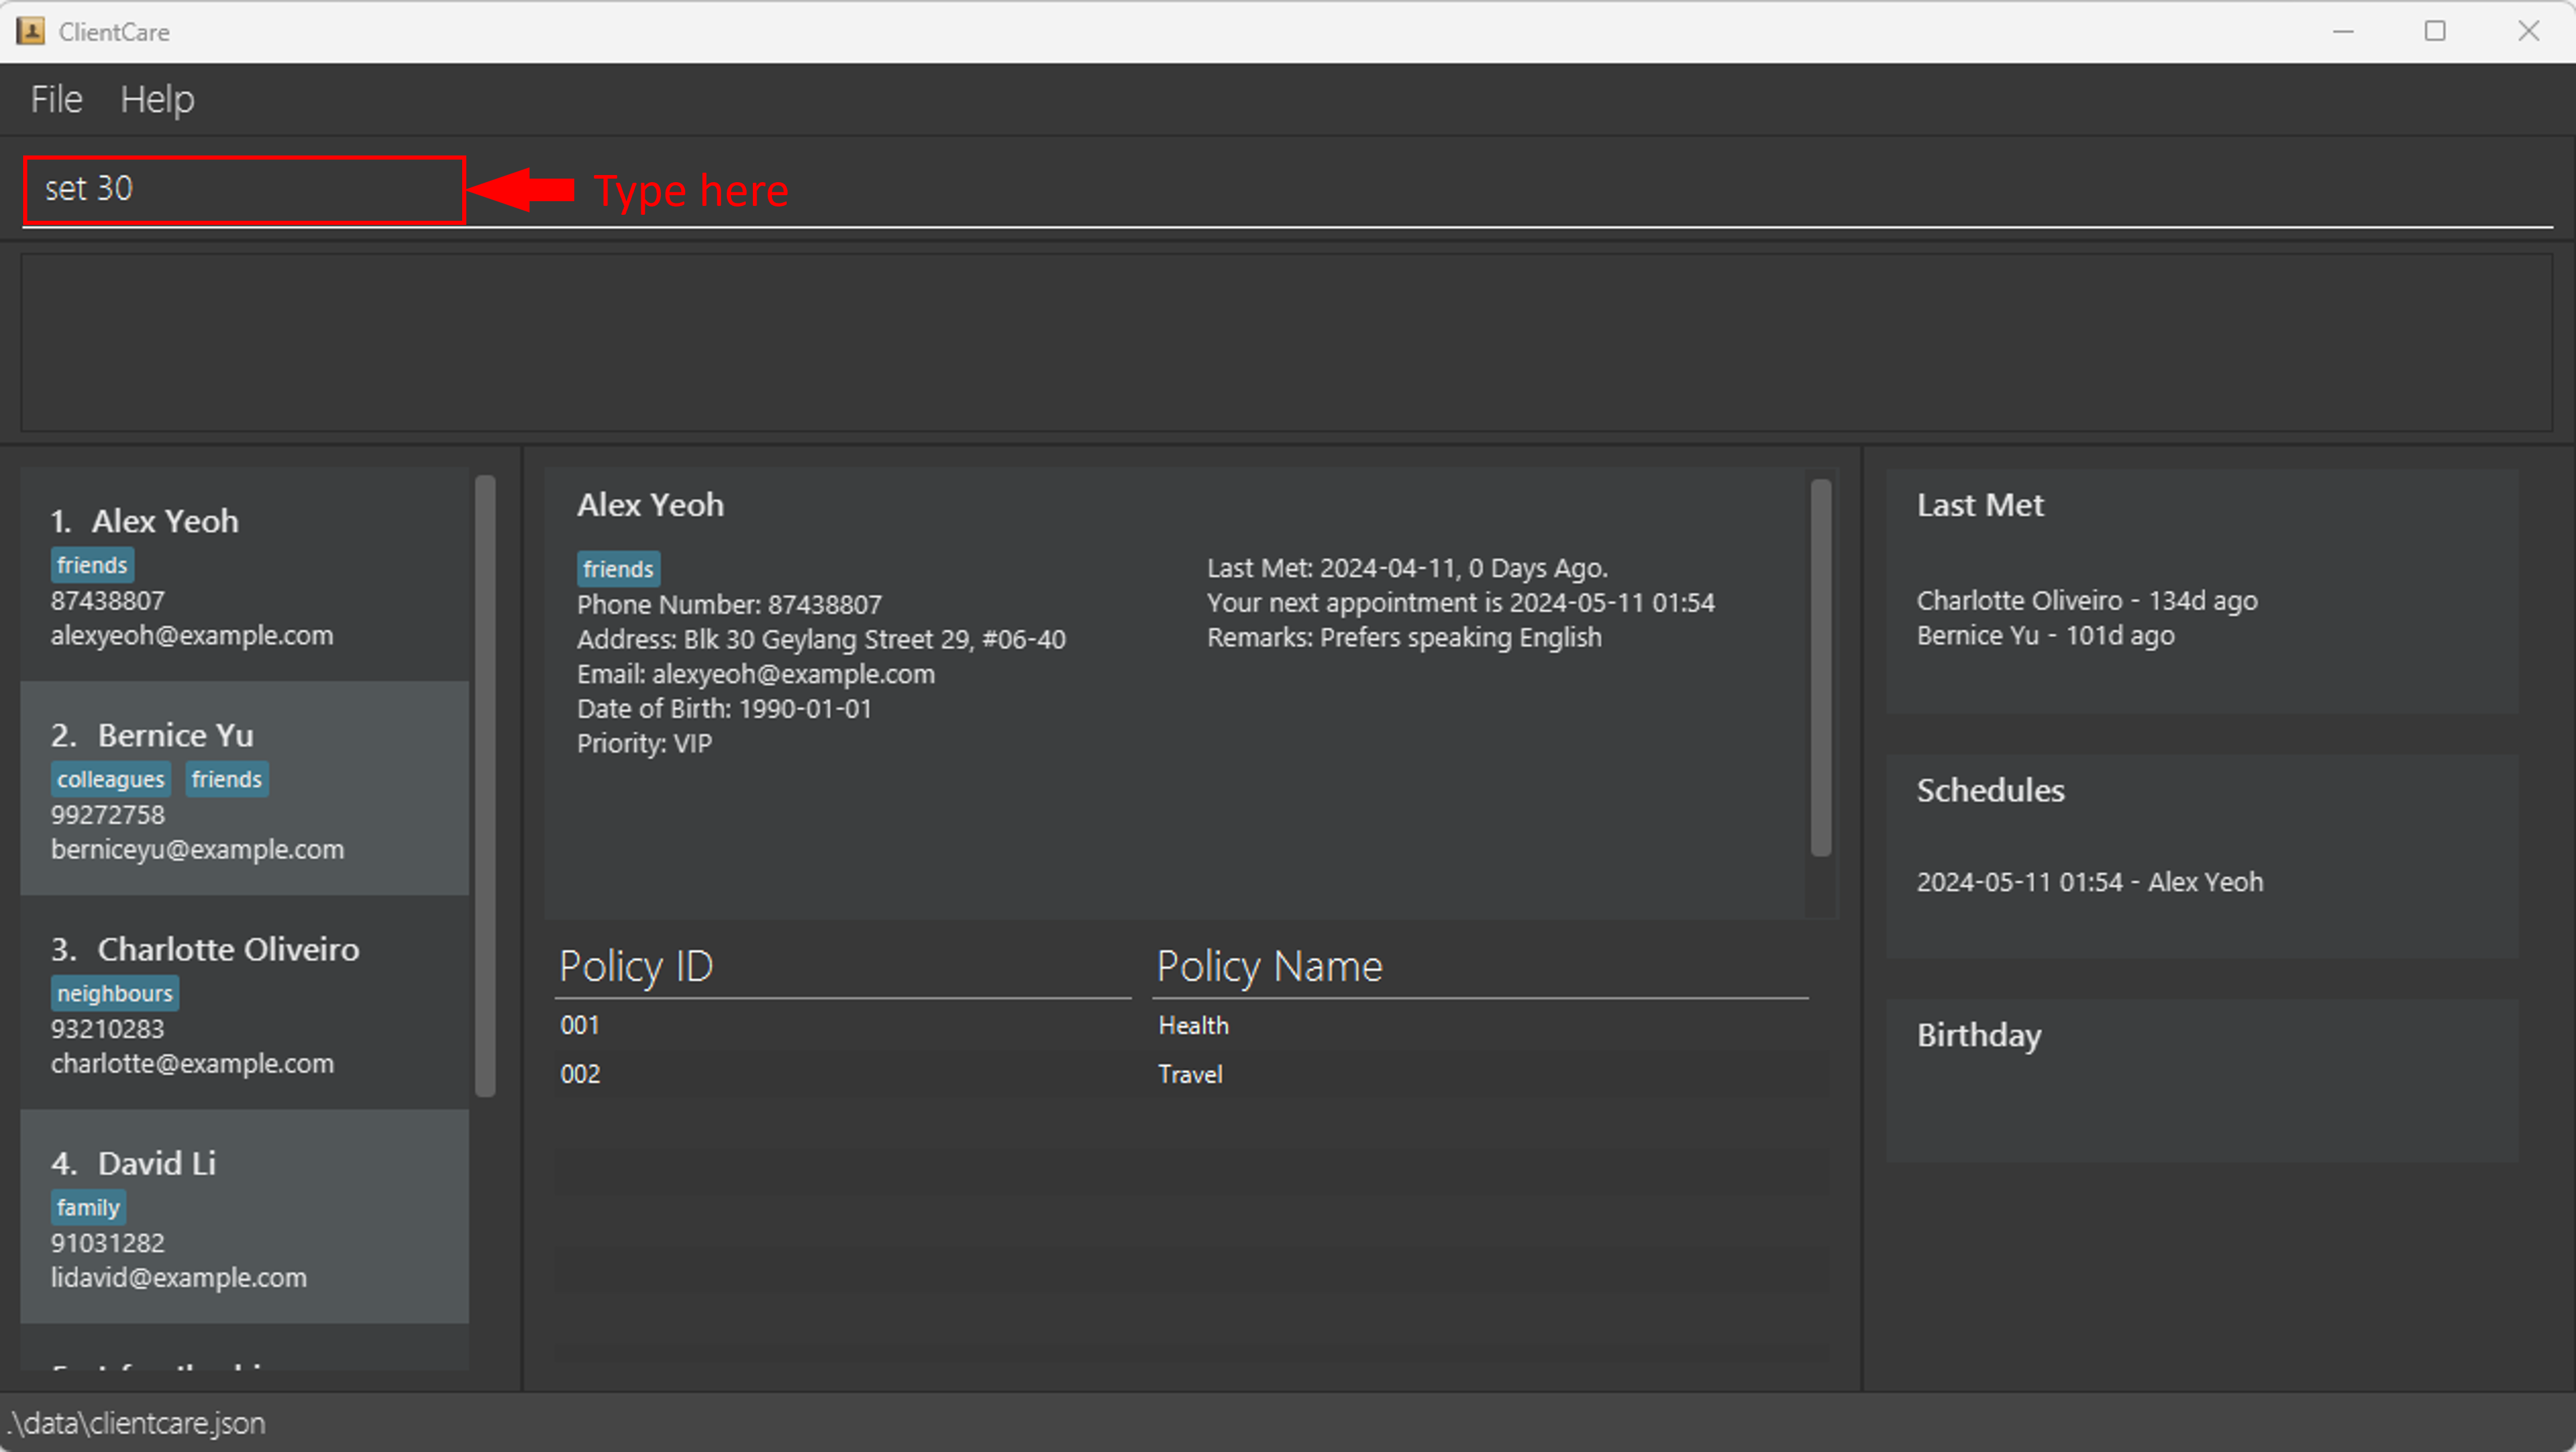
Before Command:
Suppose you feel that 90 days is too long, and we want to be reminded to meet all your clients every 30 days.
Type the following into the Command Input: set 30
After Command:
All clients which you have not met in 30 days will be shown in the Last Met Display! ClientCare shows a success message in the Feedback Display too.

Scheduling appointments: schedule
Got a new appointment or a rescheduling is needed?
You can schedule an appointment date and time you have with your client with schedule.
Format: schedule INDEX d/DATETIME
- Schedules an appointment the client at the specified
INDEX. - The index refers to the index number shown in the displayed client list.
- The index must be a positive integer 1, 2, 3, …
- The DATETIME format must be in YYYY-MM-DD HH:mm. 7 May 2023 2.15pm should be entered as 2023-05-07 14:15.
Examples:
schedule 2 d/2023-05-07 22:00schedules an appointment with the 2nd client in the client list at 7 May 2023 10pm.schedule 7 d/2024-07-08 07:30schedules an appointment with the 7th client in the client list at 8 July 2024 7.30am.
Note: ClientCare will only allow you to create a schedule with someone with a valid future date and time.
Tip: ClientCare currently only keeps track of a single schedule with a client at a time.
If you have multiple appointments, you can use the schedule command to update the appointment date and time to the
next appointment after the most recent one is done.
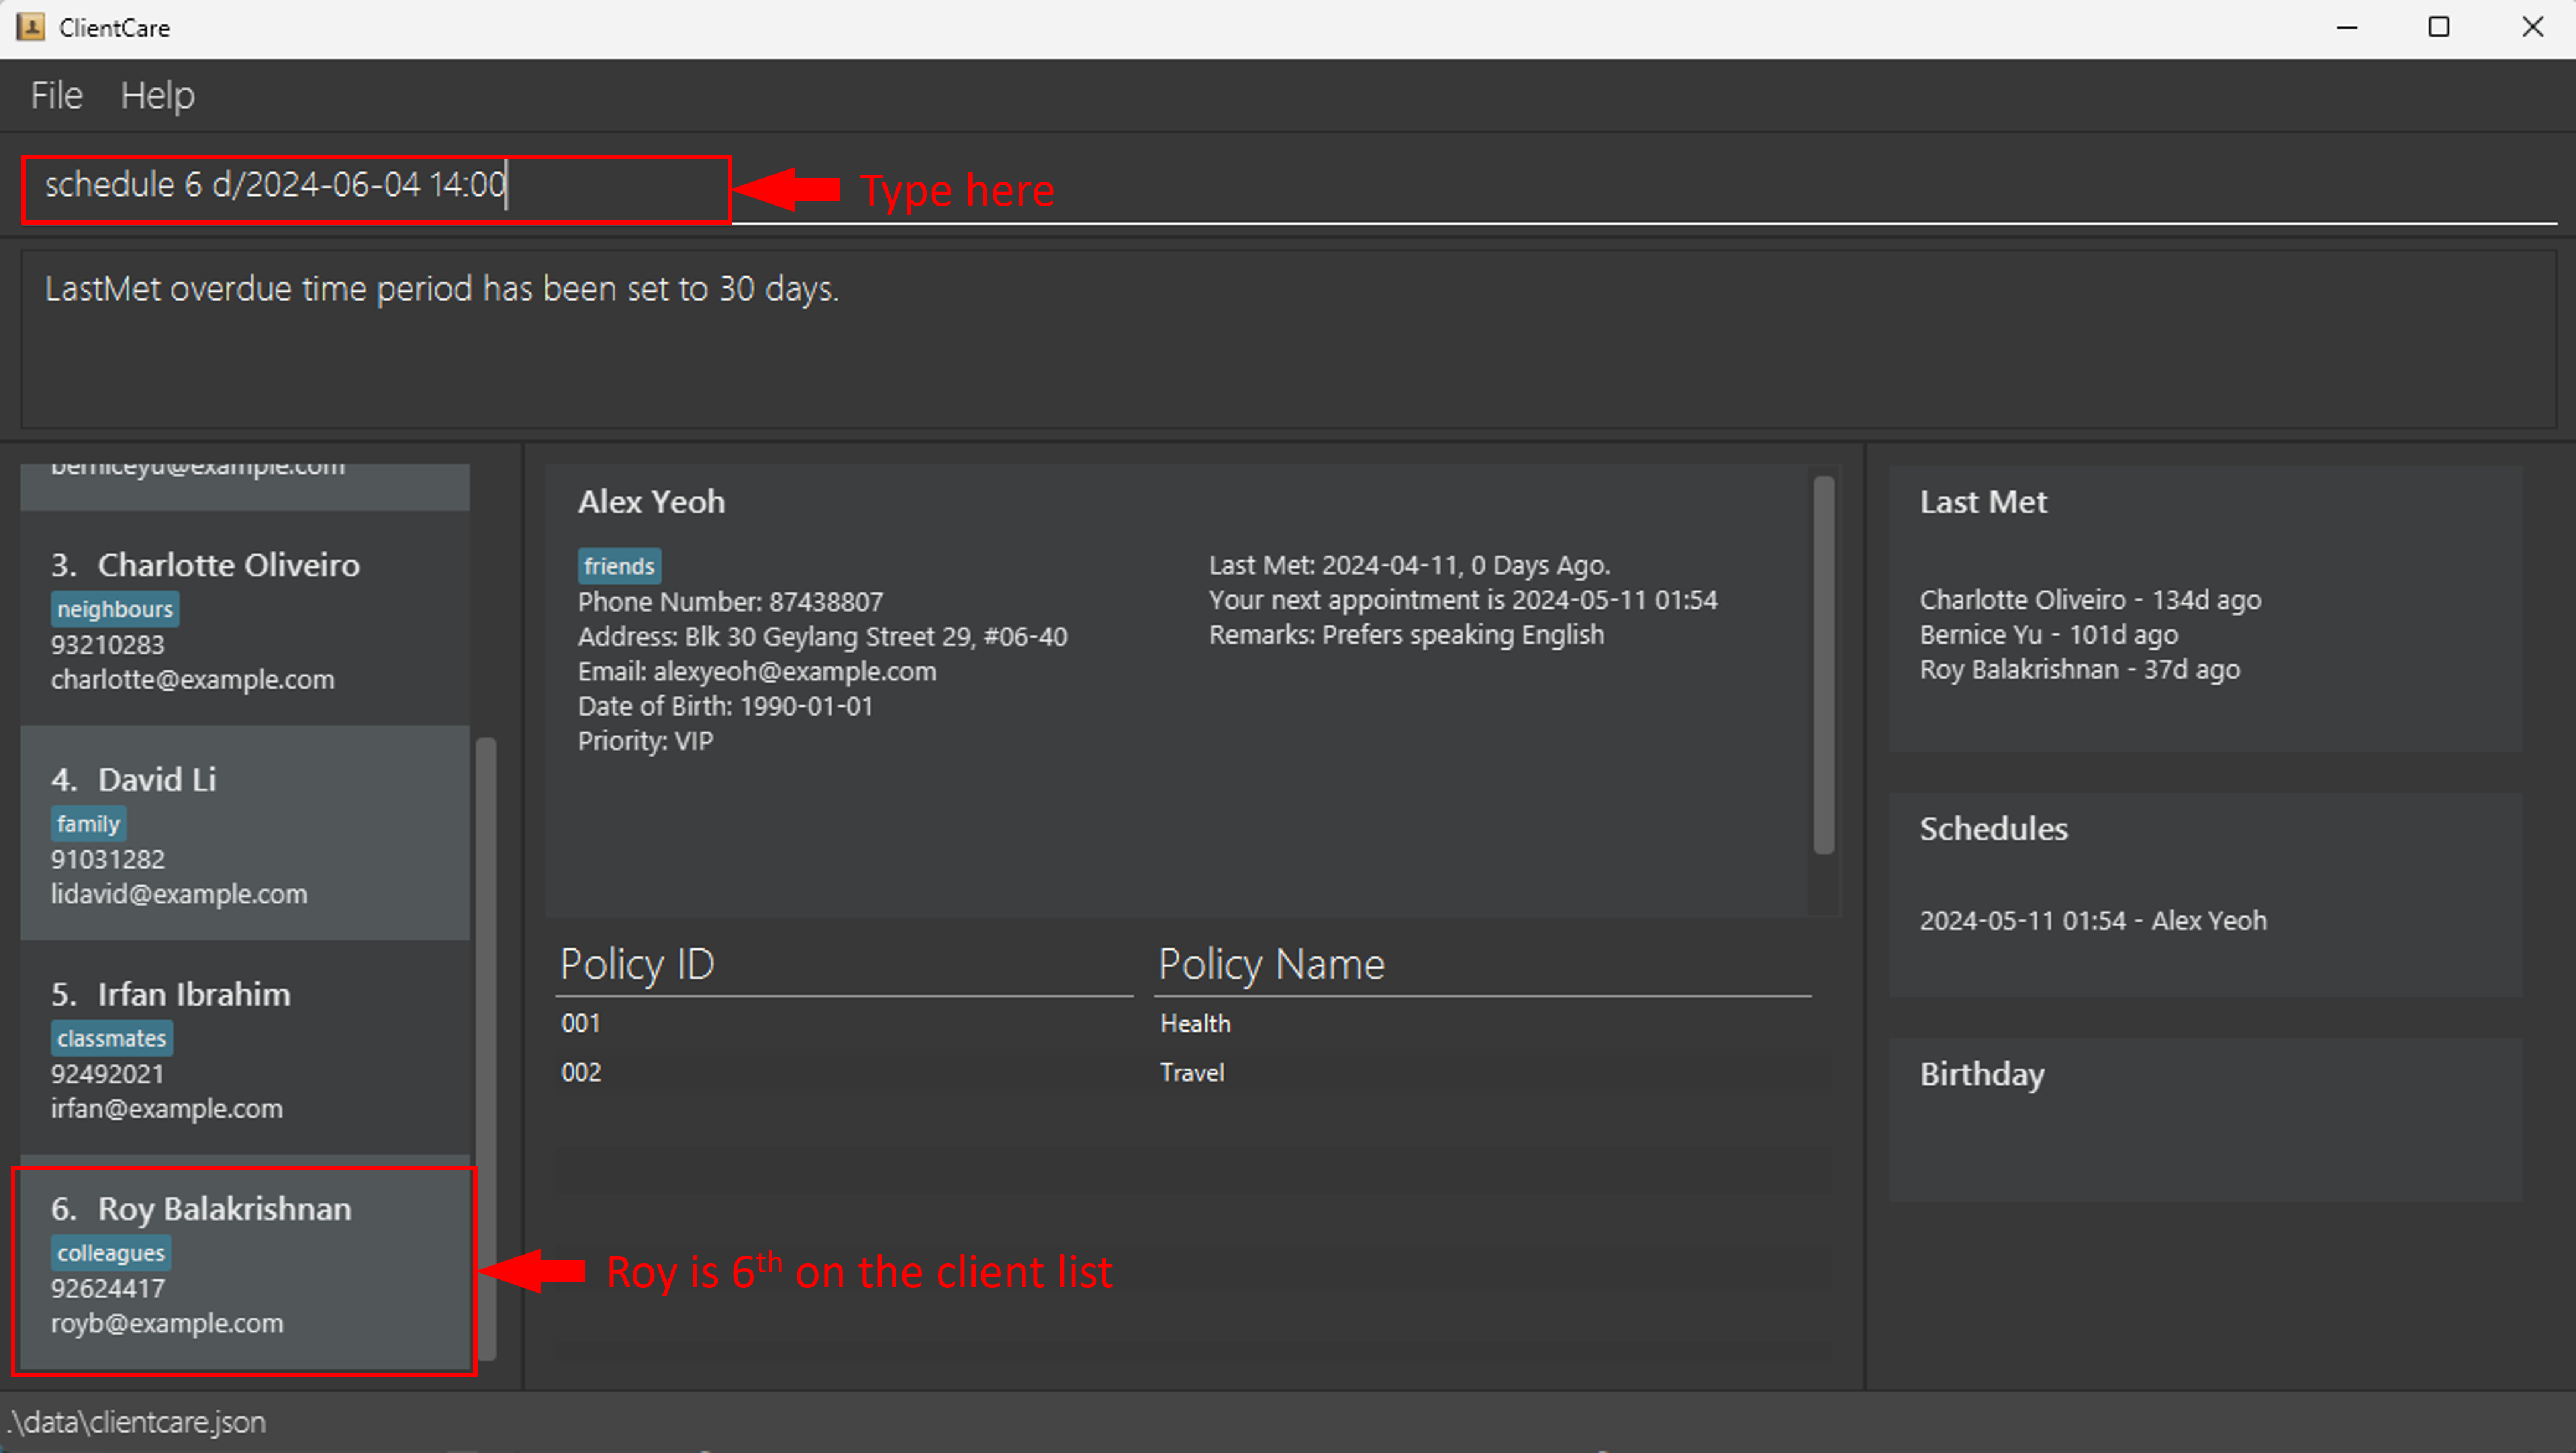
Before Command:
Suppose you want to set an appointment with Roy at 4 June 2024 2pm. Roy is number 6 on the client list. As of this guide, today is 10 April 2024. Hence, you are able to set the appointment on 4 June 2024 2pm.
Remember that you are only able to set a schedule in the future. Do change the appointment data to a future date as required.
Type the following into the Command Input: schedule 6 d/2024-06-04 14:00
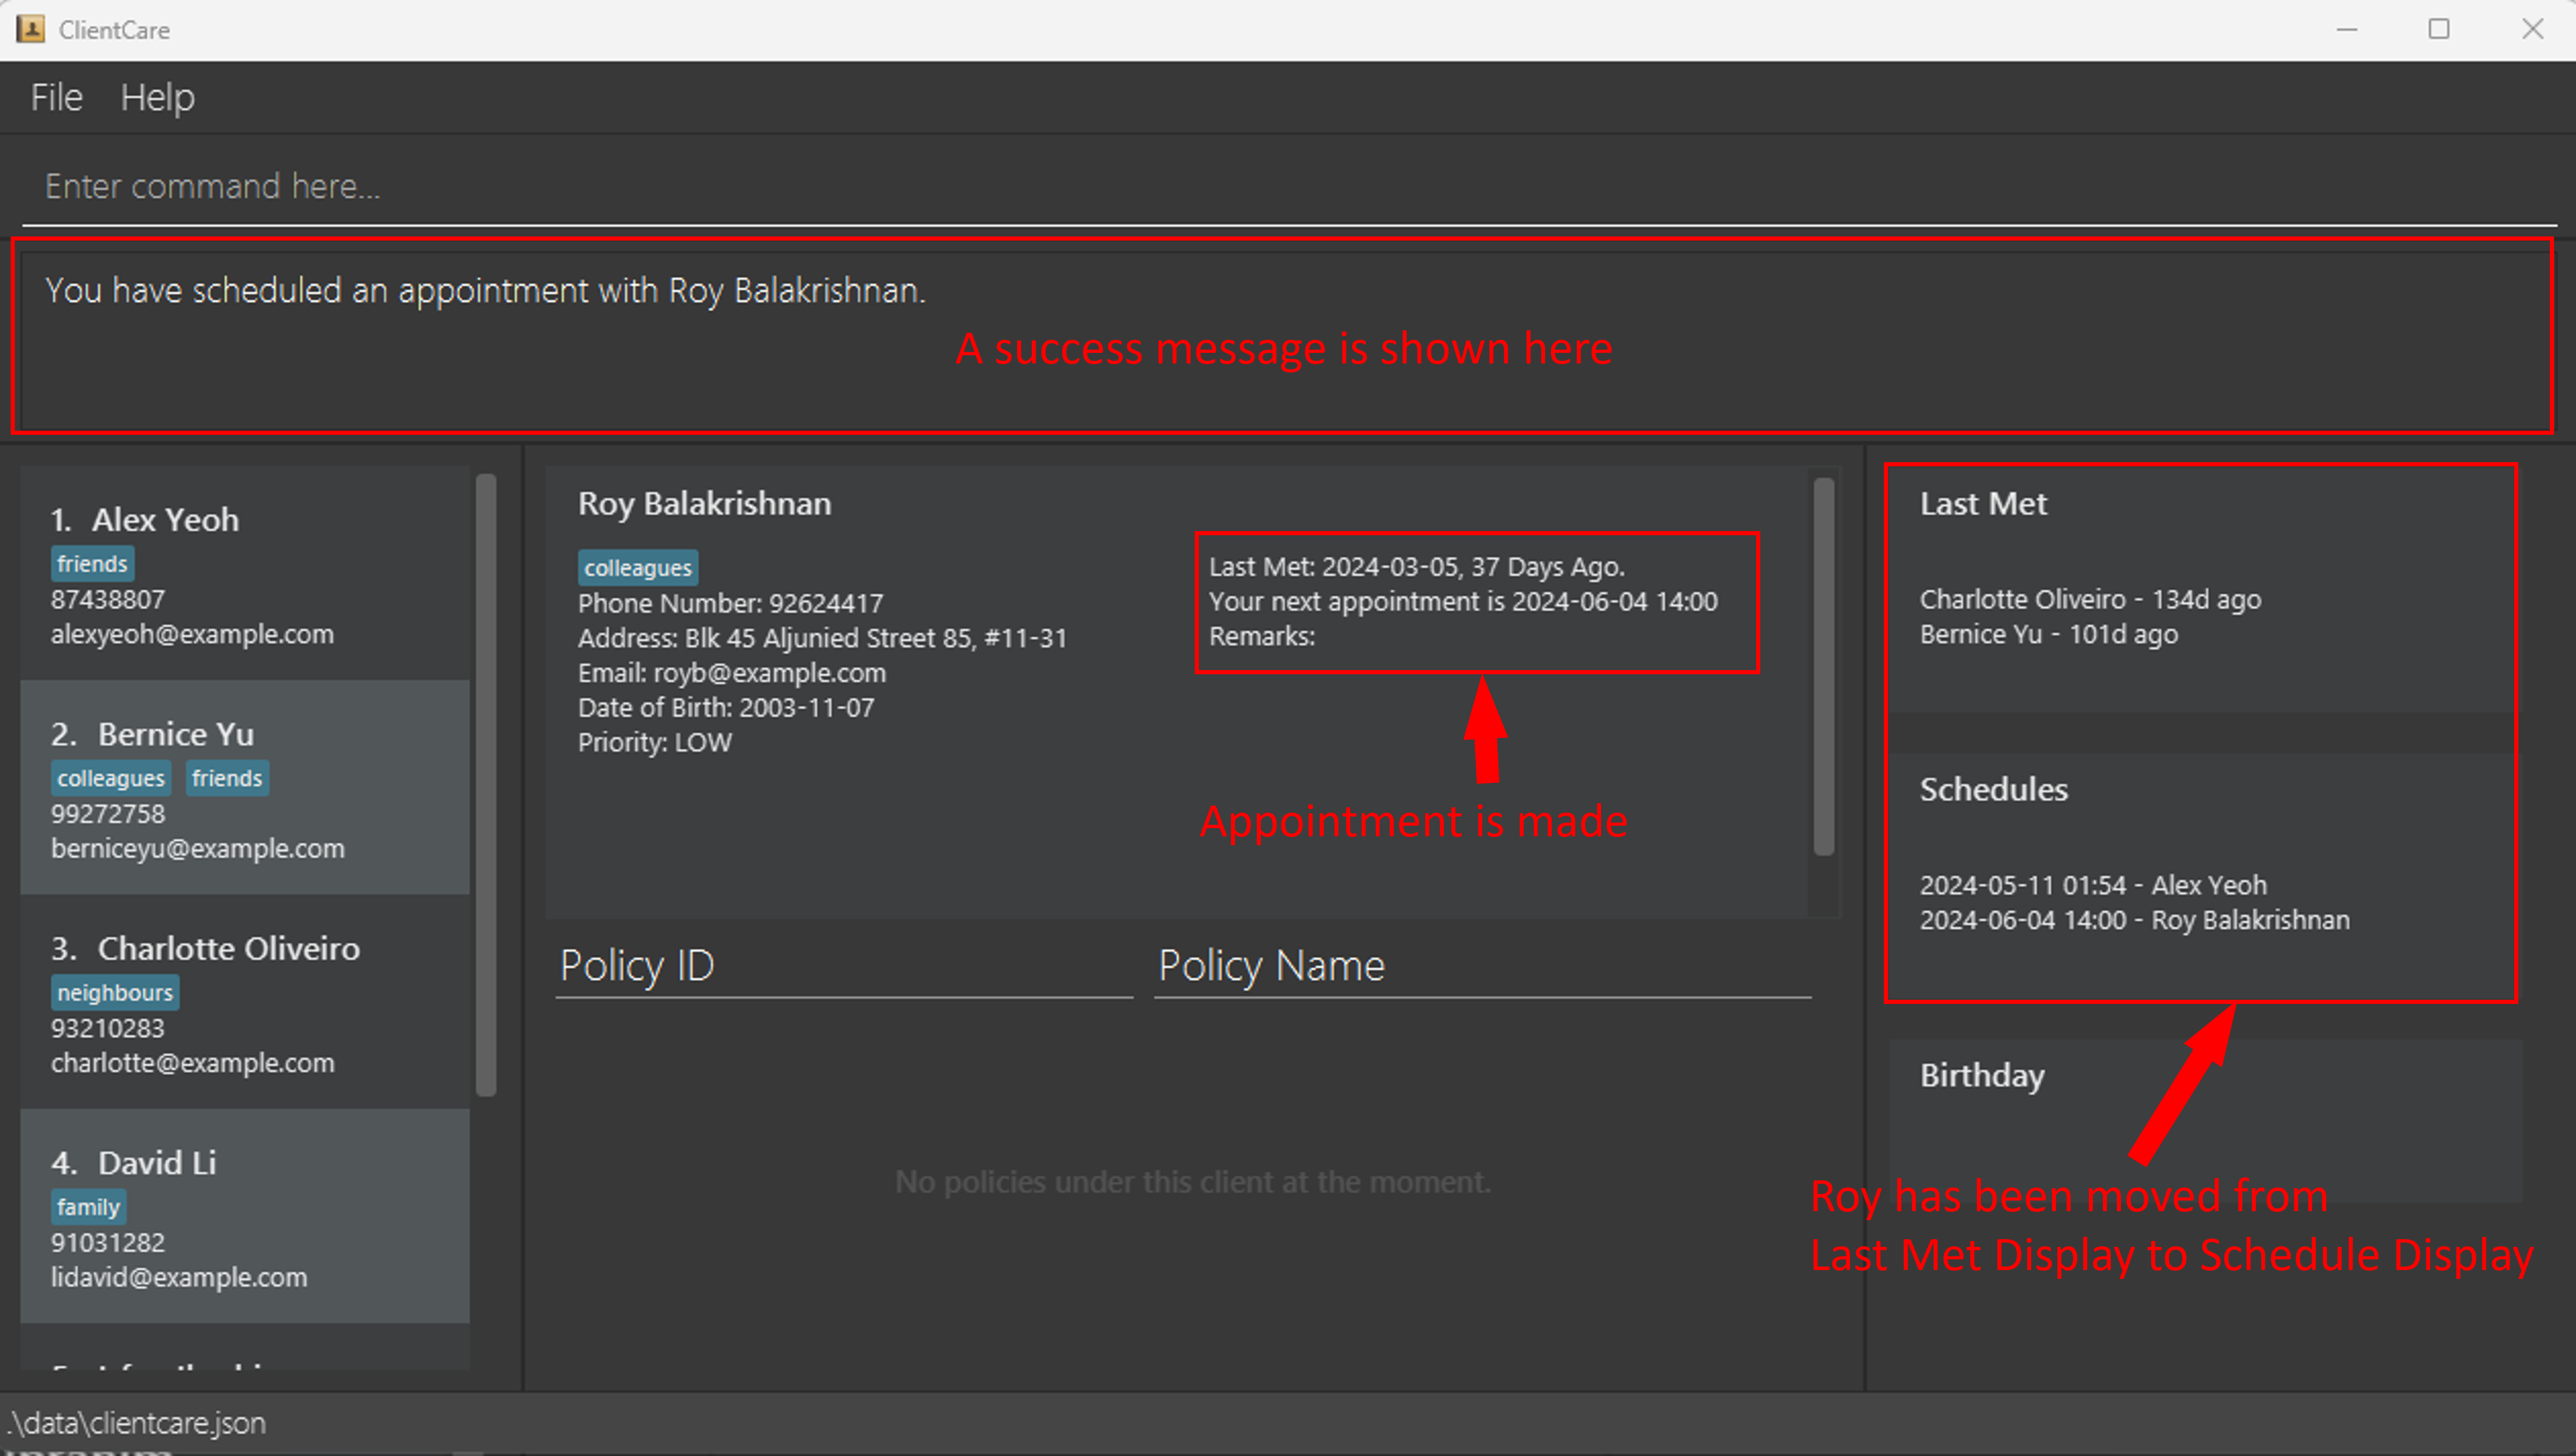
After Command:
An appointment with Roy has been made! Notice how Roy's name is removed from Last Met Display and added to Schedule Display. ClientCare shows a success message in the Feedback Display too.
Marking appointments: mark
Done with or need to cancel an appointment?
You can mark an appointment as completed with mark.
Format: mark INDEX
- Marks an appointment with the client at the specified
INDEXas completed. - The index refers to the index number shown in the displayed client list.
- The index must be a positive integer 1, 2, 3, …
Examples:
mark 1marks the appointment with the 1st client in the client list as completed.
Tip: If you have successfully met up with your client, do remember to update the last met date with met!
Before Command:
Suppose you have met up with Roy in the appointment. Roy is number 6 on the client list.
Type the following into the Command Input: mark 6 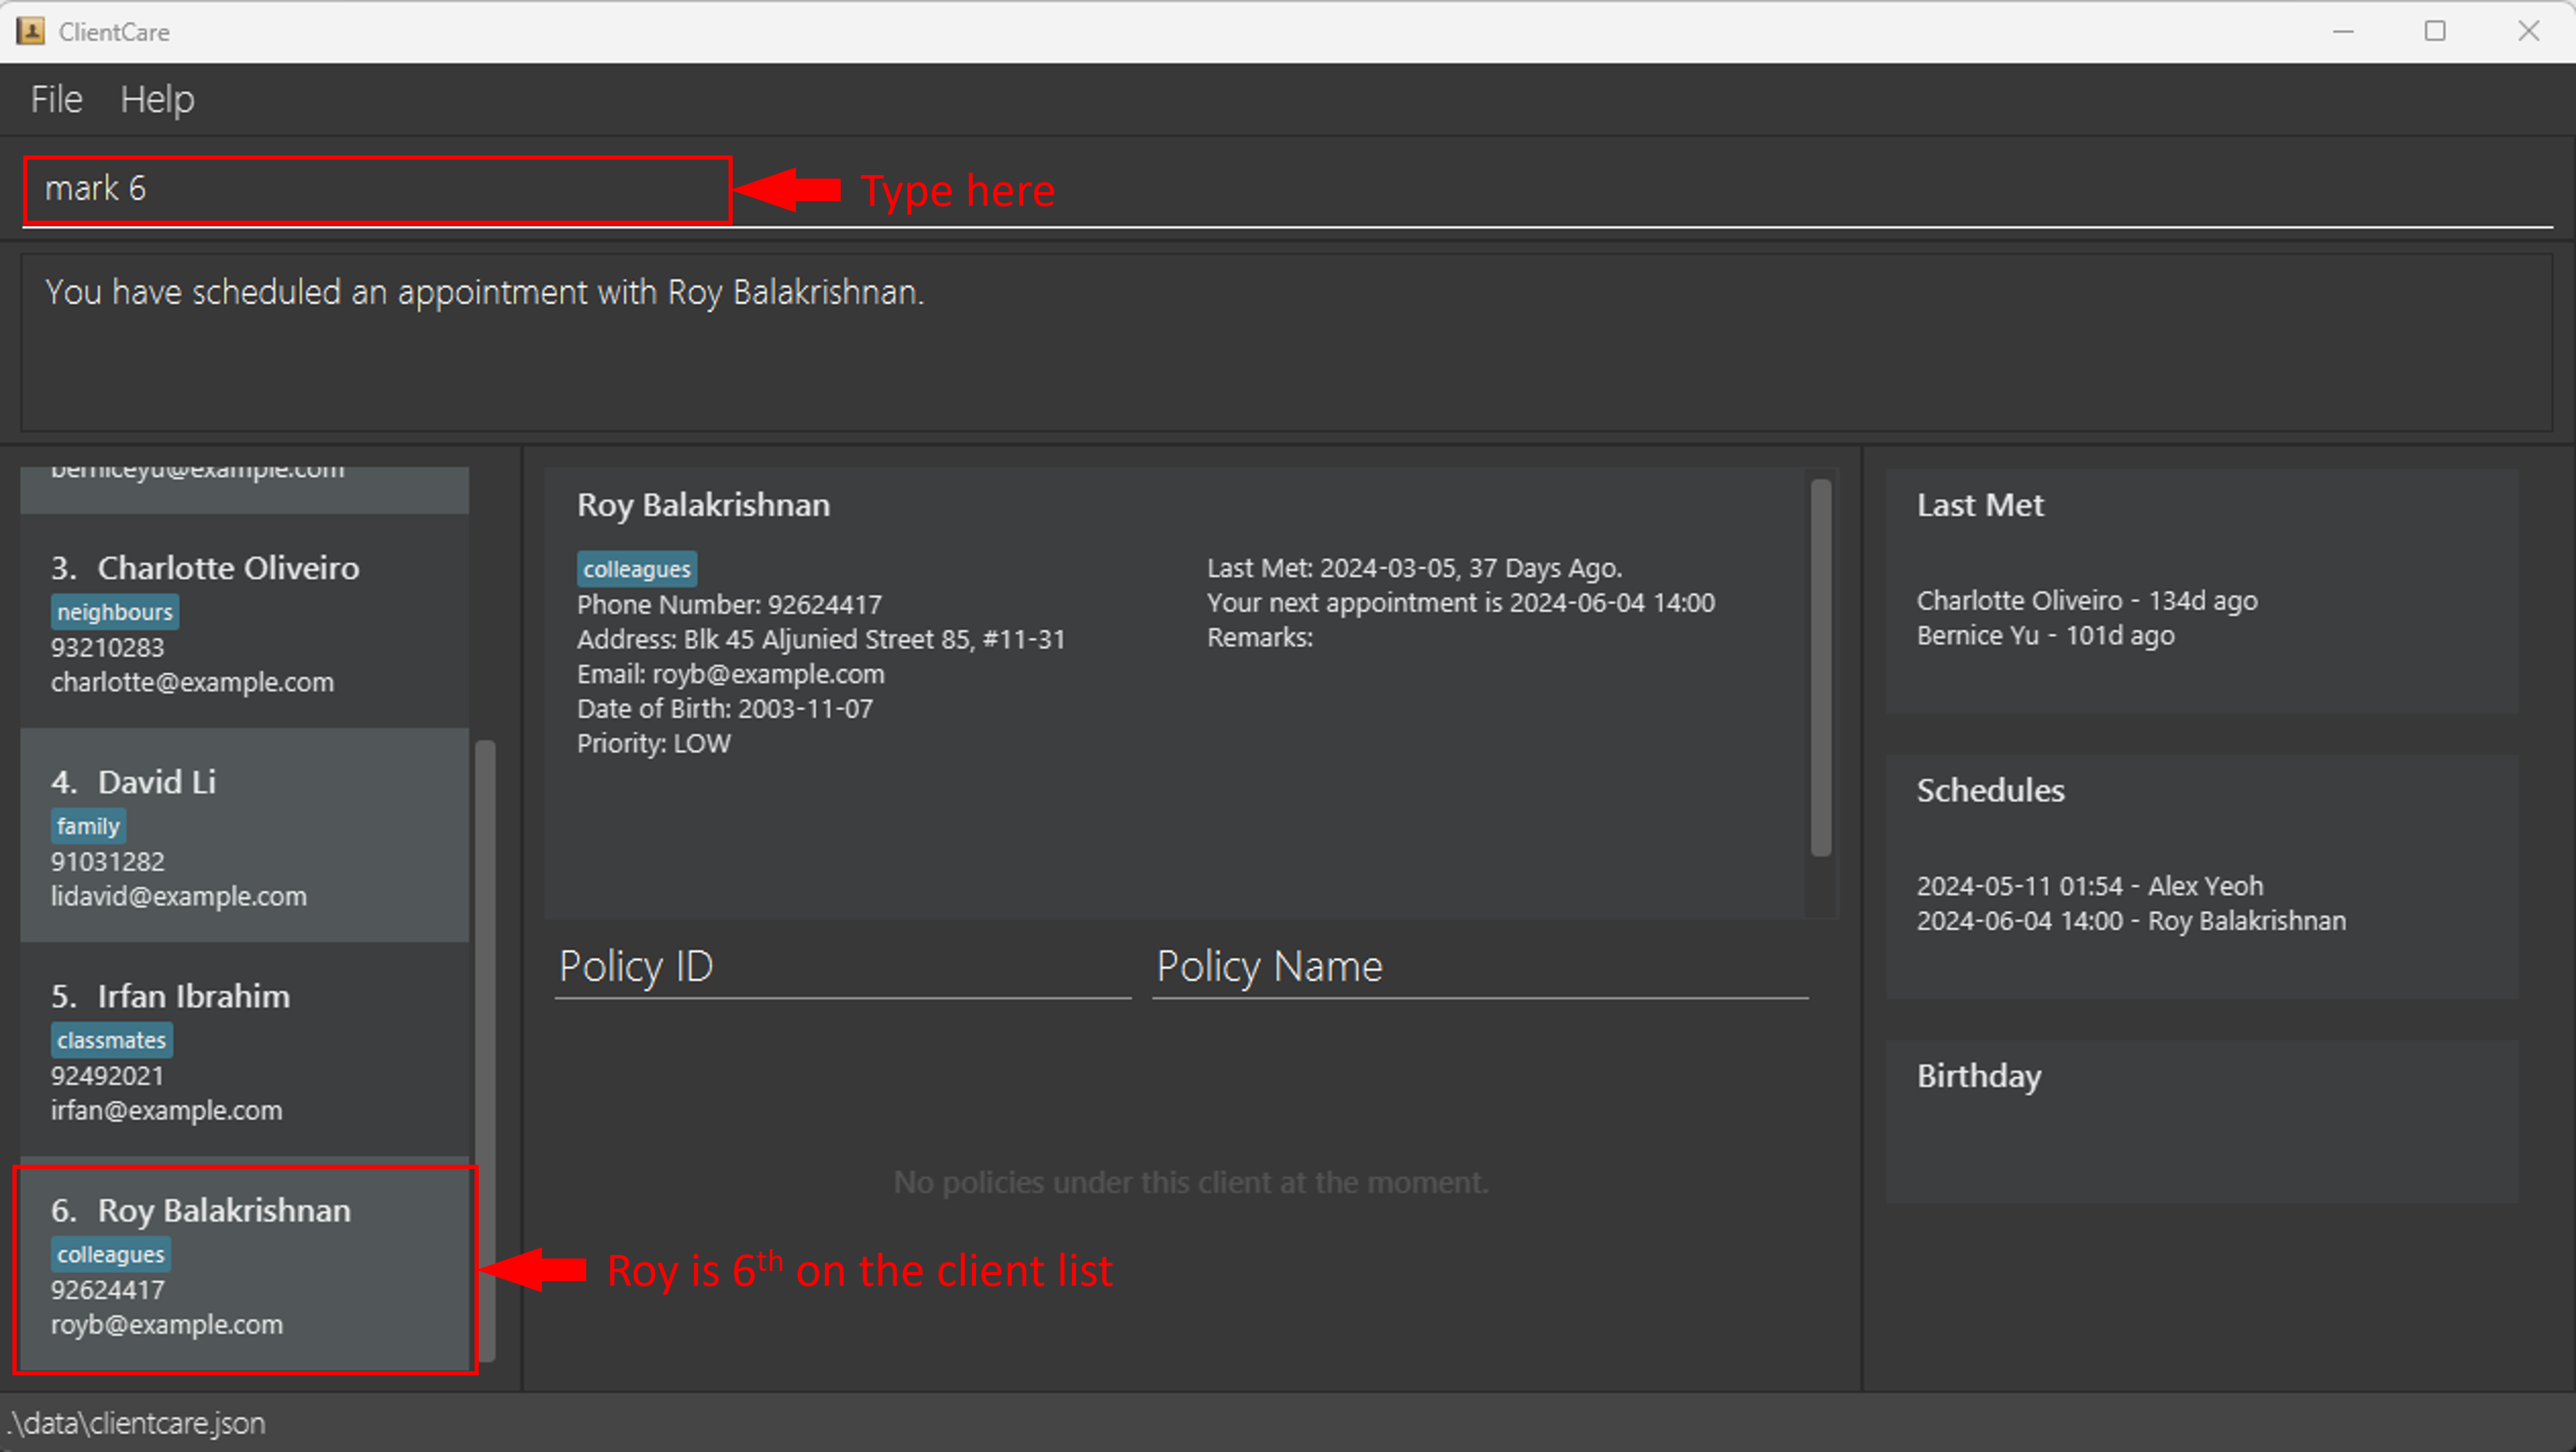
After Command:
Your appointment with Roy has been marked as done! ClientCare shows a success message in the Feedback Display too. Notice how Roy's name is removed from Schedule Display and added to Last Met Display. This is because you need to use 'met' to update your Last Met date with Roy.

If your appointment has been cancelled or postponed, you can still use mark. You can leave the Last Met date with Roy unchanged.
Policy related commands
Not sure what policies your clients have? ClientCare got you covered!
ClientCare helps you to manage all your clients' policies and allows you to view what policies your clients have easily.
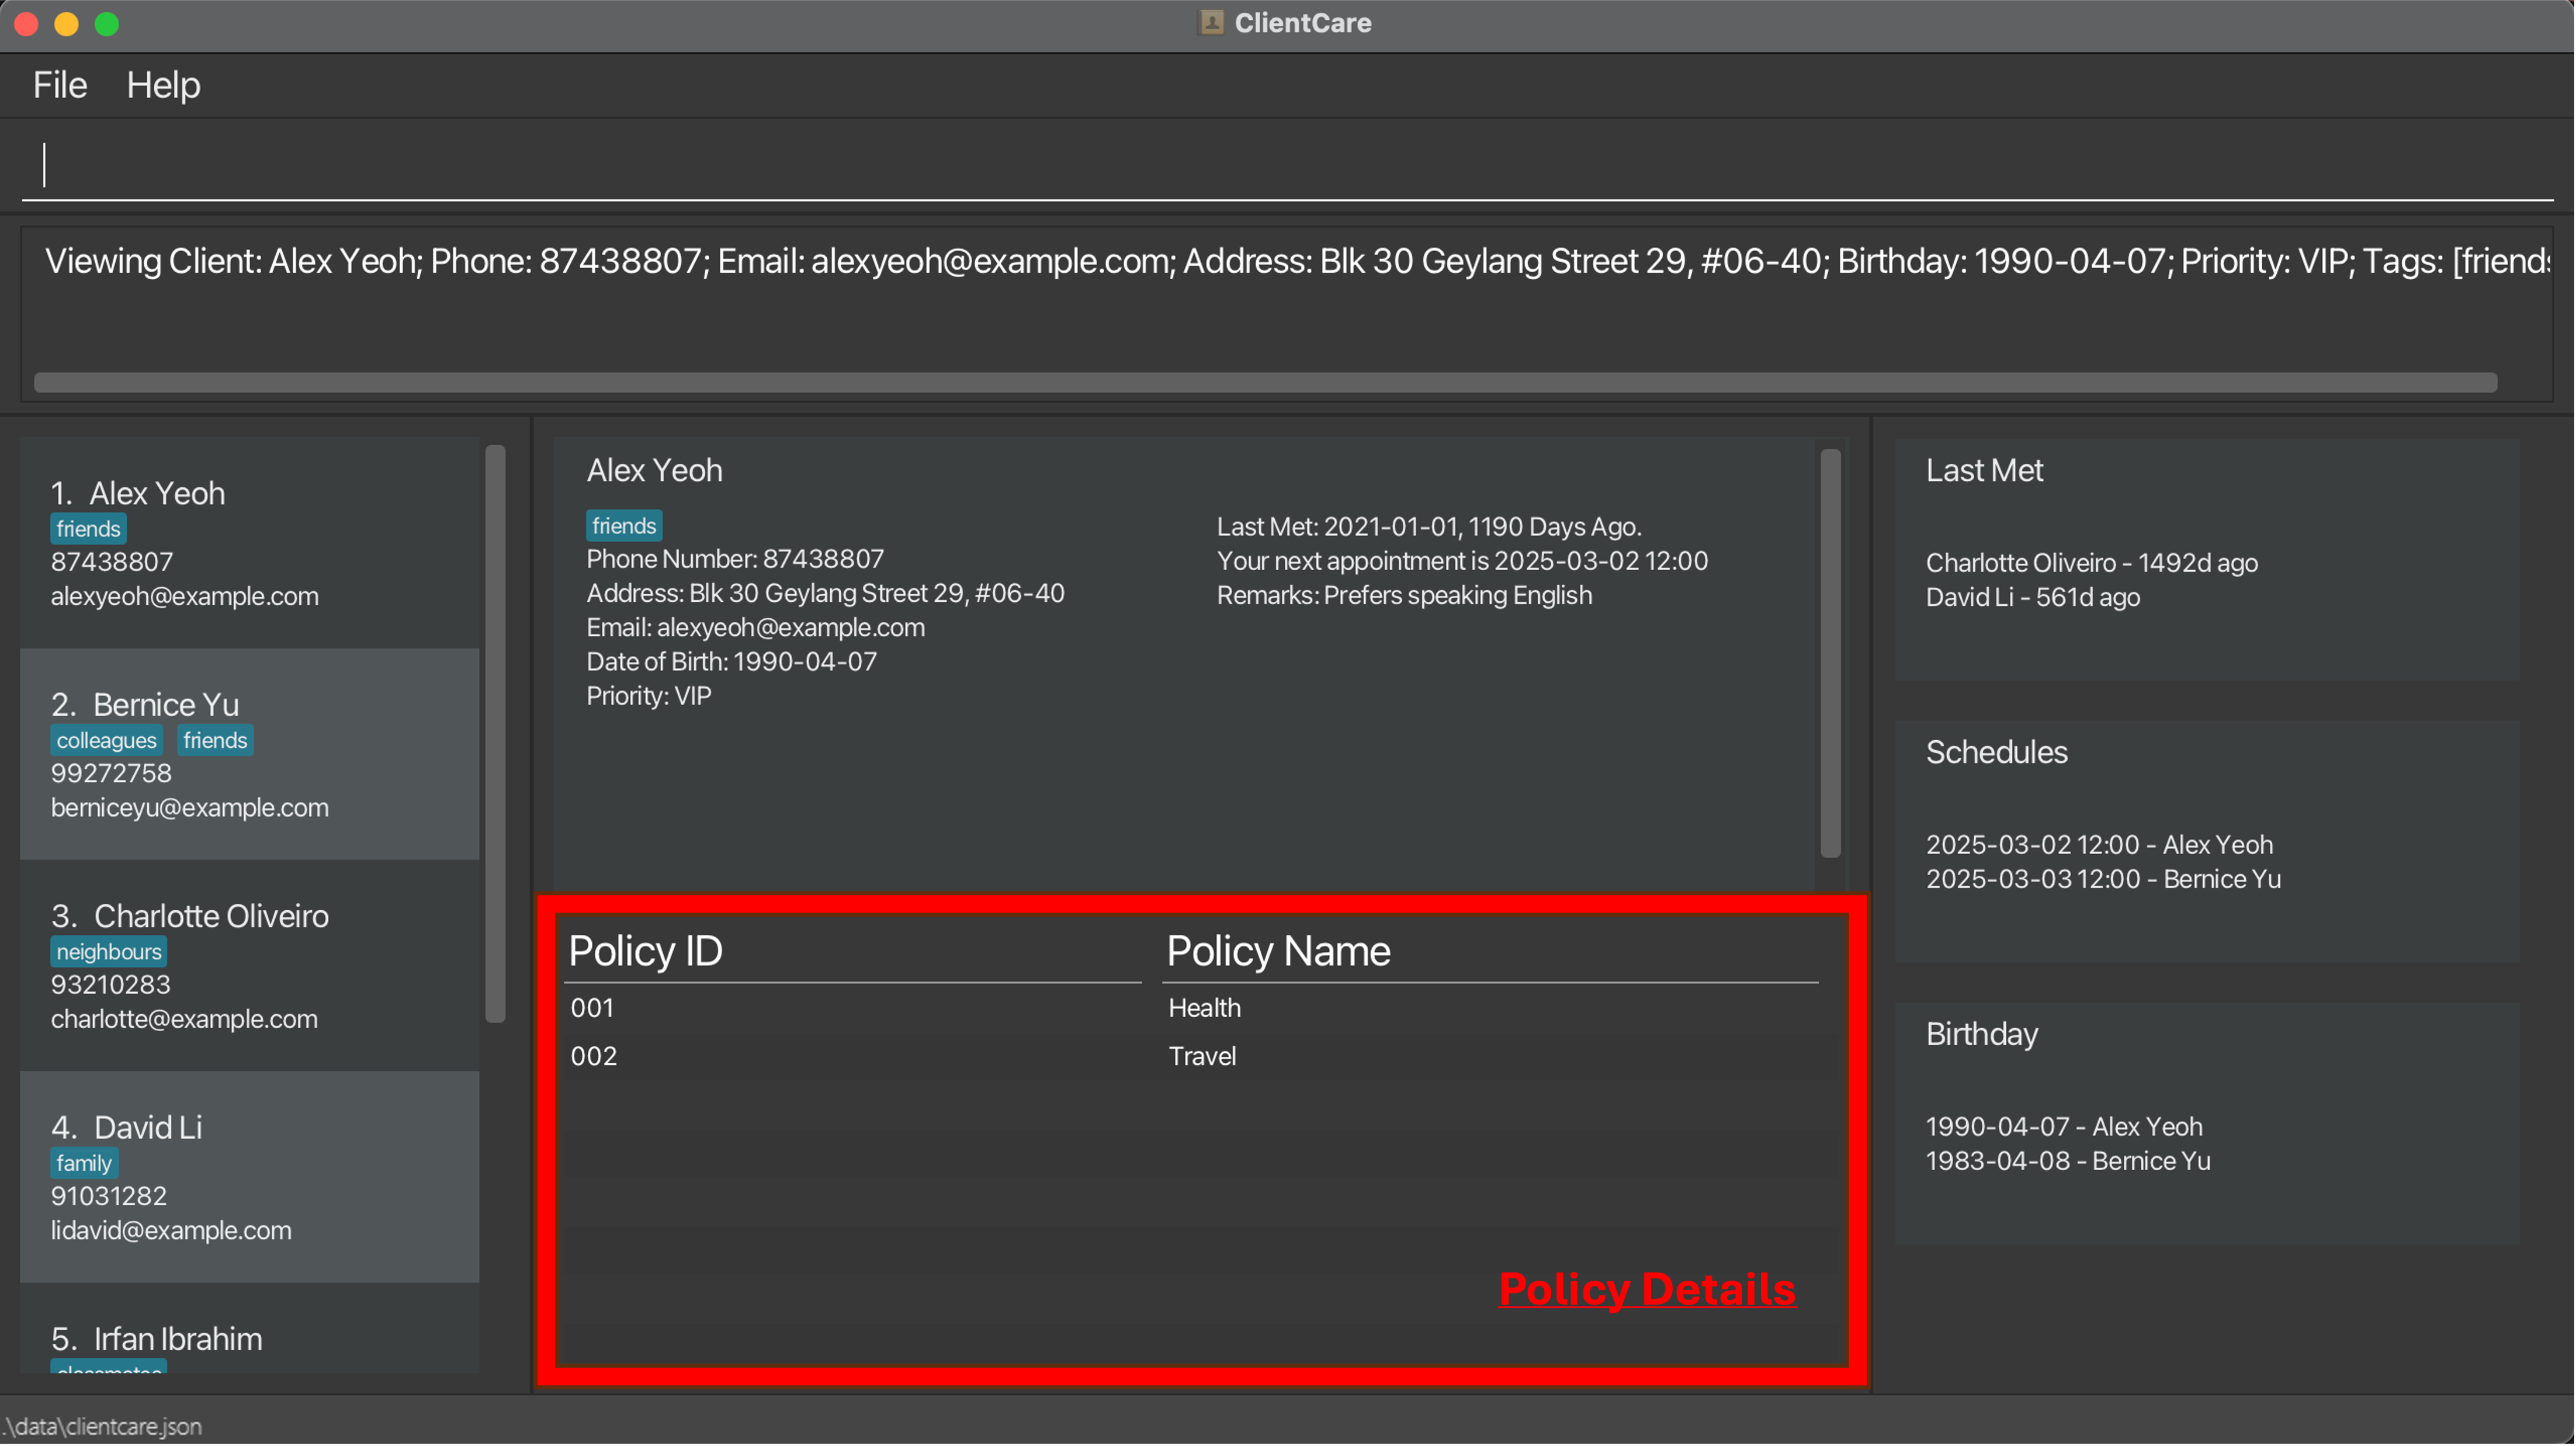
You can click on "Policy ID" and "Policy Name" to sort the policies by their respective field. Clicking once will sort in ascending order, and clicking again will sort in descending order.
Note: Sorting for both "Policy ID" and "Policy Name" will follow lexicographical order.
ClientCare offers the following commands to help you manage your clients' policies:
Adding a policy: addpolicy
Just closed a deal?
You can add a policy to a client with addpolicy.
Format: addpolicy INDEX n/POLICY_NAME i/POLICY_ID
- Adds a policy to the client at the specified
INDEX. - The index refers to the index number shown in the displayed client list.
- The index must be a positive integer 1, 2, 3, …
- The policy ID of the new policy must be unique to other policies the client has.
Examples:
addpolicy 1 n/Life i/1adds a policy namedLifewith policy ID1to the 1st client in the client list.addpolicy 3 n/Health i/2adds a policy namedHealthwith policy ID2to the 3rd client in the client list.
Note: "001" and "1" are not considered duplicated policy IDs as different insurance companies have different numbering schemes.
Note: Although most policy IDs will be up to 25 digits, ClientCare allows you to put up to about 40 digits long before values are truncated in fullscreen. The limit might vary depending on your screen size, so do check if the policy ID is fully displayed.
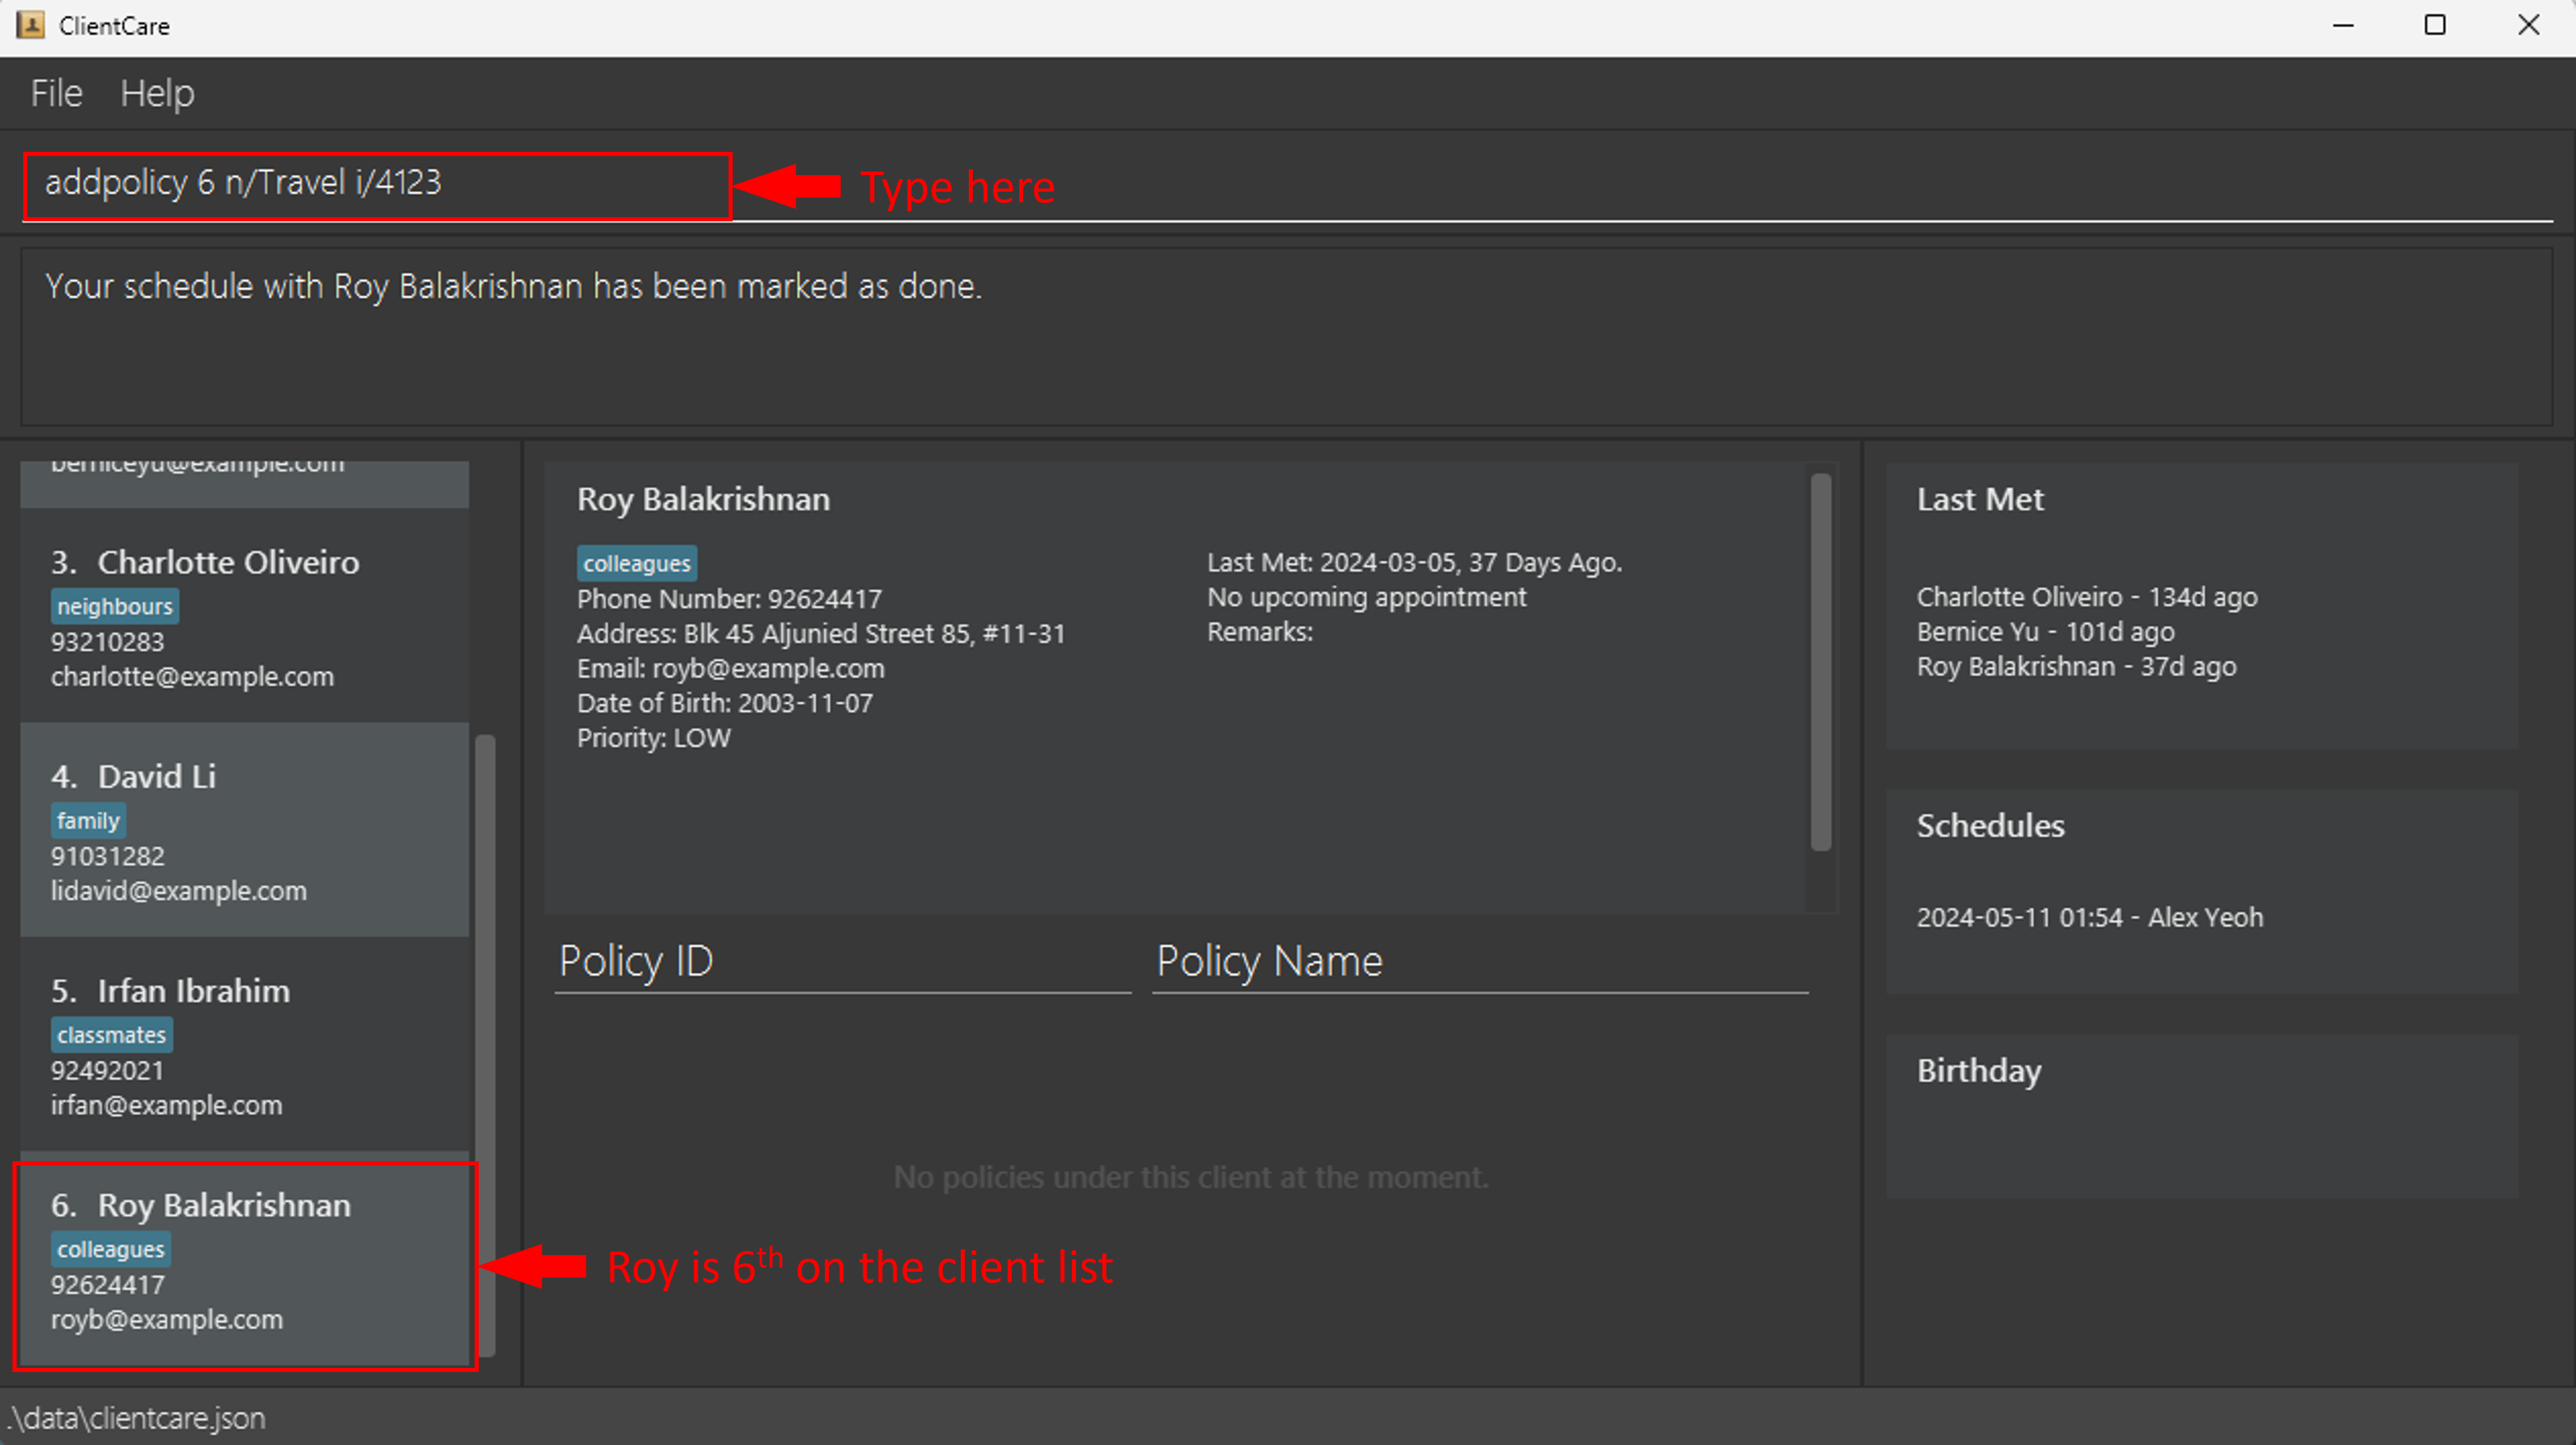
Before Command:
Suppose you have closed a new policy with Roy. His new policy name is Travel and policy ID is 4123. Roy is number 6 on the client list.
Type the following into the Command Input: addpolicy 6 n/Travel i/4123
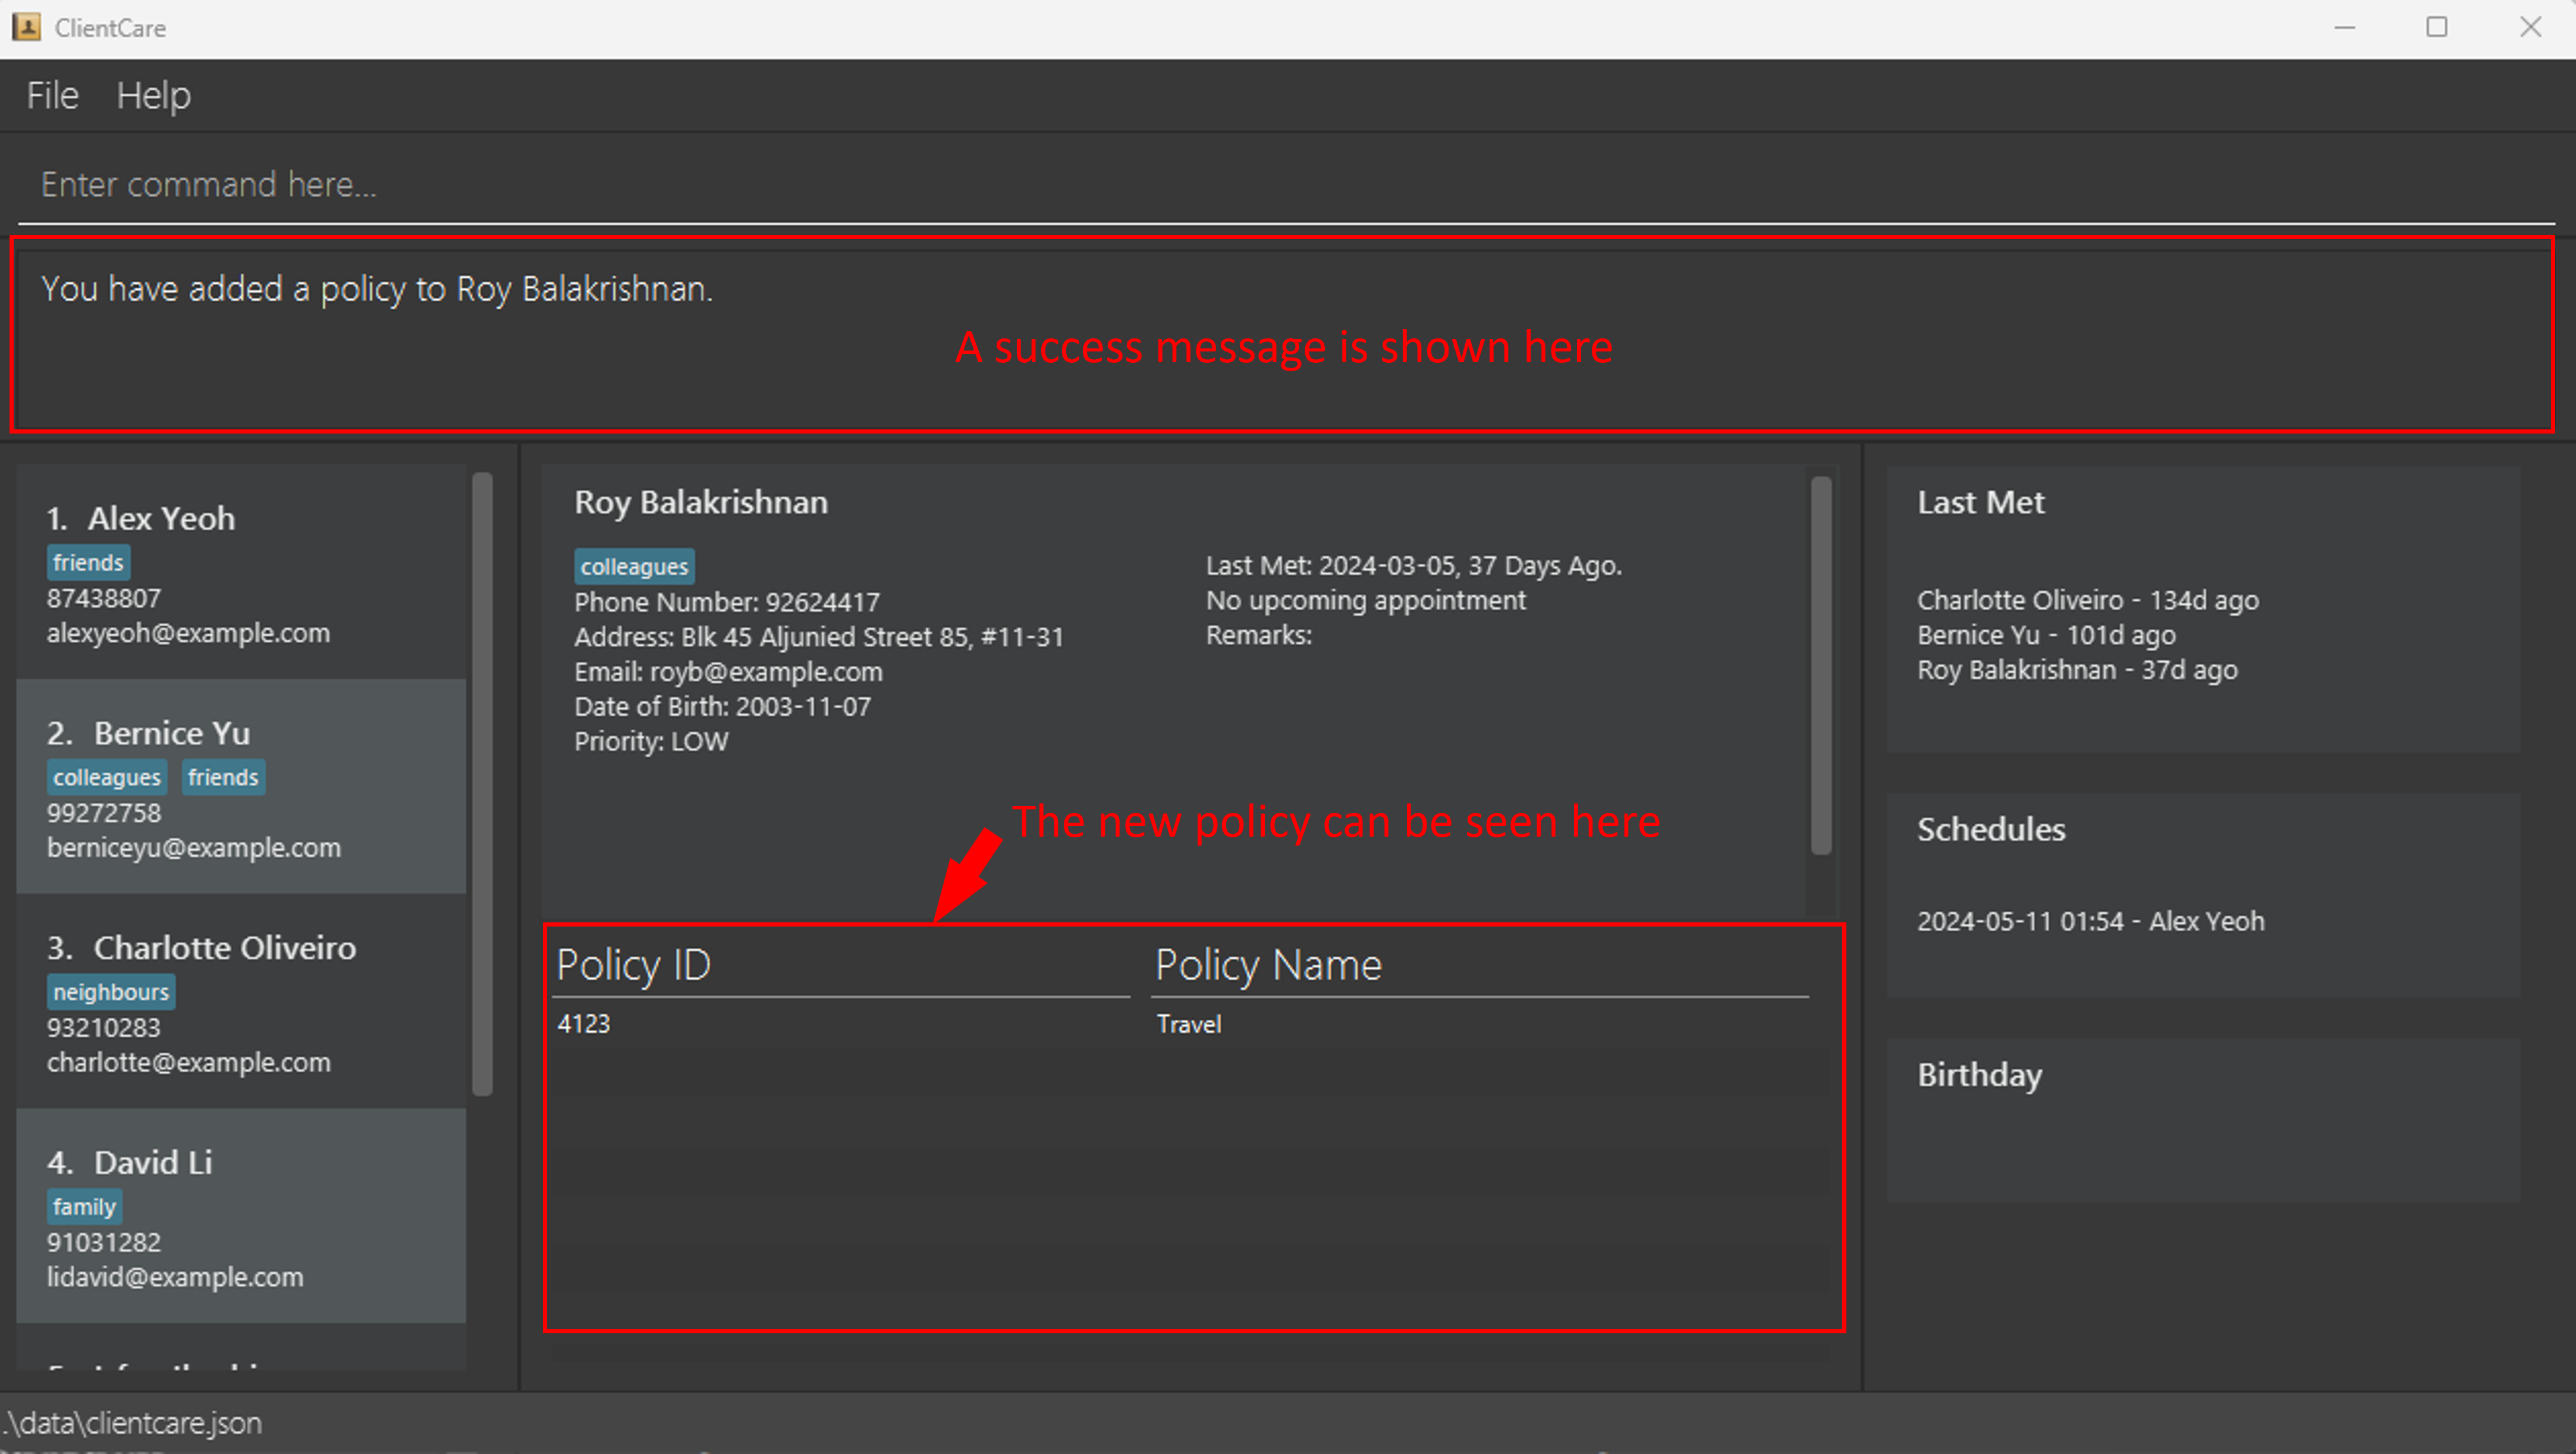
After Command:
Roy's new policy has been added! ClientCare shows a success message in the Feedback Display too.
Deleting a policy: deletepolicy
Wrong policy or a policy just matured?
You can delete a policy from a client with deletepolicy.
Format: deletepolicy INDEX i/POLICY_ID
- Deletes a policy from the client at the specified
INDEX. - The index refers to the index number shown in the displayed client list.
- The index must be a positive integer 1, 2, 3, …
Examples:
deletepolicy 1 i/1deletes the policy with policy ID1from the 1st client in the client list.deletepolicy 3 i/2deletes the policy with policy ID2from the 3rd client in the client list.
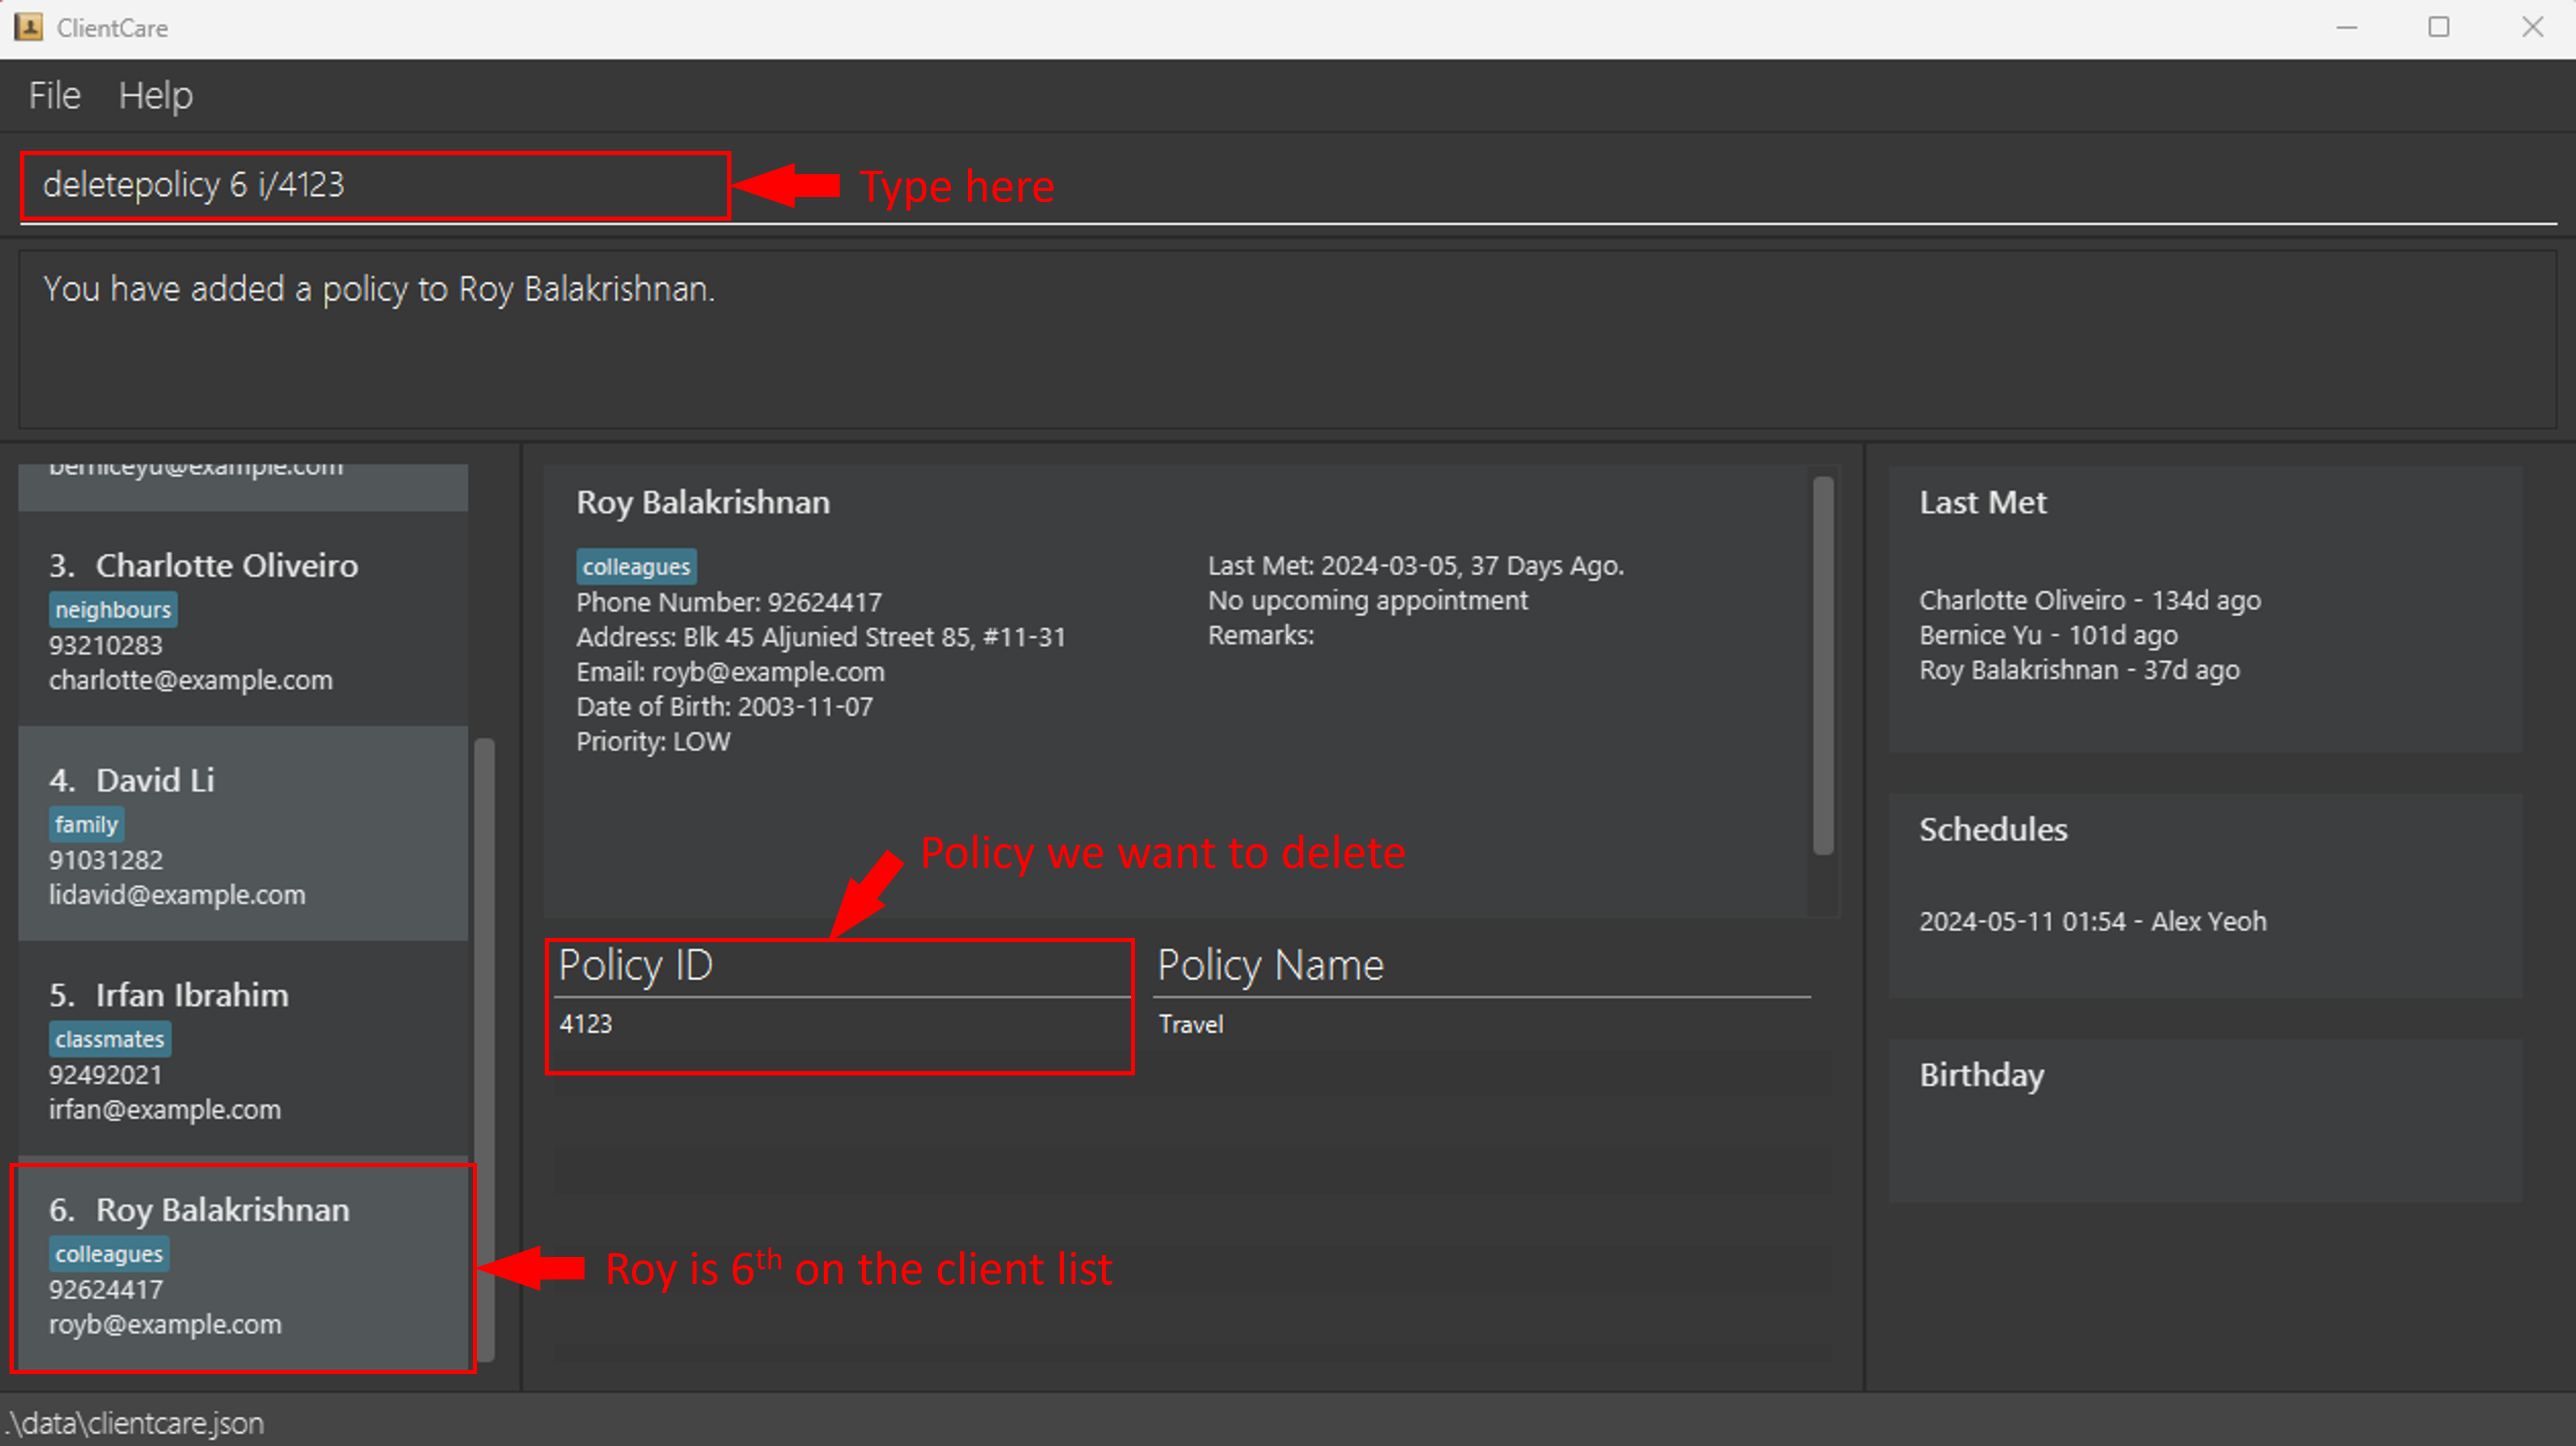
Before Command:
Suppose Roy's policy has matured. His policy name is Travel and policy ID is 4123. Roy is number 6 on the client list.
Type the following into the Command Input: deletepolicy 6 i/4123
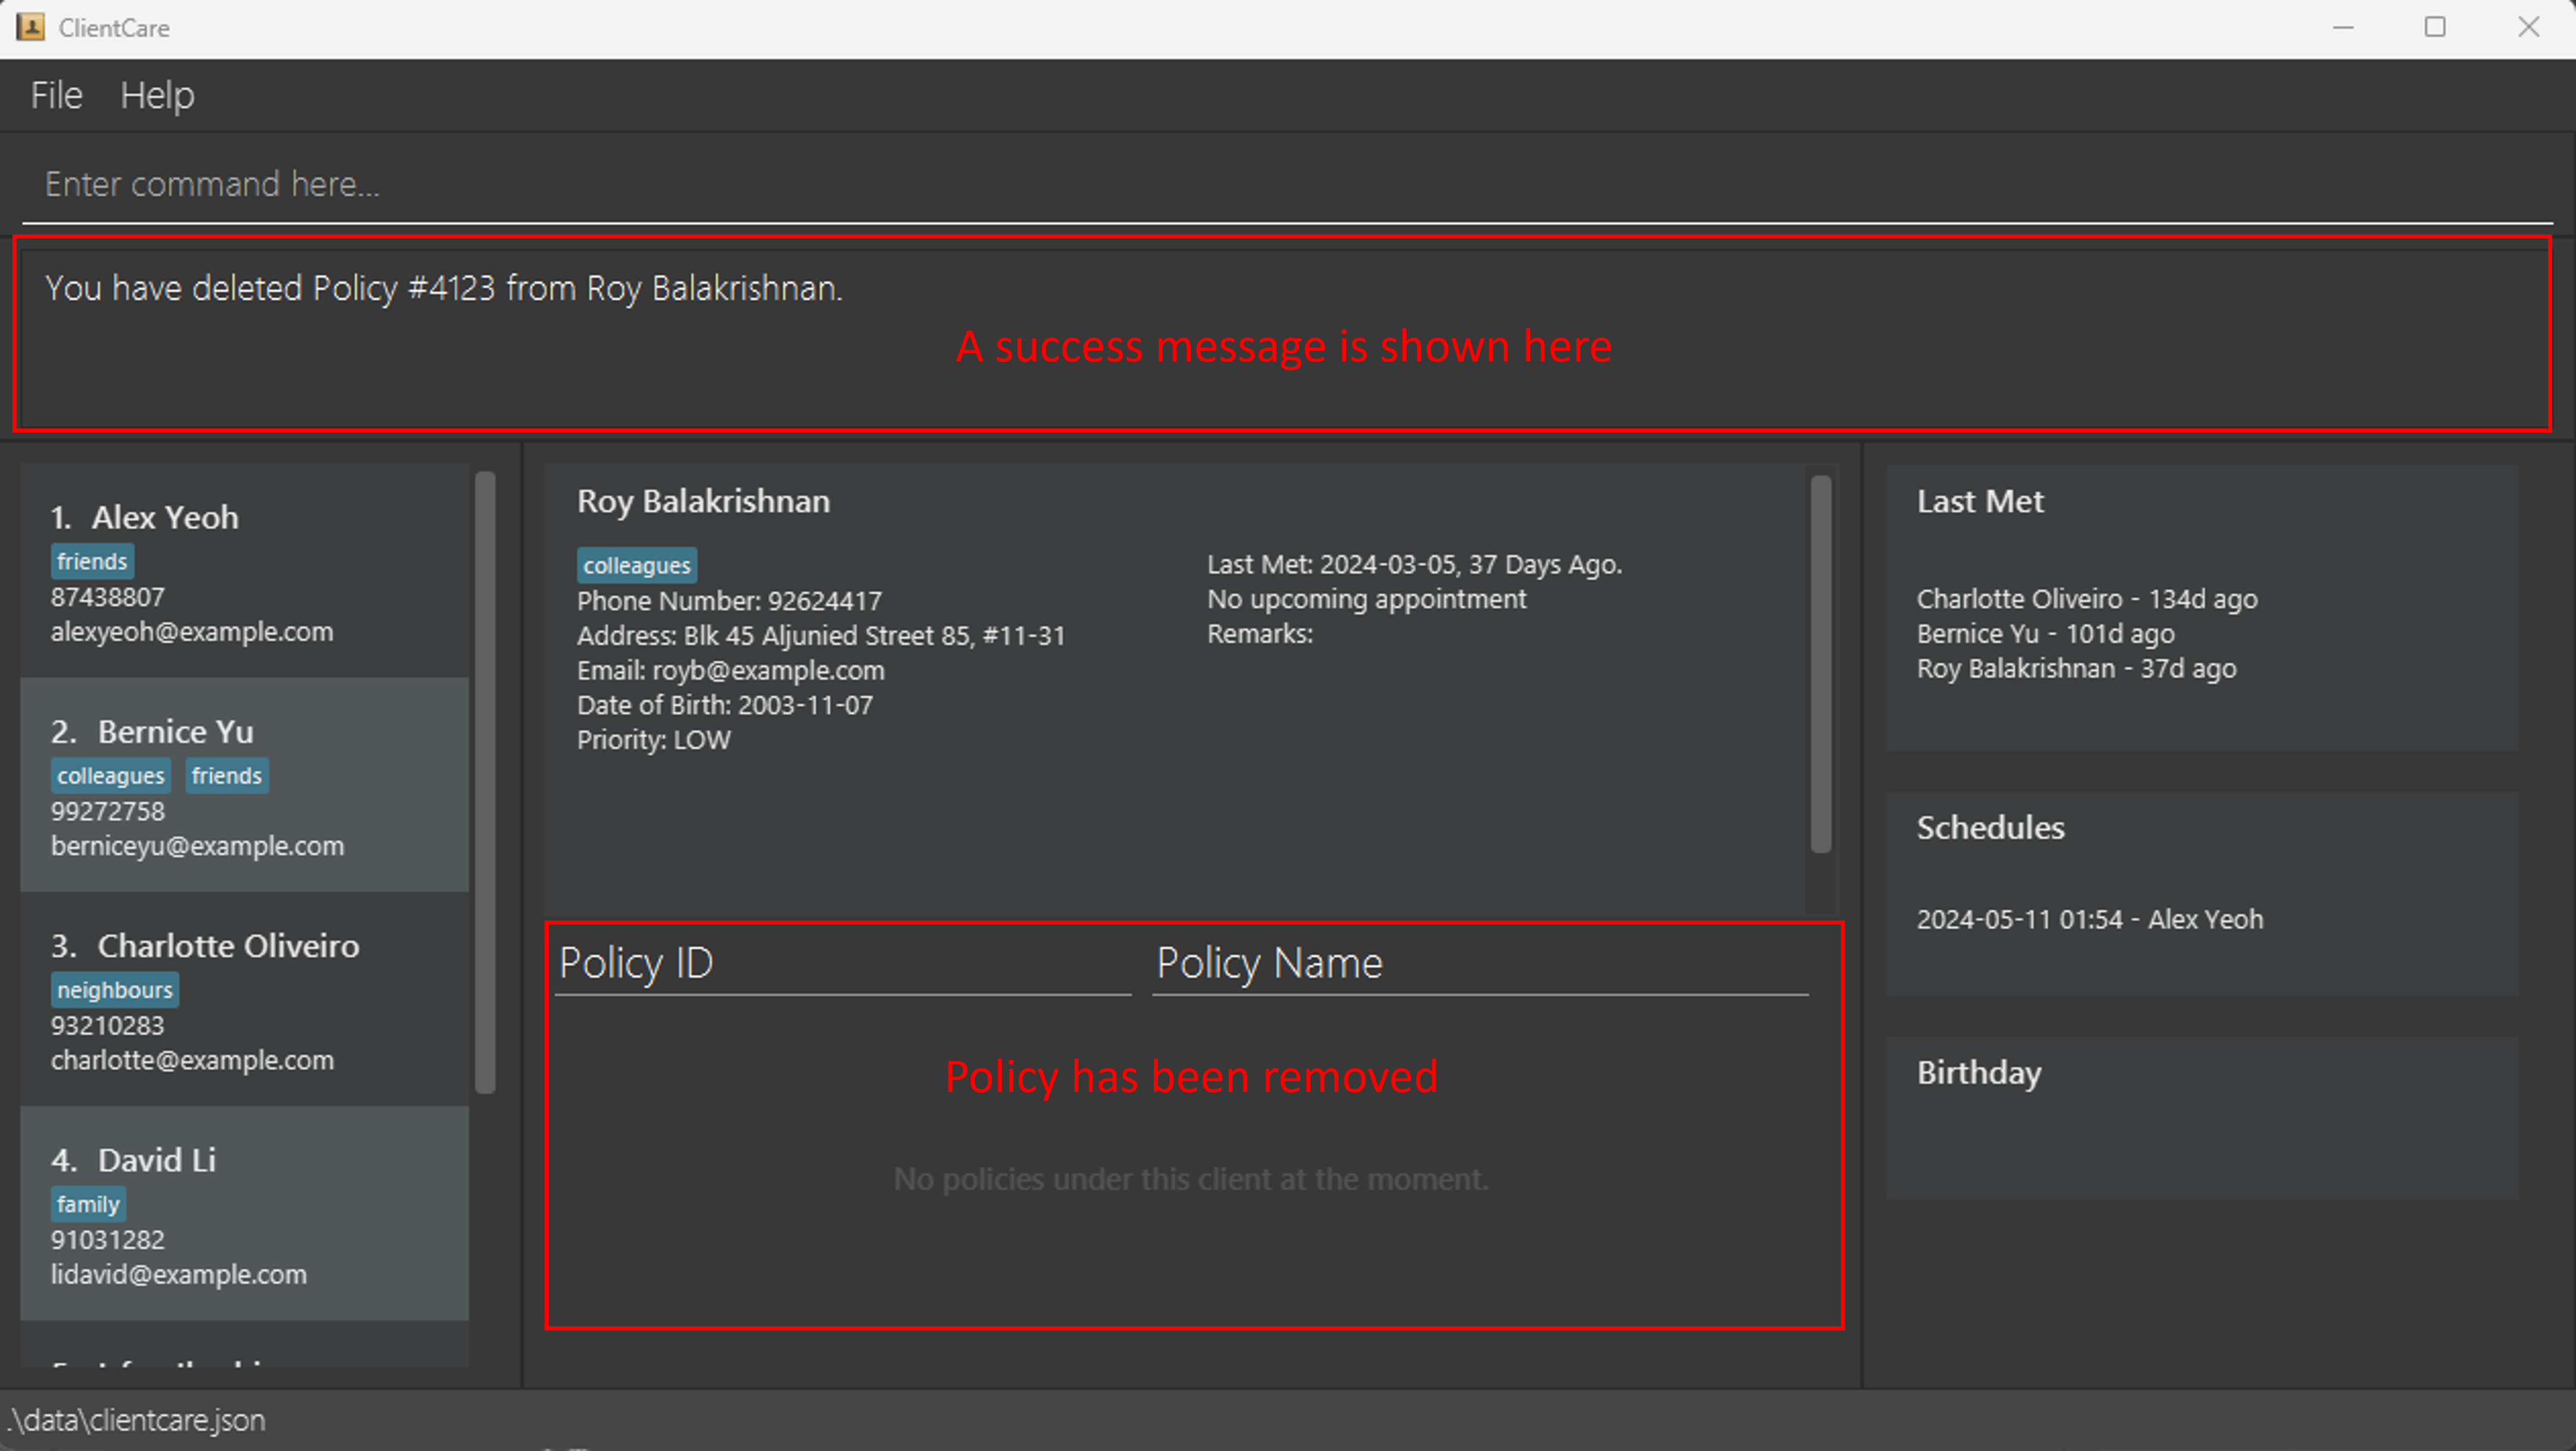
After Command:
Roy's policy with ID 4123 has been deleted! ClientCare shows a success message in the Feedback Display too.
Miscellaneous
Viewing help: help
You can look for help by typing help.
You will see a message explaining how to access the help page.

Format: help
Exiting the program: exit
Done with all your work? You can exit the program with exit.
Format: exit
Saving the data
No manual saving is required! ClientCare data are saved in the hard disk automatically after any command that changes the data. There is no need to save manually.
Editing the data file
ClientCare data is automatically saved as a file [ClientCare file location]/data/clientcare.json. Advanced users are welcome to update data directly by editing that data file.
CAUTION: If your changes to the data file makes its format invalid, ClientCare will discard all data and start with an empty data file at the next run. Hence, it is recommended to take a backup of the file before editing it.
Furthermore, certain edits can cause the ClientCare to behave in unexpected ways (e.g., if a value entered is outside the acceptable range). Therefore, edit the data file only if you are confident that you can update it correctly.
FAQ
Q : How do I transfer my data to another computer?
A : Install the app in the other computer and overwrite the empty data file it creates with the file that contains the data of your previous ClientCare home folder.
Q : Why is ClientCare saying my date format is wrong?
A : Ensure that your date format is in YYYY-MM-DD instead of DD-MM-YYYY.
Q : Why is my client not showing up in Last Met Display?
A : Check if your client already has an open appointment scheduled. In addition, the default number of days before a client shows up in Last Met Display is 90 days.
This means the last met duration must be 91 days or more.
Q : Where is my 2nd schedule I made for my client?
A : Currently, ClientCare only allows users to have 1 schedule per client. Scheduling another appointment will overwrite the previous one.
Q : Can I use ClientCare on my tablets or mobile devices?
A : As of now, no. ClientCare is only supported on Desktop devices that can run Java. Not to worry, mobile device support is currently in development!
Q : Why can ClientCare only be found on GitHub?
A : GitHub allows ClientCare to be vetted by other users and programmers too. This ensures ClientCare to be up for public scrutiny, so you know ClientCare can be trusted.
Q : I tried following the guides for schedule and met. I encountered errors telling me that the dates are invalid.
A : The schedule and met commands are time-sensitive. The dates provided in the examples may no longer be relevant.
You can easily change the dates to a future or past date to suit your needs.
Q : I accidentally cleared my data in ClientCare. Can I get my data back?
A : Unfortunately, you cannot get back your data which has been cleared. In the future, you can consider copying the data folder to save as backup.
Q : A new ClientCare version has been released. Can I use my existing my data on the new version?
A : Certainly! You just need to copy and overwrite the data folder.
Q : I am not an insurance agent. Is ClientCare still relevant for me?
A : Sure! You can still use ClientCare to manage all your contact details and personal scheduling affairs. The only features that will be less relevant are those under policies.
Q : Can someone steal my data on ClientCare?
A : All data in ClientCare is stored only in your own device. Unless you give someone the data folder or has access to your computer, no one can steal your data.
Known issues and Troubleshooting
Opening ClientCare app
If you are unable to open ClientCare by clicking, here is another way.
For Windows:
- First, click on the Address Bar as shown below. It should turn blue upon clicking.
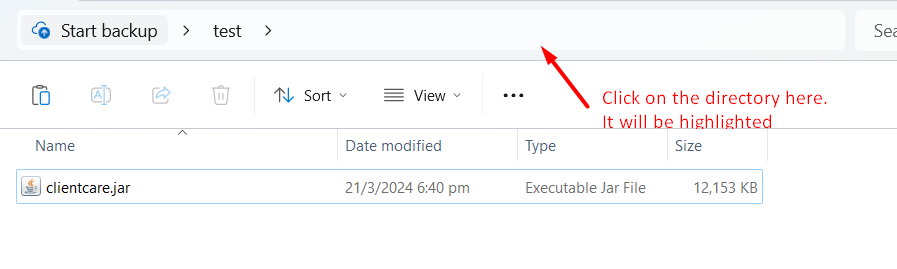
- Type
powershellinto the Address Bar and press ENTER on your keyboard
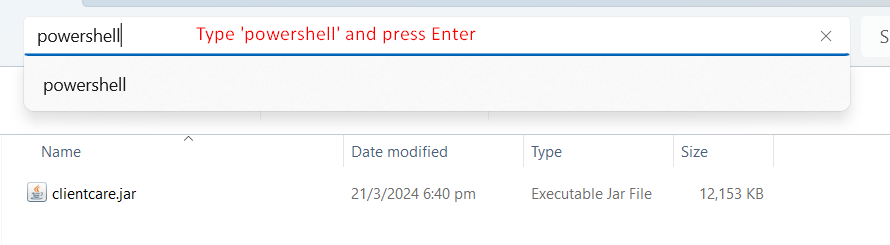
- Your PowerShell Terminal should be activated. Next, type the following:
java -jar clientcare.jar

- Hit ENTER and there we go! You should see ClientCare running on your computer!
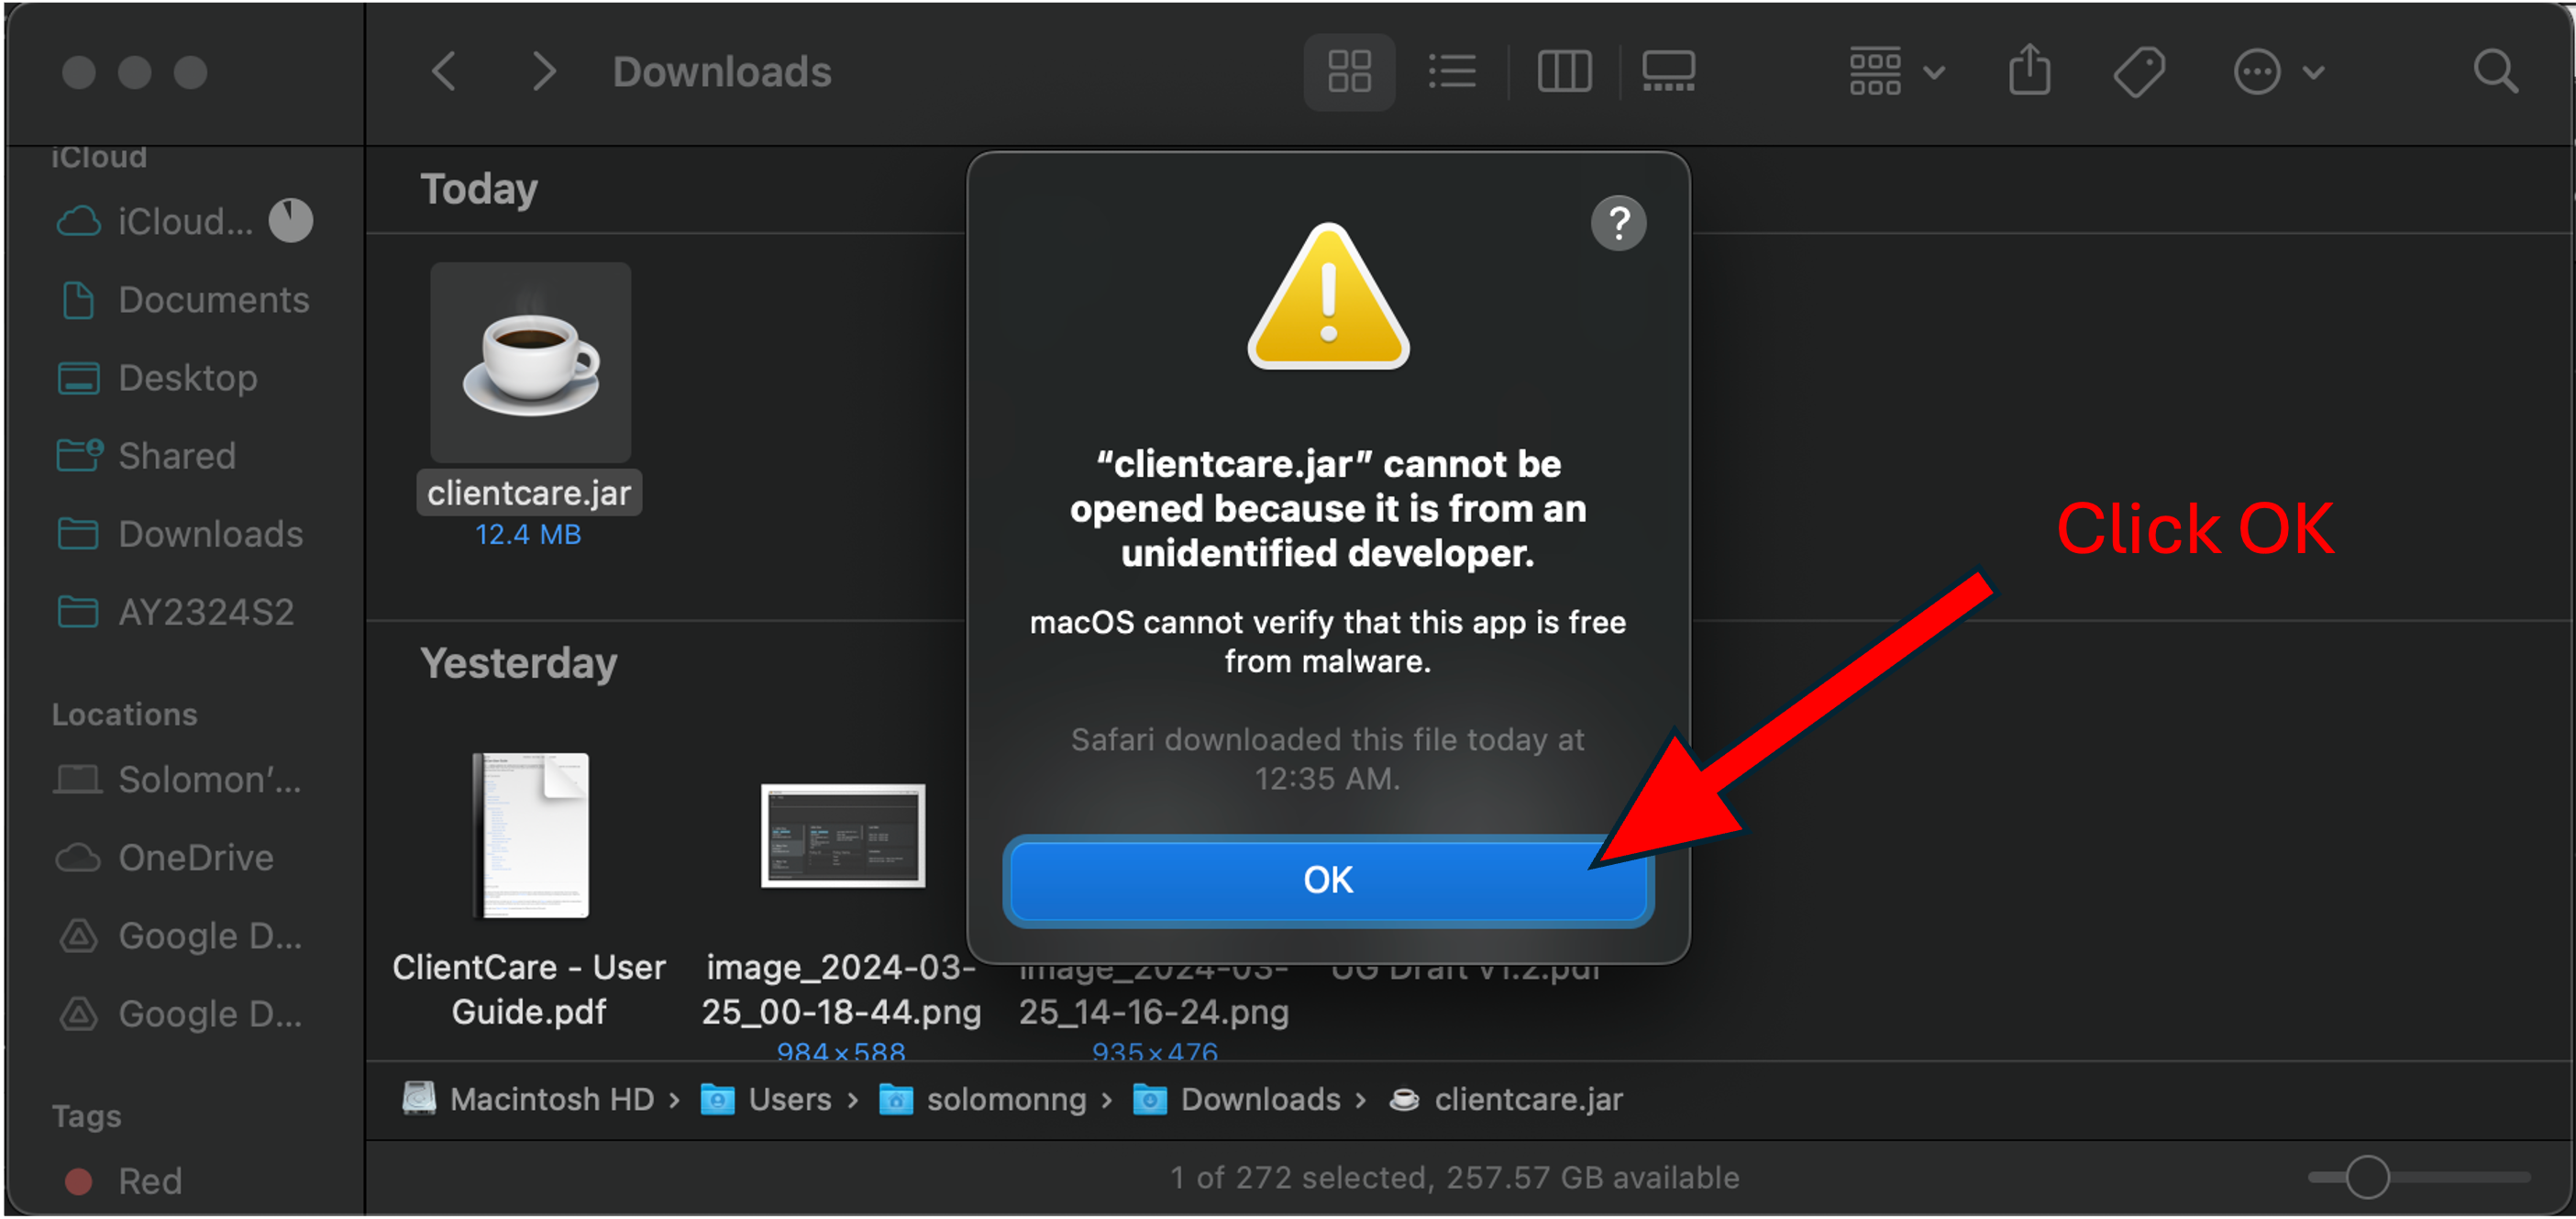
For macOS:
- If you see the following prompt, fret not! Simply click on OK and follow the following.
- To bypass the prompt, right-click on the 'clientcare.jar' app and select 'Open'.
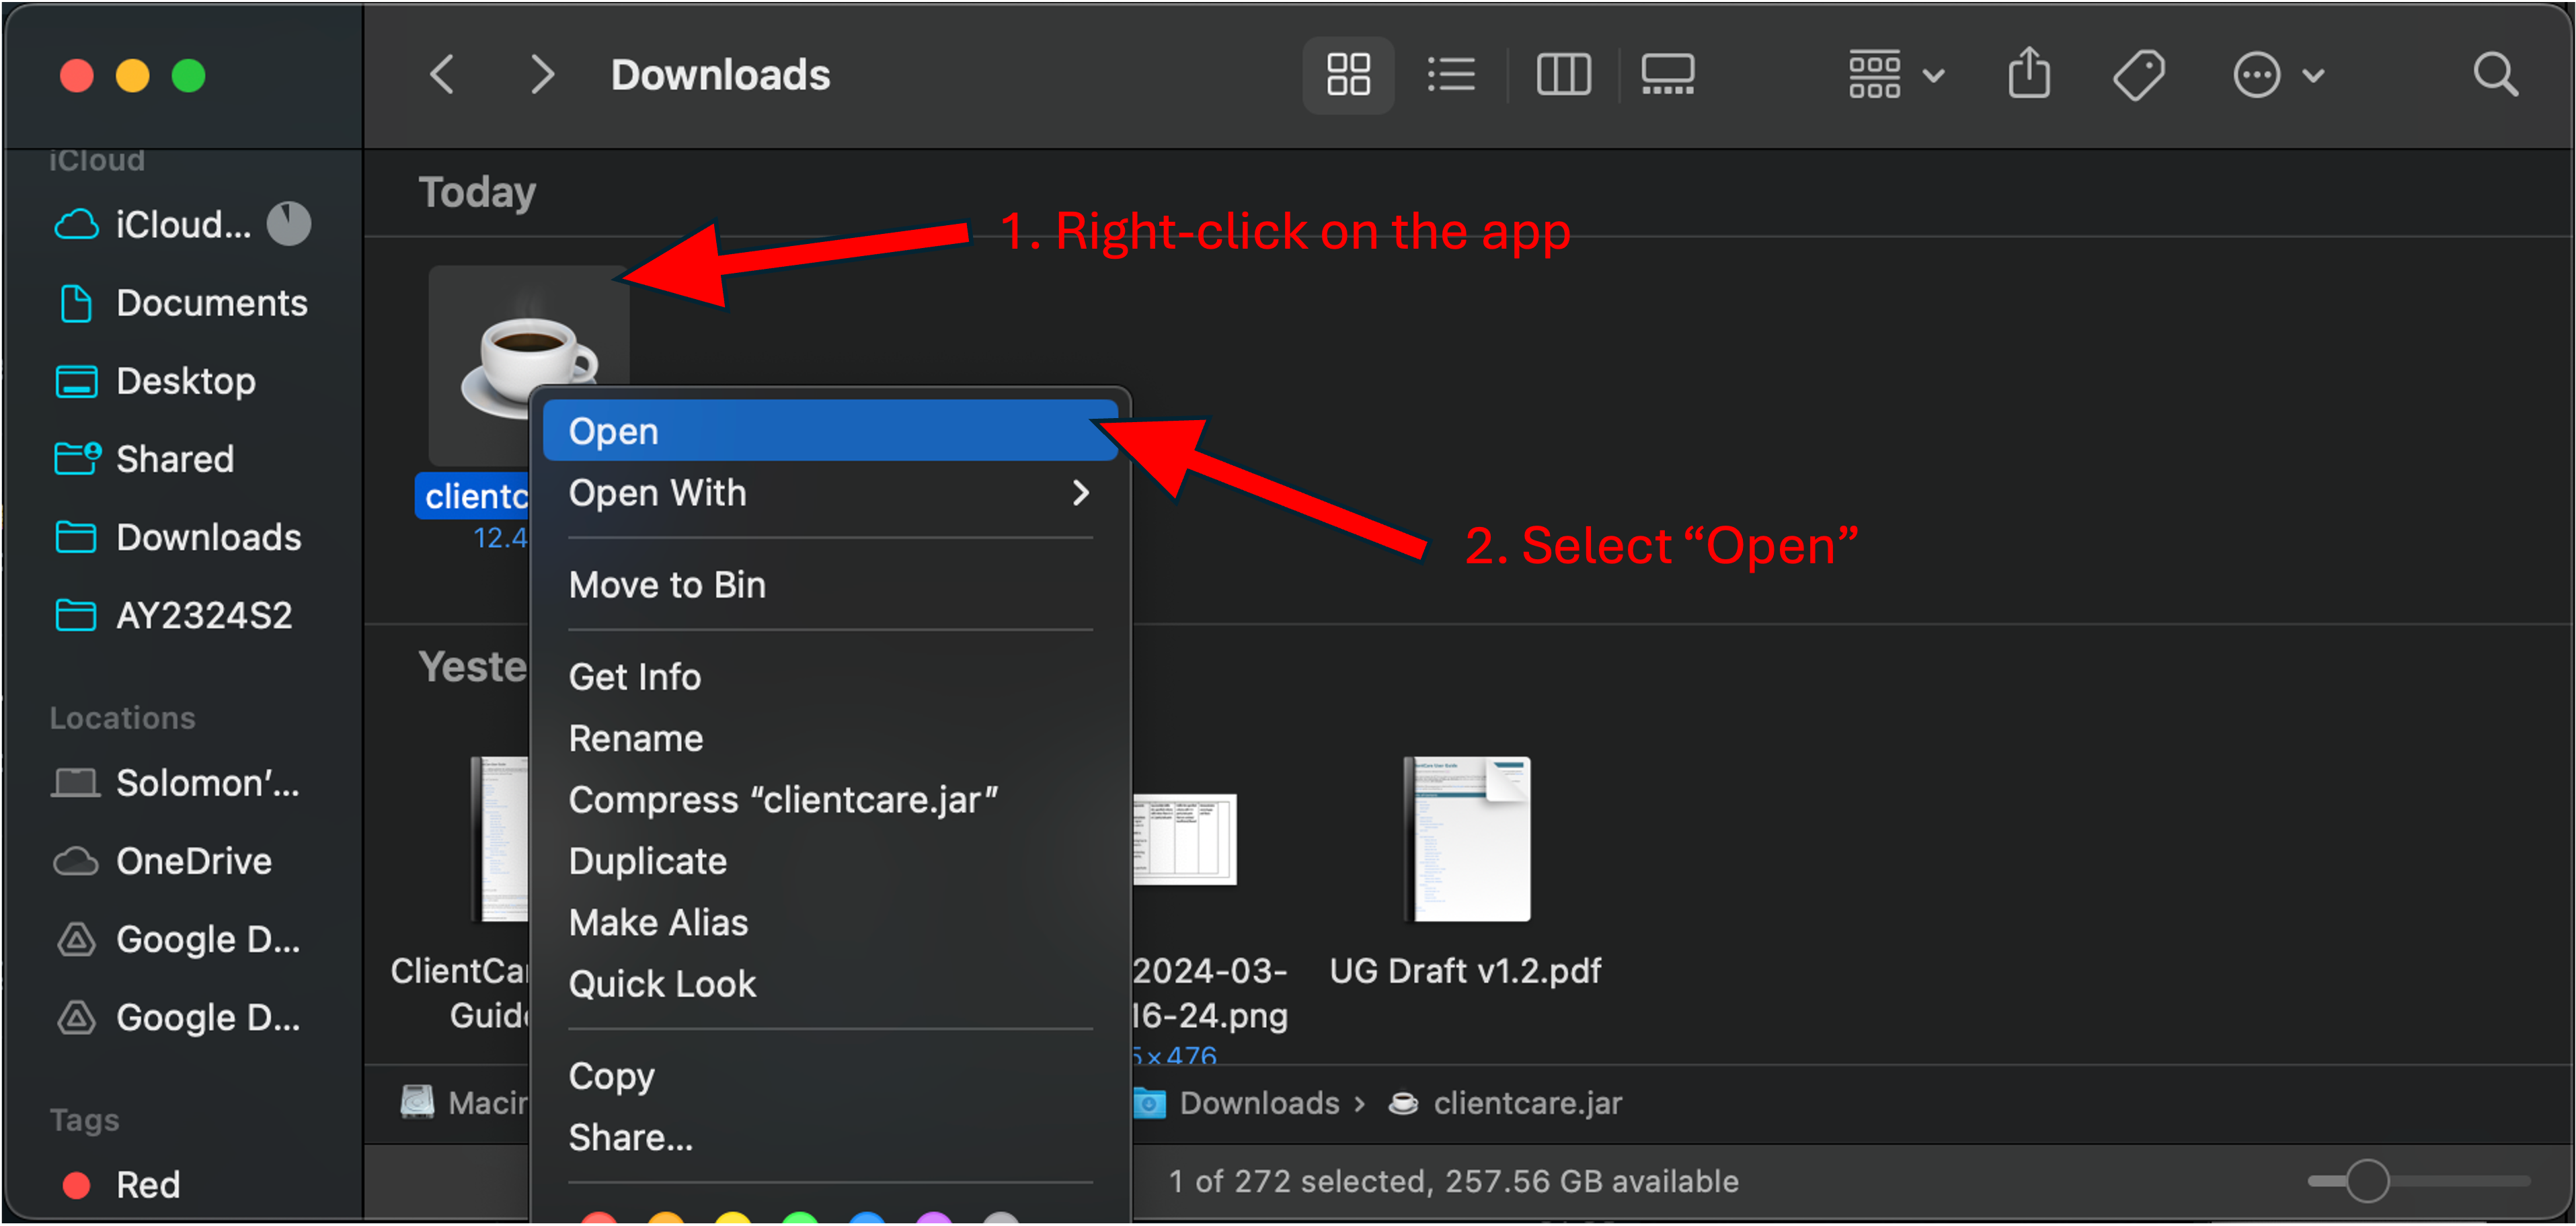
- Select 'Open' to start the application.

Multiple Screens
When using multiple screens, if you move the application to a secondary screen, and later switch to using only the primary screen, the application will open off-screen. The remedy is to delete the preferences.json file created by the application before running the application again.
Glossary
- Desktop Application
This refers to electronic devices that ClientCare can run on. This includes devices such as computers and laptops. Mobile devices such as phones and tablets are not supported by ClientCare.
- Features
These are things ClientCare can do!
- Command
This is the text you type to tell ClientCare what to do!
- Hyperlinks
These are texts that you can click on. They will either bring you to another section in the User Guide or open up the relevant website link. Not to worry, all external website links are from official distributors and are safe!
- Fields
These are inputs that you can choose! For example: name, phone number, date are all fields you can type into ClientCare.
- Java 11
Java is the programming language that ClientCare is built on! The number 11 refers to Java version. Not to worry! You do not need to know programming to use ClientCare.
- Index
This is the number which is assigned to a particular Client. For example, the 3rd client in the list will have the index 3.
- Integer
This is a whole number. No decimal or fractions is allowed. -7, -1, 0, 7, 14 are all integers. 3.14 or 5/8 are not integers.
- Address
This is the place your client lives at.
- Prefix
These are characters that you need to put in front of certain fields. For example, phone numbers have the prefix c/ and
names have the prefix n/. Indexes do not have any prefix in front.
For more information, you can visit our Text Command Introduction for a more comprehensive explanation.
Emails have 2 components. The local-part and the domain. The local-part often refers to the username while domain is where
the email was created from.
For example: mike@gmail.com
mike will be the local-part while gmail.com will be the domain.
- Not Cumulative
This means that the new value added will not be added on top of the existing information. This is especially so for Tags.
For example, if a Client currently has 2 tags friend and important, editing the tags with high will override the previous 2 tags.
The Client will only have the high tag upon a success edit. To preserve all the tags, users must key in all previous tags in addition
to their new tag they wish to add.
- Last Met Overdue Period
This refers to the number of days users can wait and not meet up with the Client before the Client shows up in the Last Met Display.
The default period is 90 days. You can change this value using the set command.
- Miscellaneous
This refers to features or commands in ClientCare that are not related to Client, Schedules or Policies.
- Truncated
If a text is truncated in the display, this means that the full text has been shortened, with an ellipsis ... at the end.
Command summary
| Action | Format, Examples |
|---|---|
| Add | add n/NAME c/PHONE_NUMBER e/EMAIL a/ADDRESS d/BIRTHDAY p/PRIORITY [t/TAG]… e.g. add n/James Ho p/22224444 e/jamesho@example.com a/123, Clementi Rd, 1234665 d/1990-01-01 p/medium t/friend t/colleague |
| Delete | delete INDEXe.g. delete 3 |
| Edit | edit INDEX [n/NAME] [c/PHONE] [e/EMAIL] [a/ADDRESS] [d/BIRTHDAY] [p/PRIORITY] [t/TAG]…e.g. edit 2 n/James Lee e/jameslee@example.com |
| List | list |
| View | view INDEXe.g, view 1 |
| Find | find KEYWORD [MORE_KEYWORDS]e.g. find James Jake |
| Remark | remark INDEX [r/REMARK]e.g. remark 3 r/Has 2 school-age children and 1 elderly dependent |
| Clear | clear |
| Sort | sort CRITERIA o/ORDER e.g. sort priority o/desc |
| LastMet | met INDEX d/DATEe.g. met 2 d/2023-05-07 |
| Set | set NUMBER_OF_DAYSe.g. set 5 |
| Schedule | schedule INDEX d/DATETIMEe.g. schedule 2 d/2023-05-07 22:00 |
| Mark | mark INDEXe.g. mark 2 |
| Add Policy | addpolicy INDEX n/POLICY_NAME i/POLICY_ID e.g. addpolicy 1 n/Life i/1 |
| Delete Policy | deletepolicy INDEX i/POLICY_ID e.g. deletepolicy 1 i/1 |
| Help | help |
| Exit | exit |